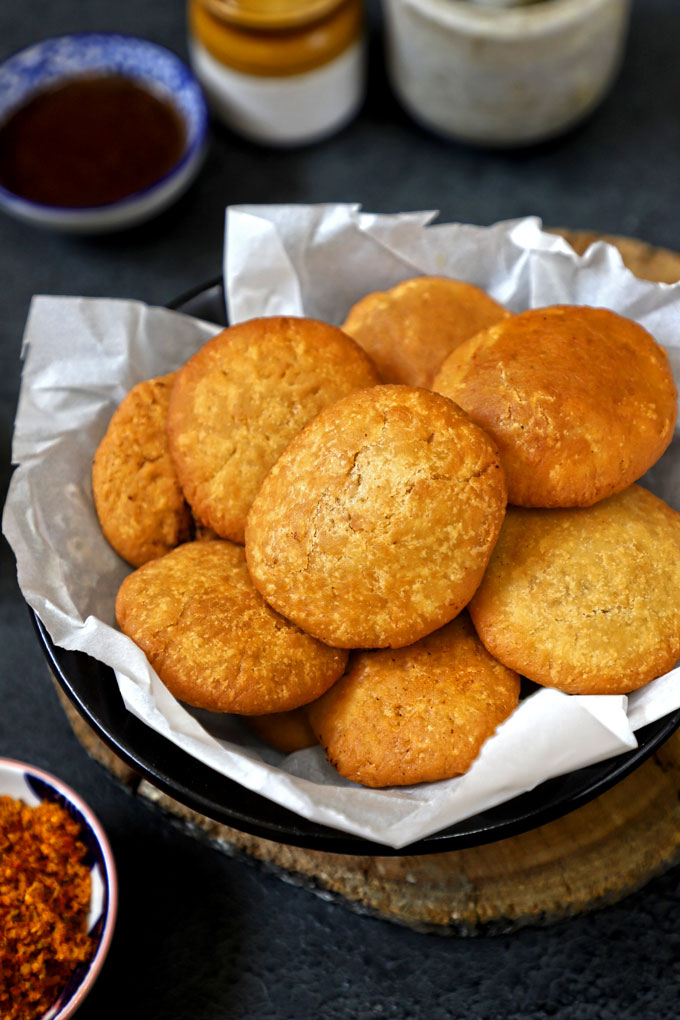
I am sharing a tried and tested failproof khasta kachori recipe. The highlight of this kachori recipe is the crust made with whole wheat flour and instant dal filling. Be sure to watch the video!
- What is Kachori?
- USP Of My Kachori Recipe
- Ingredients Required
- My Tried & True Tips
- FAQs for Kachori Recipe
- Watch Khasta Kachori Video
- Storing Suggestion
- More Indian Chaat Recipes
- Whole Wheat Khast Kachori Recipe
What is Kachori?
Kachori is a deep-fried, crisp, and flaky Indian snack stuffed with a delicious vegetarian filling. It is one of the most popular street foods in India. One can enjoy kachori for breakfast with aloo ki sabzi or for an evening snack with green chutney .
There are many versions of kachori – dal kachori, khasta kachori, pyaaz kachori, matar kachori , and so on.
Khasta Kachori is one of my husband’s favourite Indian snacks. On any given day he can gulp two to three kachori in one go. Hence, I developed this whole wheat kachori recipe for him.

USP Of My Kachori Recipe
The two key reasons why you should bookmark this khasta kachori recipe are:
- I use whole wheat flour for the kachori dough and it gives the perfectly khasta ( meaning perfectly crisp and flaky ) kachori.
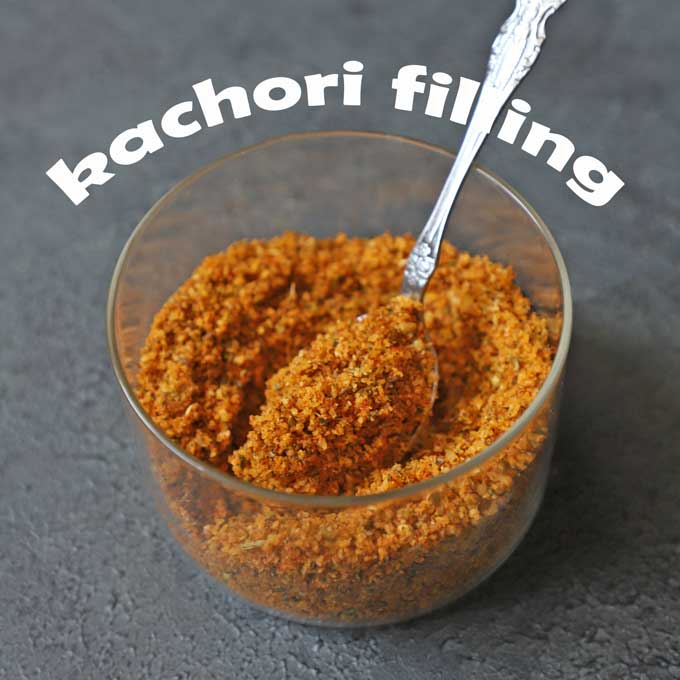
- I use moong dal namkeen instead of cooked dal for my kachori filling. It is a no-cook, vegan, and gluten-free filling that you can use in a million creative ways. I use it for filling mini dal samosa as well.
More Reasons To LOVE My Khasta Kachori
- fuss-free recipe
- vegan and vegetarian snack
- easy to pre-make and store
- perfect for traveling and lunchbox snacks
Ingredients Required
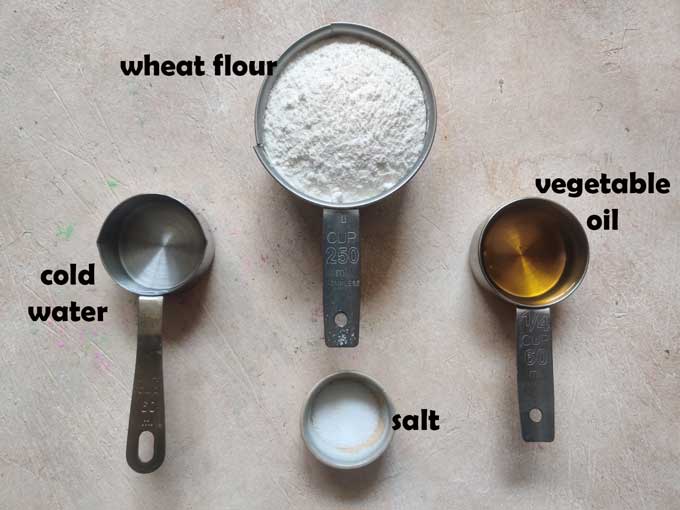
For the kachori dough you need:
- Whole Wheat Flour (Gehun Ka Atta)
- Vegetable Oil (Flavorless Refined Oil)
- Salt, Cold Wate r
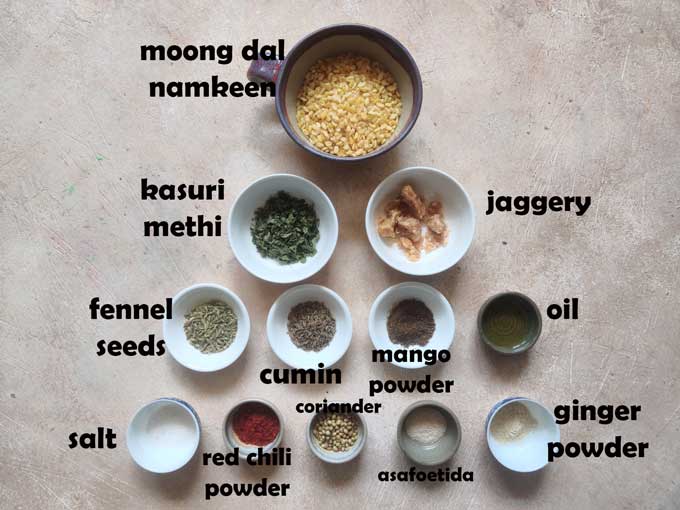
For the kachori filling you need:
- Moong Dal Namkeen (Haldiram’s)
- Spices – Red Chilli Powder, Mango Powder, Fennel Seeds, Cumin Seeds, Coriander Seeds, Kasuri Methi, Salt, Asafoetida , Ginger Powder
- Jaggery (Crushed)
- Vegetable Oil
My Tried & True Tips
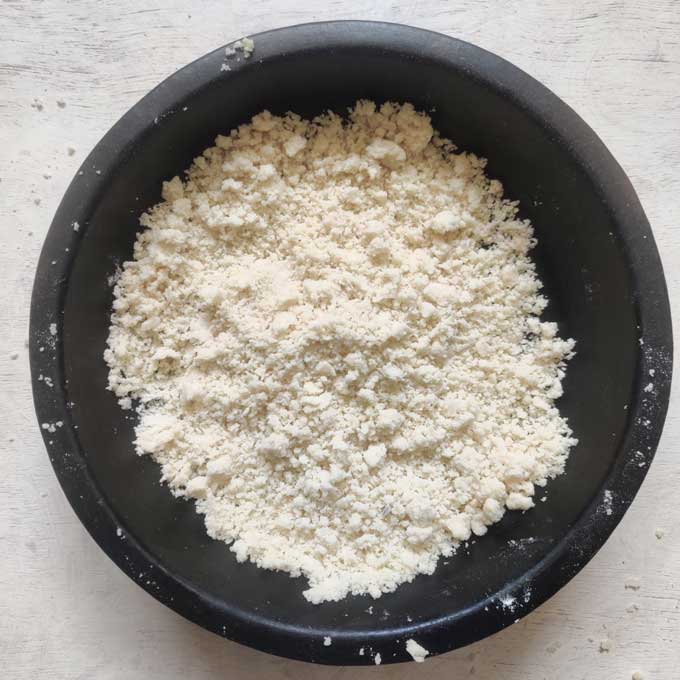
Make sure to rub oil and flour nicely before adding water. This process needs most of your time and attention if you want perfectly khasta kachori. Both (flour and oil), when combined, must stick together.
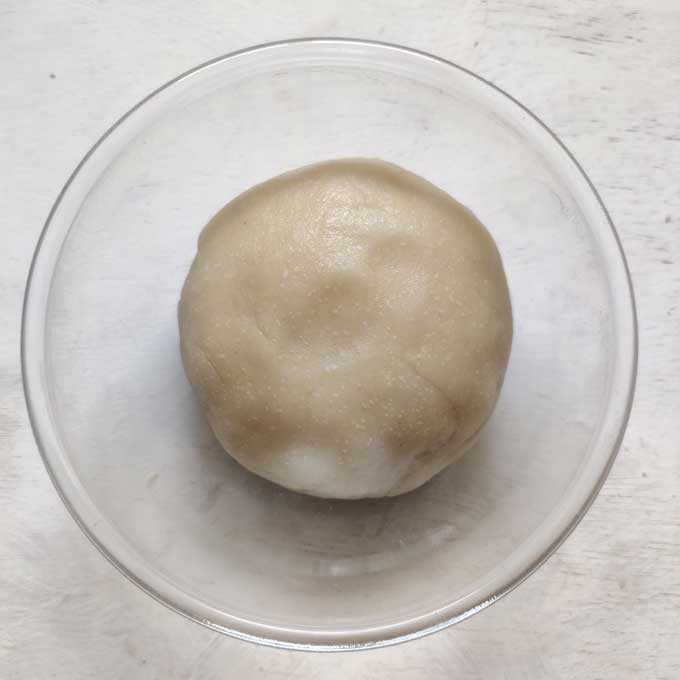
Next, add only one tablespoon of ice-cold water at a time to bind the dough. We want a non-sticky, soft, moist, and pliable dough . Knead the dough for 5 minutes.
Cover the dough with a moist muslin cloth. Rest it at room temperature for at least 15 minutes.
Do NOT add too much fat/oil/ghee (moyen) to the flour. Follow the precise khasta kachori recipe measurements. Otherwise, you will end up with soft and non-crisp kachori.
Before making kachori, again knead the dough for 5 minutes . This time, it will become a bit more soft and pliable.
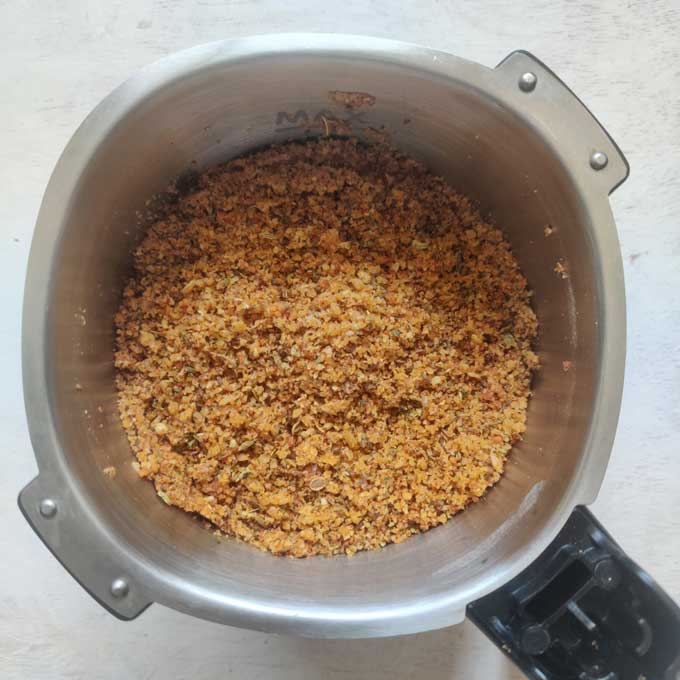
Do not make a fine powder of the filling. A bit of coarse texture is ideal for kachori stuffing.
Do not press the kachori too hard after stuffing. Each kachori is only 2 to 2 ½ inches wide.
Adding too much fat/oil to the kachori dough produces soft and non-crisp kachori. Use ice-cold water for binding the dough and follow precise recipe measurements.
The dry dough or inaccurate thickness of the kachori are the two main reasons for a hard kachori. Do not roll out kachori too thin else, it will become like a papdi.
Always fry khasta kachori over low to medium heat. If you fry them over high heat, they will become dark brown (burnt) from the outside but uncooked from the inside. Keep turning them regularly while frying for even browning and cooking.
It is best not to overstuff the kachori with the filling. Otherwise, the outer crust of the dough will burst while frying. Fill each kachori with only 1 ½ teaspoon of filling.
Watch Khasta Kachori Video
Storing Suggestion
You can store khasta kachori for 1 week at room temperature. In cold climatic conditions, they remain fresh for 15 days.
Make sure to store them in an airtight container away from moist and damp places. Usually, I like to keep them on my dining table or the snacks counter in an airtight container.
More Indian Chaat Recipes
- Matar (Peas) Kachori
- Sweet Potato Chaat
- Dahi Papdi Chaat
- Aloo Tikki Chaat
- Sabudana Vada
- Peanut Chaat
- Corn Chaat
- Dahi Vada
If you try this recipe and love it, please leave a comment and a rating. This helps us grow and reach other food lovers like you.

Ingredients
For Kachori Dough
- ▢ 150 gram (approx 1 Cup) whole wheat flour (gehun ka atta)
- ▢ 50 ml (approx 4 tablespoon) refined oil (flavourless oil)
- ▢ 1 teaspoon salt
- ▢ 50 ml (approx ¼ Cup) cold water, to bind dough
For Kachori Filling
- ▢ 1 Cup moong dal namkeen packaged
- ▢ 1 tablespoon coriander seeds
- ▢ 1 tablespoon cumin seeds
- ▢ 1 tablespoon kasuri methi (dried fenugreek leaves)
- ▢ 1 tablespoon brown sugar or jaggery
- ▢ 1 teaspoon fennel seeds (saunf)
- ▢ 1 teaspoon red chilli powder
- ▢ 1 teaspoon dry ginger powder (saunth)
- ▢ 1 teaspoon mango powder (amchur)
- ▢ 1 teaspoon refined oil
- ▢ ¼ teaspoon hing (asafoetida)
Other Ingredients
- ▢ 3 Cup vegetable oil, deep-frying
Instructions
How To Make Kachori Dough
- Mix the flour, salt and oil in a mixing bowl. Combine the mixture using your fingers to get the bread crumbs like consistency.
- Add the chilled water one tablespoon at a time, and start binding the dough. Add water in small portions.
- Once the dough comes together, knead it for 5 minutes. The dough should be soft yet firm to touch. Cover the dough with a wet muslin cloth and let it sit for at least fifteen minutes.
How To Make Kachori Filling
- Meanwhile, prepare the filling for kachori. Add namkeen to a food processor or mixer. Add all the remaining ingredients (spices, salt, and 1 teaspoon of vegetable oil) to the mixer. Blend to a coarse powder.
- Transfer to a bowl. We require a crunchy mixture and not a fine powder for the filling.
How To Shape Kachori
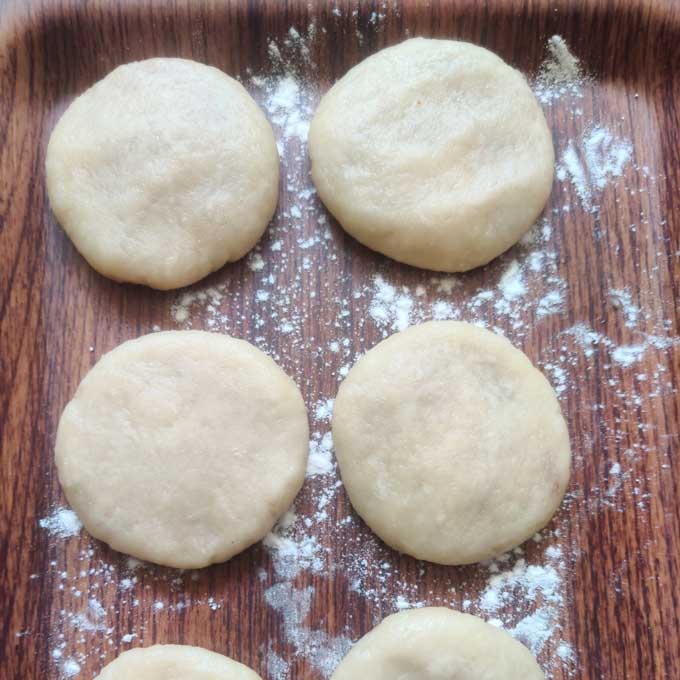
- To shape the kachoris, divide the dough into ten lemon-sized balls. Take one part of the dough and with your fingers flatten the edges and make into 3-inch circle just like a small poori. Leaving center little thicker then edges.
- Place 1 ½ teaspoon of filling in the center. Pull the edges of the dough all the edges and join them all together at one place like a dim sum. Flatten the kachori gently with the pressure of your palm. Each kachori is 2 – 2 ½ inches wide. DO NOT use a rolling pin.
How To Fry Kachori
- Heat the oil in a deep frying pan over medium heat. To check if oil is ready put a little piece of dough in the oil. The dough should sizzle, and come on the surface immediately rather than sitting at the bottom of the pan.
- Fry Kachori in small batches on medium-low heat. After they start to puff, slowly turn them over. Fry until golden-brown on both sides. Flip them regularly to get even cooking and color.
- Serve Khasta Kachori with sweet chutney.
Recipe Notes:
- I use whole wheat flour for the kachori dough. You can use all-purpose flour and wheat flour in the ratio of 50:50.
- I use moong dal namkeen instead of cooked dal for my kachori filling. No need to cook this filling.
- Do not make a fine powder of the filling. A bit of coarse texture is ideal for kachori stuffing.
- Use the ice-cold, chilled water to bind the dough. U
- Fill each kachori with only 1 ½ teaspoon of filling.
- Do not press the kachori too hard after stuffing. Each kachori is only 2 to 2 ½ inches wide.
- Always fry kachori on low to medium heat for that beautiful golden color, perfect crust, and fully cooked layers.
Nutrition
We follow a strict NO SPAM Policy

Whole Wheat Khast Kachori Recipe
Ingredients
For Kachori Dough
- 150 gram (approx 1 Cup) whole wheat flour (gehun ka atta)
- 50 ml (approx 4 tablespoon) refined oil (flavourless oil)
- 1 teaspoon salt
- 50 ml (approx ¼ Cup) cold water, to bind dough
For Kachori Filling
- 1 Cup moong dal namkeen packaged
- 1 tablespoon coriander seeds
- 1 tablespoon cumin seeds
- 1 tablespoon kasuri methi (dried fenugreek leaves)
- 1 tablespoon brown sugar or jaggery
- 1 teaspoon fennel seeds (saunf)
- 1 teaspoon red chilli powder
- 1 teaspoon dry ginger powder (saunth)
- 1 teaspoon mango powder (amchur)
- 1 teaspoon refined oil
- ¼ teaspoon hing (asafoetida)
Other Ingredients
- 3 Cup vegetable oil, deep-frying
Instructions
How To Make Kachori Dough
- Mix the flour, salt and oil in a mixing bowl. Combine the mixture using your fingers to get the bread crumbs like consistency.
- Add the chilled water one tablespoon at a time, and start binding the dough. Add water in small portions.
- Once the dough comes together, knead it for 5 minutes. The dough should be soft yet firm to touch. Cover the dough with a wet muslin cloth and let it sit for at least fifteen minutes.
How To Make Kachori Filling
- Meanwhile, prepare the filling for kachori. Add namkeen to a food processor or mixer. Add all the remaining ingredients (spices, salt, and 1 teaspoon of vegetable oil) to the mixer. Blend to a coarse powder.
- Transfer to a bowl. We require a crunchy mixture and not a fine powder for the filling.
How To Shape Kachori
- To shape the kachoris, divide the dough into ten lemon-sized balls. Take one part of the dough and with your fingers flatten the edges and make into 3-inch circle just like a small poori. Leaving center little thicker then edges.
- Place 1 ½ teaspoon of filling in the center. Pull the edges of the dough all the edges and join them all together at one place like a dim sum. Flatten the kachori gently with the pressure of your palm. Each kachori is 2 - 2 ½ inches wide. DO NOT use a rolling pin.
How To Fry Kachori
- Heat the oil in a deep frying pan over medium heat. To check if oil is ready put a little piece of dough in the oil. The dough should sizzle, and come on the surface immediately rather than sitting at the bottom of the pan.
- Fry Kachori in small batches on medium-low heat. After they start to puff, slowly turn them over. Fry until golden-brown on both sides. Flip them regularly to get even cooking and color.
- Serve Khasta Kachori with sweet chutney.
Video
Notes
- I use whole wheat flour for the kachori dough. You can use all-purpose flour and wheat flour in the ratio of 50:50.
- I use moong dal namkeen instead of cooked dal for my kachori filling. No need to cook this filling.
- Do not make a fine powder of the filling. A bit of coarse texture is ideal for kachori stuffing.
- Use the ice-cold, chilled water to bind the dough. U
- Fill each kachori with only 1 ½ teaspoon of filling.
- Do not press the kachori too hard after stuffing. Each kachori is only 2 to 2 ½ inches wide.
- Always fry kachori on low to medium heat for that beautiful golden color, perfect crust, and fully cooked layers.
Nutrition
Are you also struggling to set the perfect curd at home? Here is my honest review of curd maker for Indian kitchens. Be sure to watch the video!
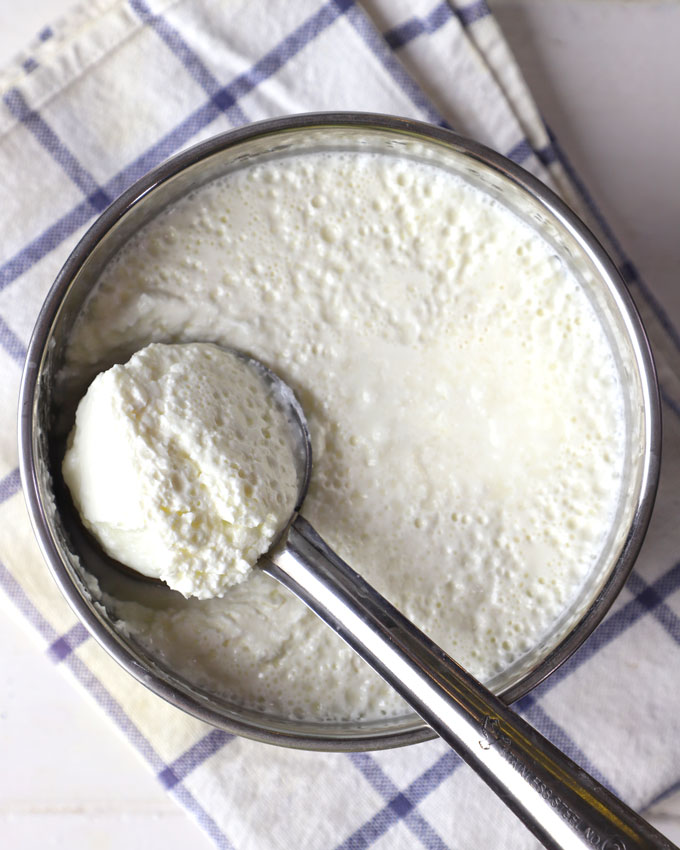
Curd is an essential ingredient in Indian cooking and everyday meals . While traditional methods of curd making at home involve careful temperature monitoring and precise timing. For our modern Indian kitchens, curd maker is the perfect appliance for the task.
- What is Curd Maker?
- How Does Curd Maker Work?
- Watch How To Use Curd Maker
- My Honest Review
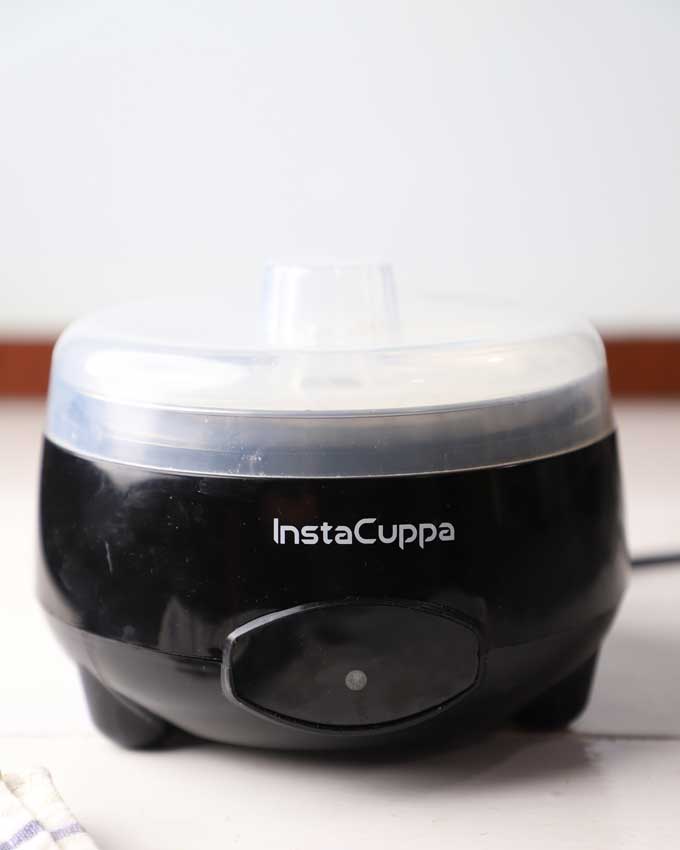
What is Curd Maker?
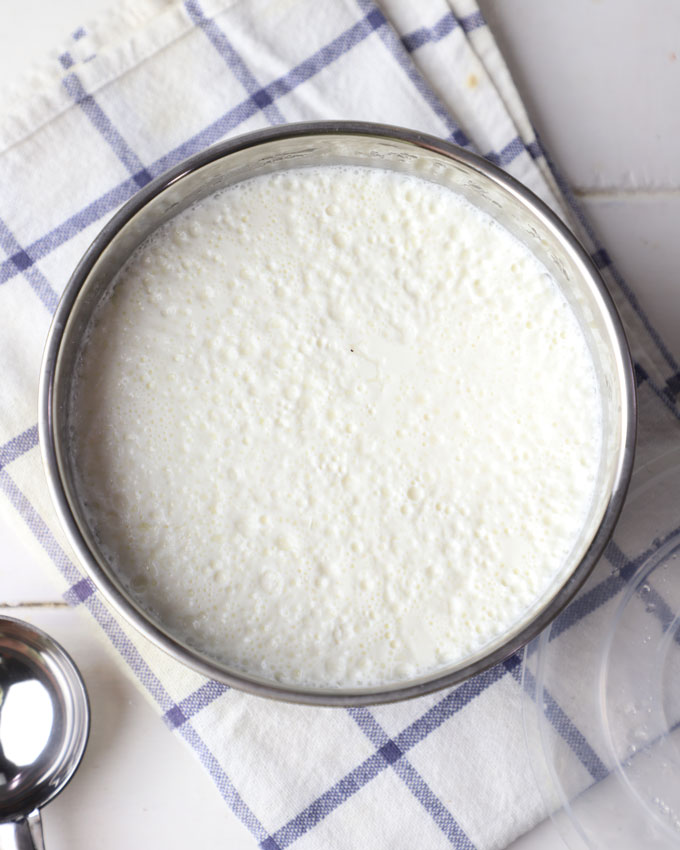
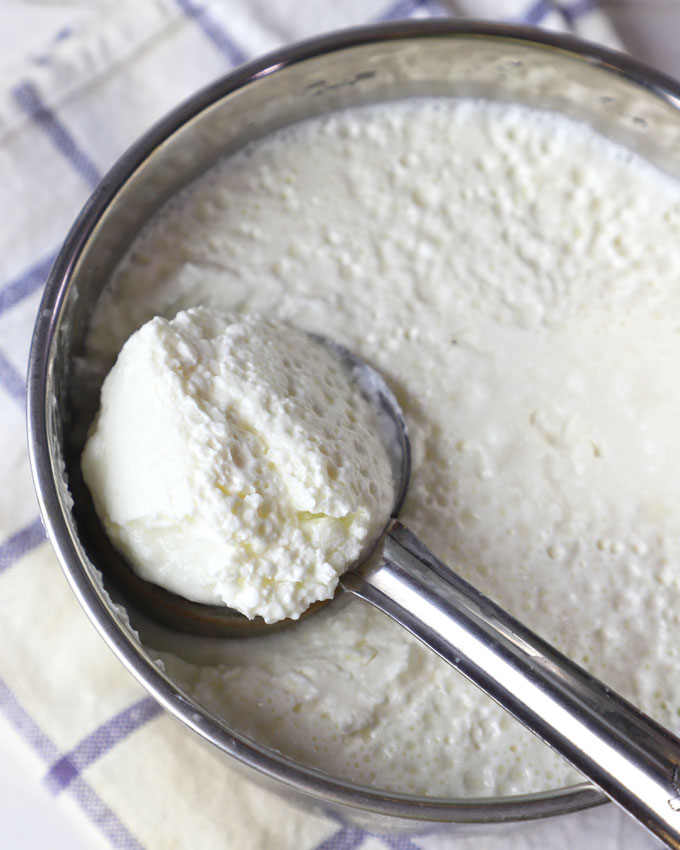
A curd maker, also known as a yoghurt maker, is a kitchen appliance designed to facilitate the fermentation of milk into curd. The core task of a curd maker is to provide the perfect temperature for setting curd using a culture (jamun/khatta).
It typically consists of a container for holding the milk, a heating element to maintain the temperature, and sometimes a timer or indicator to monitor the fermentation process.
Here are my two favourite curd/yogurt makers – Agaro and Instacuppa . Both are durable, budget-friendly, and easy to use. You can use the yoghurt function of instant pot also to set curd/yoghurt at home. It works exactly like a curd maker.
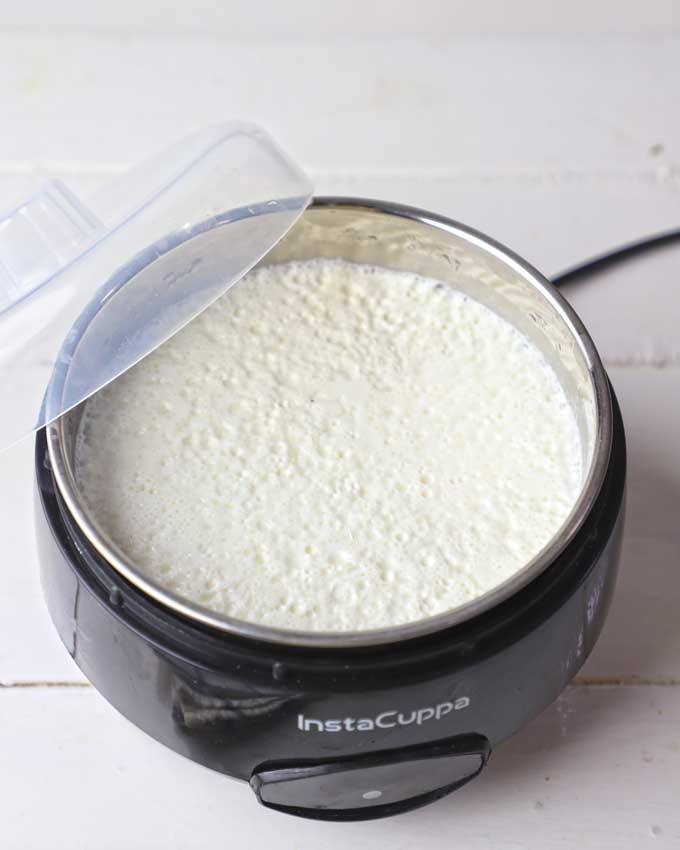
How Does Curd Maker Work?
Here’s a detailed breakdown of how a curd maker works:
- Container is where you pour the milk to ferment into curd. It’s usually made of stainless steel and comes in various sizes to accommodate different quantities of milk.
- Heating Element is at the base or around the sides of the container. This heating element is responsible for maintaining the optimal temperature for the fermentation process, usually around 110°F to 115°F (43°C to 46°C). This temperature range provides the ideal conditions for the growth of curd cultures, which ferment the milk and turn it into yoghurt or curd.
- Temperature Control : Some curd makers have built-in temperature controls that allow you to set and maintain the desired temperature throughout the fermentation process. This ensures consistent results and prevents the milk from overheating or cooling down too much, which could affect the fermentation process.
- Timer or Indicator helps you keep track of the fermentation time. Fermentation typically takes anywhere from 4 to 12 hours, depending on the desired thickness and tartness of the yoghurt.
Let’s delve into the pros and cons of this kitchen appliance.
Pros of Curd Maker:
1. Convenience:
Curd makers simplify the process of curd preparation, requiring minimal manual intervention. Once the ingredients are mixed and poured into the appliance, it takes care of the rest. This convenience is beneficial for busy individuals, novice cooks, or those with limited culinary skills.
2. Consistent Results:
One of the primary advantages of using a curd maker is its ability to maintain a constant temperature throughout the fermentation process. Consistent temperature is crucial for the growth of beneficial bacteria and the formation of creamy curd.
3. Time-Saving:
Traditional methods of curd making often involve lengthy waiting periods and frequent temperature checks. Curd makers accelerate the fermentation process, yielding freshly prepared curd in a fraction of the time.
4. Customization Options:
Curd makers offer versatility in terms of flavour and texture customization. Whether you prefer a thick Greek-style yoghurt or a tangy, probiotic-rich curd, the curd maker allows for ample experimentation.
5. Hygienic:
Curd makers are designed with hygiene in mind, featuring removable parts that are easy to clean and maintain. Unlike traditional methods that may involve multiple utensils and containers, curd makers minimize the risk of contamination.
Cons of Curd Maker:
1. Initial Cost:
While curd makers offer long-term savings in terms of time and convenience, the initial investment may deter some consumers. In India, they start from INR 999 and onwards.
2. Dependence on Electricity:
Curd makers rely on electricity to function, making them unsuitable during power outages.
3. Lack of Control:
While curd makers offer convenience and consistency, some users may miss the hands-on approach of traditional curd making. The automated nature of curd makers leaves little room for manual intervention or adjustments during the fermentation process.
4. Risk of Malfunction:
Like any electronic appliance, curd makers are susceptible to malfunctions or technical issues over time. Components such as heating elements or temperature sensors may degrade with use, compromising the appliance’s performance.
5. Space Consumption
Like any other kitchen appliance, curd maker also requires space in your kitchen counter or pantry – which might be a challenge for many of us.
Watch How To Use Curd Maker
My Honest Review
- A curd maker simplifies the process of making curd at home, especially in moderate to colder climates like Bengaluru or Pune.
- It provides consistent temperature control and a convenient container for fermentation.
- It’s a handy appliance for those who enjoy homemade curd and want to have control over the quality of ingredients and curd.
- In my opinion, the curd maker presents a modern solution to the age-old practice of curd making, offering convenience, consistency, and customization options to new enthusiasts like me.
Conclusion: However, potential buyers should weigh the pros and cons carefully to determine if a curd maker aligns with their needs and preferences. Ultimately, whether you opt for the simplicity of a curd maker or the traditional charm of manual preparation, the joy of indulging in homemade curd remains unparalleled.
f ollow us on Youtube or Instagram for video recipes.
If you try this recipe and love it, please leave a comment and a rating. This helps us grow and reach other food lovers like you.
We follow a strict NO SPAM Policy
