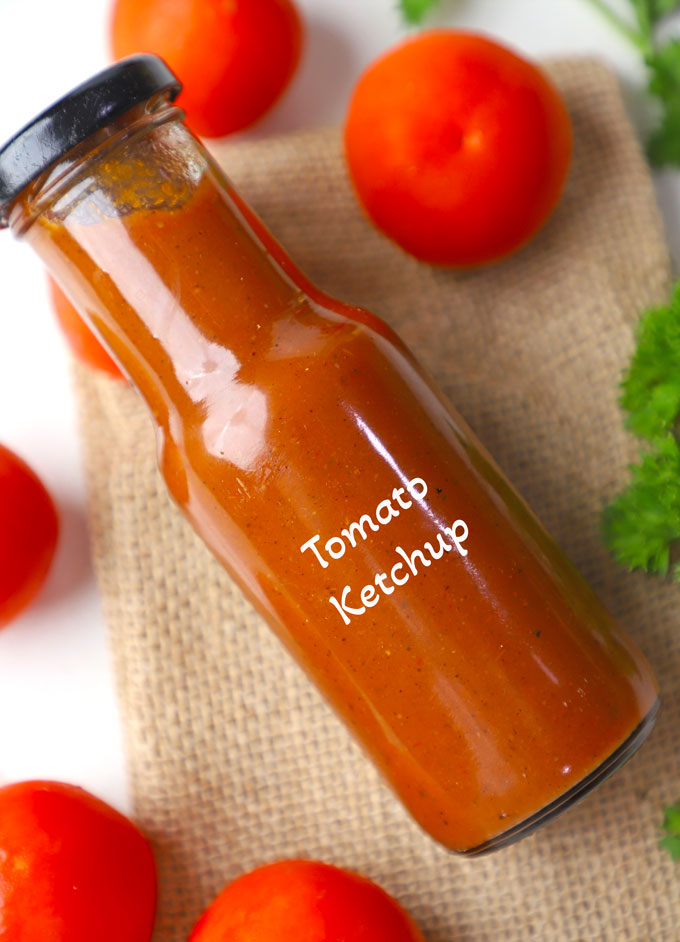
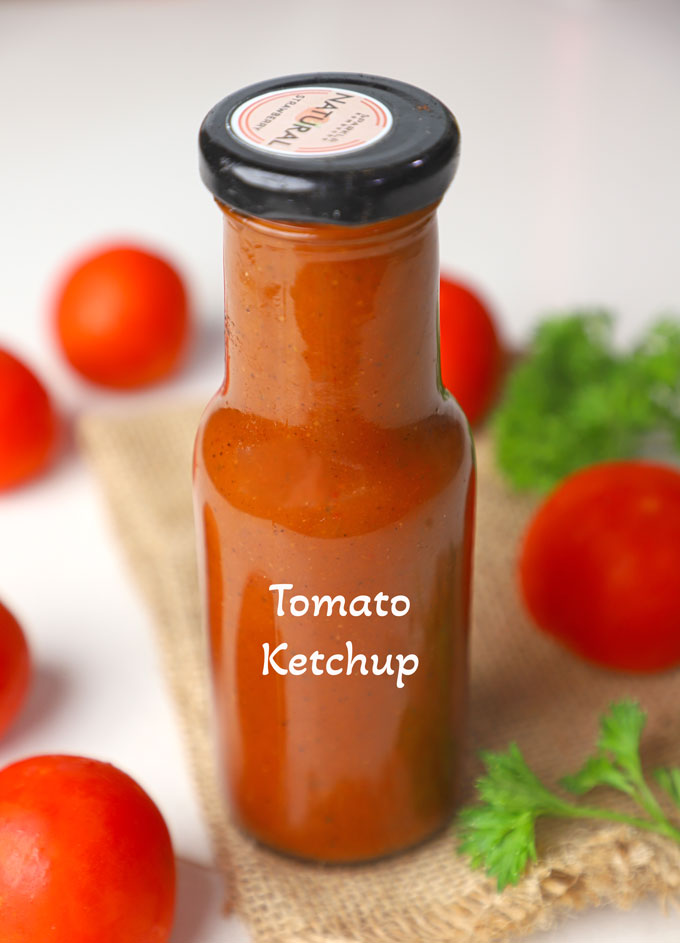
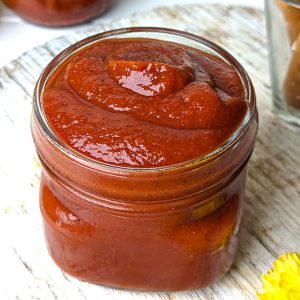
Ditch the bottled ketchup: Here is your guide to homemade, clean, vegan tomato ketchup recipe without artificial preservatives and colours.
Estimated reading time: 6 minutes
- Why Go Homemade? The Benefits
- Ingredients You’ll Need
- How To Make Ketchup
- Storage
- My Tried and True Tips
- Tomato Ketchup Recipe

Making your own perfectly sweet, and utterly delicious tomato ketchup at home is a rewarding experience that puts you back in charge of what goes into your food.
And the best part? You have complete control over every single ingredient, ensuring no hidden nasties, no unwanted sugars, and absolutely no preservatives .
This hot and spicy Indian Style Tomato Ketchup Recipe is:
- vegan
- gluten and nut free
- pressure cooker friendly
- contains zero oil or corn syrup
Why Go Homemade? The Benefits
- No Preservatives: This is the big one. Commercial ketchups rely on preservatives to give them their long shelf life. By making your own, you skip these chemicals entirely, opting for a fresher, cleaner taste.
- Control Over Sugar: Most store-bought ketchups are sugar bombs. With homemade, you can control the sweetness to your preference, using natural alternatives like maple syrup or agave, or even reducing it significantly.
- Real Ingredients: You know exactly what’s going into your ketchup – ripe tomatoes, aromatic spices, and natural sweeteners. No weird “natural flavours” or unidentifiable ingredients.
- Dietary Needs: For vegans, it ensures no animal-derived ingredients (like some obscure processing aids). For those with allergies, it guarantees a safe condiment.
- Cost-Effective: Especially when tomatoes are in season, making a large batch can be surprisingly economical.
Does it taste better than your favourite bottled tomato ketchups? The answer is NO. But its definitely healthier, wholesome, and an excellent homemade condiment especially for those who love to slather ketchup on anything and everything.
Ingredients You’ll Need
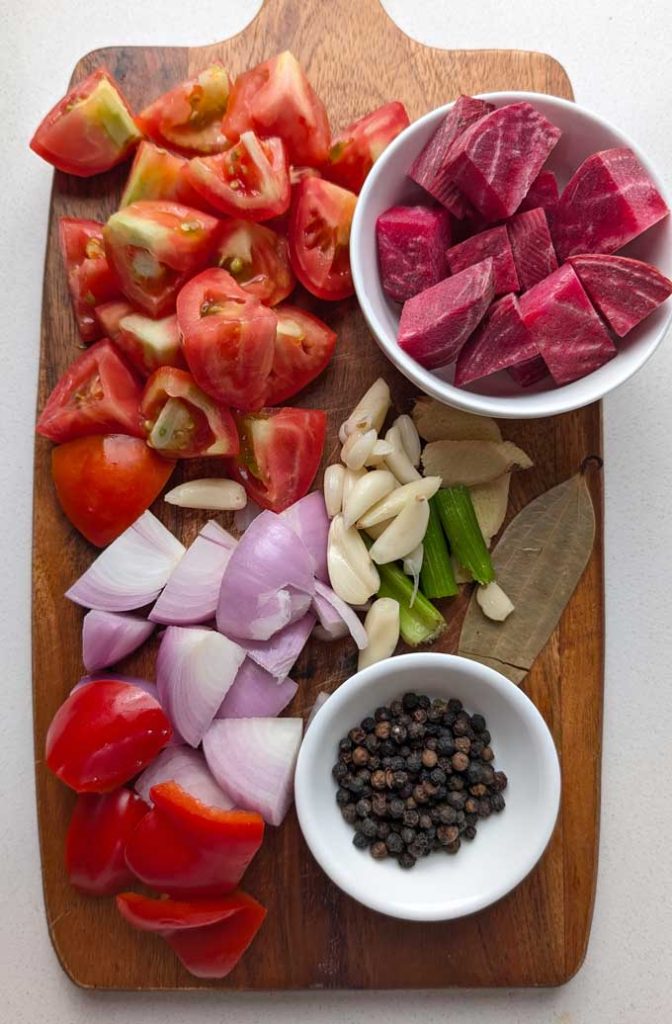
This tomato ketchup recipe focuses on simple, wholesome ingredients that are easily available:
- Ripe Tomatoes: The star of the show! Use good quality, ripe tomatoes – San Marzano, Roma Tomatoes are excellent, but any flavourful ripe plum, juicy, slightly sweet tomatoes will do. You can use fresh or good quality canned crushed tomatoes.
- Vegetables: A small size beetroot gives the bright red colour to the ketchup. Red Bell Pepper and celery helps in subtly sweet and spicy taste.
- Aromatics: Onion and garlic form the foundational savory notes.
- Apple Cider Vinegar or white vinegar provides that essential tangy kick.
- Sweetener: Brown Sugar, raw sugar, or agave nectar offers natural sweetness.
- Spices: A carefully selected blend of spices like ginger, bay leaf, dried red chilli, black peppercorn creates the classic ketchup profile.
- Salt is crucial for seasoning.
- Water to pressure cook.
How To Make Ketchup
Prep Vegetables:
- Peel beetroot, onion, and ginger. Wash all the vegetables.
- Dice all the vegetables into bite size chunks.
Pressure Cook
- Add diced tomato, beet, bell pepper, onion, celery, ginger, garlic, whole spices, and water in a pressure cooker. Close the lid and put on the whistle.
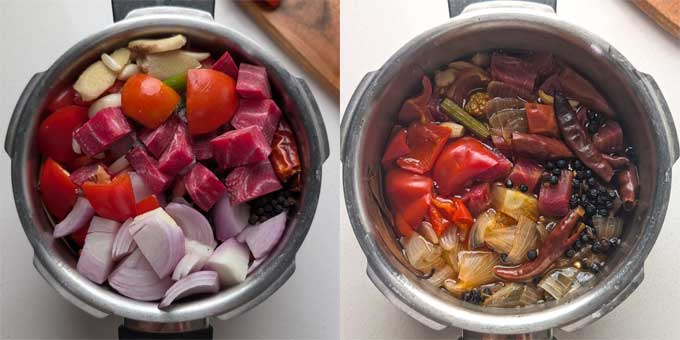
- Pressure cook over low heat for 4 whistles. Allow the steam to release naturally. Vegetables should be soften.
Blend To Puree
- Discard bay leaf. Allow the pressure cooked vegetables to cool down.
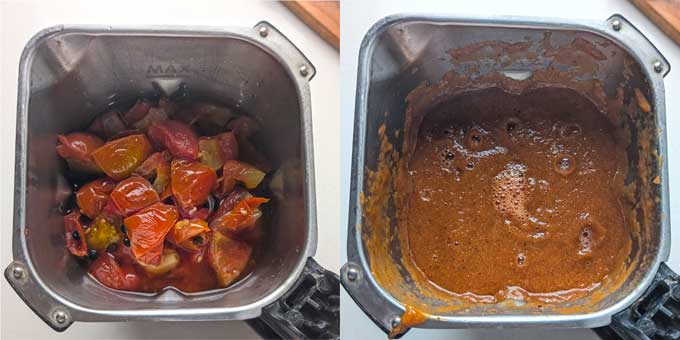
blending tomatoes to a puree
- Transfer them to a blender. Without using water, blend them to a smooth puree. Caution: When blending hot liquids, fill the blender only halfway, hold the lid down firmly with a towel, and start on low speed, gradually increasing.
Strain and Simmer
- For the absolute silkiest tomato ketchup , pass the blended mixture through a fine-mesh sieve using the back of a spoon to push the solids through. This removes any lingering seeds or skin bits. This step is optional but highly recommended for that classic ketchup texture.
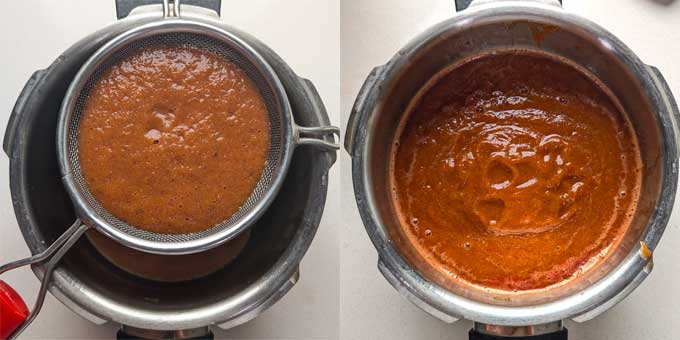
- Stir in the apple cider vinegar, sugar, salt. Stir well to combine.
- Bring the mixture to a gentle boil, then reduce the heat to low. Simmer, uncovered, stirring occasionally, for 30 minutes. The goal is to allow the sauce to thicken and for the flavours to meld beautifully. It should reduce by about one-third and have a rich, concentrated tomato flavour.
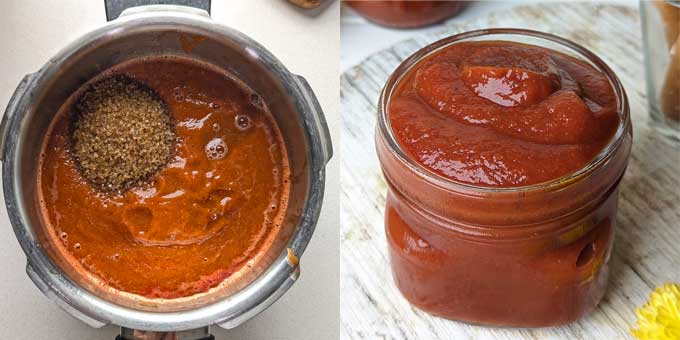
- Taste the ketchup. This is crucial! Add more salt, pepper, sweetener, or vinegar as needed to achieve your perfect balance of sweet, tangy, and savoury. Remember, flavours intensify as it cools.
Let the tomato ketchup cool completely at room temperature before transferring it to clean, airtight jars or bottles.
Storage
Because this tomato ketchup contains no artificial preservatives, its shelf life is shorter than commercial varieties.
Store it in an airtight container in the refrigerator for up to 1 month . For longer storage, you can freeze it in small portions (e.g., in ice cube trays, then transfer to a freezer bag) for up to 3 months.
My Tried and True Tips
- Taste, Taste, Taste: The most important step! Adjust sweetness, tang, and saltiness to your liking.
- Patience is Key: Don’t rush the simmering process. Slow reduction concentrates the flavours and thickens the ketchup naturally.
- Fresh vs. Canned Tomatoes: While fresh ripe tomatoes offer incredible flavour, good quality canned crushed tomatoes are a fantastic, convenient alternative that yields excellent results.
- Cleanliness: Ensure your jars and utensils are clean and sterilized to maximize shelf life (even without preservatives).
More Dipping Sauce Recipes
- Chilli Oil
- Hummus
- Spicy Mango Dip
- Spicy Peanut Sauce
- Thai Sweet Chilli Sauce
- Greek Cucumber Sauce
- Roasted Red Pepper Dip
Ingredients
- ▢ 500 gram tomato
- ▢ 1 medium size onion
- ▢ 1 small size beetroot
- ▢ 1 small size red bell pepper
- ▢ 6 garlic cloves
- ▢ 1 inch ginger
- ▢ 1 inch celery stalk
- ▢ 1 tablespoon black peppercorns
- ▢ 4 dried red chilli
- ▢ 1 bay leaf (tej patta)
- ▢ 1 tablespoon salt
- ▢ ¼ Cup water
- ▢ ¼ Cup brown sugar
- ▢ 2 tablespoon apple cider vinegar
Instructions
- Peel beetroot, onion, and ginger. Wash all the vegetables. Dice all the vegetables into bite size chunks.
- Add diced tomato, beet, bell pepper, onion, celery, ginger, garlic, whole spices, and water in a pressure cooker. Close the lid and put on the whistle.
- Pressure cook over low heat for 4 whistles. Allow the steam to release naturally. Vegetables should be soften. You can do the same in an instant pot pressure cook mode for 8 minutes.
- Discard bay leaf. Allow the pressure cooked vegetables to cool down. Transfer them to a blender. Without using additional water, blend them to a smooth puree. Caution: When blending hot liquids, fill the blender only halfway, hold the lid down firmly with a towel, and start on low speed, gradually increasing.
- Pass the blended mixture through a fine-mesh sieve using the back of a spoon to push the solids through. This removes any lingering seeds or skin bits.
- Stir in the apple cider vinegar, sugar, salt. Stir well to combine. Bring the mixture to a gentle boil, then reduce the heat to low. Simmer, uncovered, stirring occasionally, for 30 minutes. The goal is to allow the sauce to thicken and reduce by about one-third and have a rich, concentrated tomato flavour.
- Taste the ketchup. Add more salt, pepper, sweetener, or vinegar as needed to achieve your perfect balance of sweet, tangy, and savoury. Remember, flavours intensify as it cools.
- Let the tomato ketchup cool completely at room temperature before transferring it to clean, airtight jars or bottles.
Recipe Notes:
- Substitute dried red chillies with smoked paprika.
- This is a hot and spicy Indian style tomato ketchup recipe. If you are not too keen on spicy flavour, skip adding ginger and red chillies.
- The colour of the ketchup is defined by the quality of the tomatoes. Hence, pick the ripe, red, juicy tomatoes without yellow or green blemishes.
- Beetroot is only added for the colour. Hence, do not add too much of it.
Nutrition
We follow a strict NO SPAM Policy

Tomato Ketchup Recipe
Equipment
- Pressure Cooker
- Blender
- Seive/Filter
Ingredients
- 500 gram tomato
- 1 medium size onion
- 1 small size beetroot
- 1 small size red bell pepper
- 6 garlic cloves
- 1 inch ginger
- 1 inch celery stalk
- 1 tablespoon black peppercorns
- 4 dried red chilli
- 1 bay leaf (tej patta)
- 1 tablespoon salt
- ¼ Cup water
- ¼ Cup brown sugar
- 2 tablespoon apple cider vinegar
Instructions
- Peel beetroot, onion, and ginger. Wash all the vegetables. Dice all the vegetables into bite size chunks.
- Add diced tomato, beet, bell pepper, onion, celery, ginger, garlic, whole spices, and water in a pressure cooker. Close the lid and put on the whistle.
- Pressure cook over low heat for 4 whistles. Allow the steam to release naturally. Vegetables should be soften. You can do the same in an instant pot pressure cook mode for 8 minutes.
- Discard bay leaf. Allow the pressure cooked vegetables to cool down. Transfer them to a blender. Without using additional water, blend them to a smooth puree. Caution: When blending hot liquids, fill the blender only halfway, hold the lid down firmly with a towel, and start on low speed, gradually increasing.
- Pass the blended mixture through a fine-mesh sieve using the back of a spoon to push the solids through. This removes any lingering seeds or skin bits.
- Stir in the apple cider vinegar, sugar, salt. Stir well to combine. Bring the mixture to a gentle boil, then reduce the heat to low. Simmer, uncovered, stirring occasionally, for 30 minutes. The goal is to allow the sauce to thicken and reduce by about one-third and have a rich, concentrated tomato flavour.
- Taste the ketchup. Add more salt, pepper, sweetener, or vinegar as needed to achieve your perfect balance of sweet, tangy, and savoury. Remember, flavours intensify as it cools.
- Let the tomato ketchup cool completely at room temperature before transferring it to clean, airtight jars or bottles.
Video
Notes
- Substitute dried red chillies with smoked paprika.
- This is a hot and spicy Indian style tomato ketchup recipe. If you are not too keen on spicy flavour, skip adding ginger and red chillies.
- The colour of the ketchup is defined by the quality of the tomatoes. Hence, pick the ripe, red, juicy tomatoes without yellow or green blemishes.
- Beetroot is only added for the colour. Hence, do not add too much of it.
Nutrition
This is a detailed guide for beginners on how to make homemade butter from milk cream (malai) truly Indian style.
Estimated reading time: 7 minutes
- About Homemade Butter
- Malai vs Cream
- How To Collect Milk Malai (Cream)
- Ingredients Required
- Butter Making Process
- Shelf Life and Storage
- Homemade Butter Recipe
About Homemade Butter
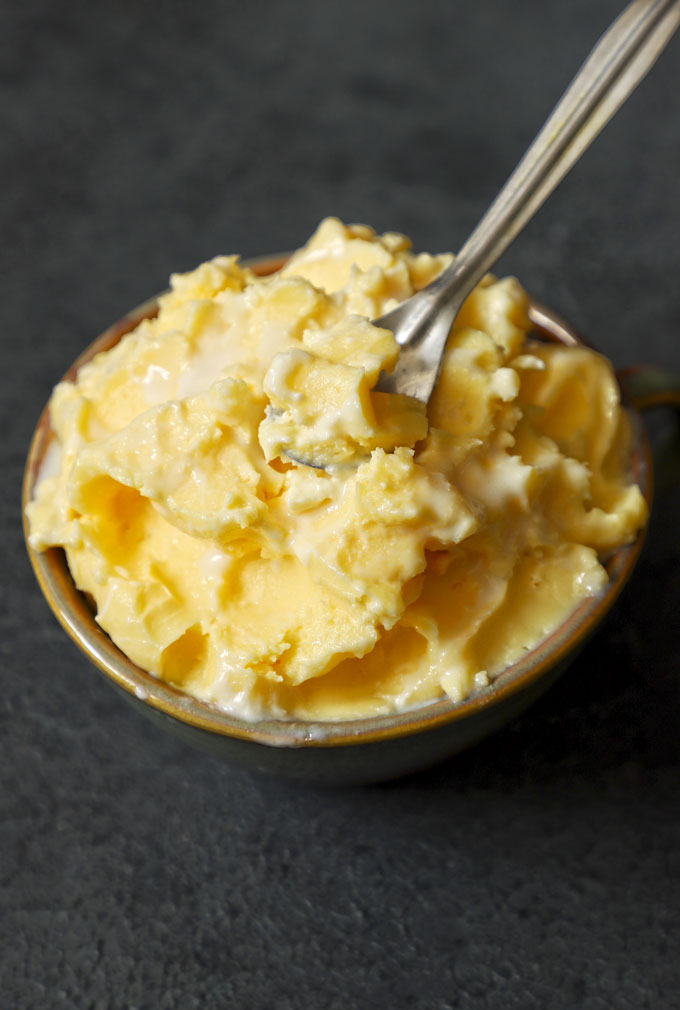
In India, homemade butter is a weekly ritual in many households, including mine. For three generations, women in my family have been making butter at home using cream (malai) collected from milk.
The freshly churned butter is served as a condiment with piping hot stuffed paratha , naan , dal makhani , and many other Indian main course dishes. This homemade butter (safed makkhan) is gluten-free, has no added artificial flavour or salt, and has a delicious natural taste.
In the Indian sub-continent, homemade butter is known as safed makkhan or white butter.
You must be wondering why one should bother with making butter from scratch. There are several reasons!
- superior quality product
- taste and texture are unmatched
- it enhances the flavour of the dish
- best way to use the cream collected from milk
- homemade butter is unadulterated and preservative-free
Malai vs Cream
You can make butter at home from both – malai and fresh cream.
Malai is the Hindi term for a thick layer of cream collected from whole milk. I get 1 litre of whole, full-fat, A2 cow milk daily. Collect the milk cream in a separate bowl (malai) every day after boiling the milk. Keep the bowl in the refrigerator until you are ready to churn butter. Later, add yogurt and churn the butter.
If collecting milk cream seems tedious, you can also make butter from store-bought full-fat cream. Heavy cream with more than 30% fat content works best for churning butter. Do not use low-fat cream with less than 25% fat, cooking, or light creams like Amul.
The reason for using full-fat cream is to churn out maximum butter. Toned milk malai or skimmed cream will not give you butter, no matter how long you whisk or churn it.
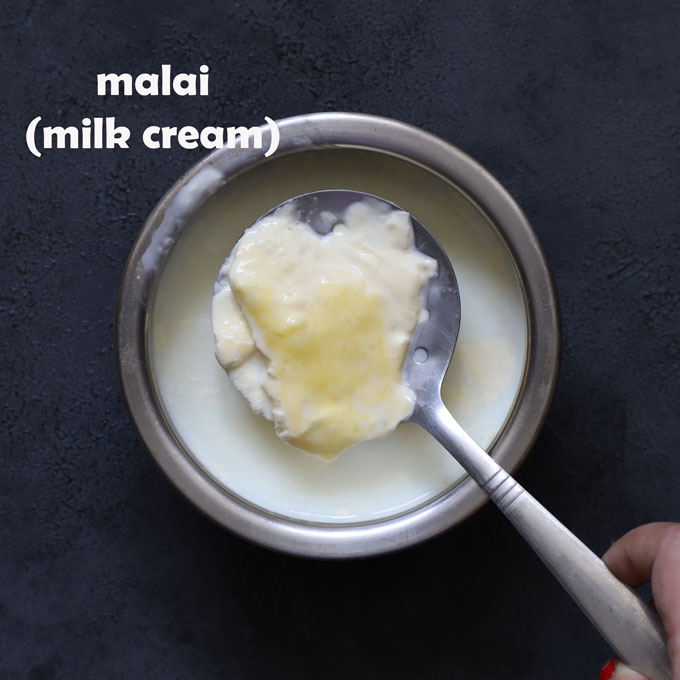
How To Collect Milk Malai (Cream)
Collecting milk cream (malai) is an everyday process. It is used for cooking, making butter, and in many other creative ways in Indian cooking.
- Boil the full-fat milk one time. Turn off the heat. Allow the boiled milk to cool down completely at room temperature.
- Once the milk cools down, a thick layer of cream forms. It is called malai (milk cream). Using a broad spoon or spatula, gently remove the layer of cream from the milk and transfer it to a glass bowl with the lid. Keep it in the refrigerator.
- Add 1 tablespoon of curd/yoghurt to the cream (bowl). This helps in reducing odour and increases the shelf life of malai. Repeat this malai collecting process for the next 10 days.
I collect the cream of 1-liter full fat cow milk every day for 10 days to churn 250 grams of butter.
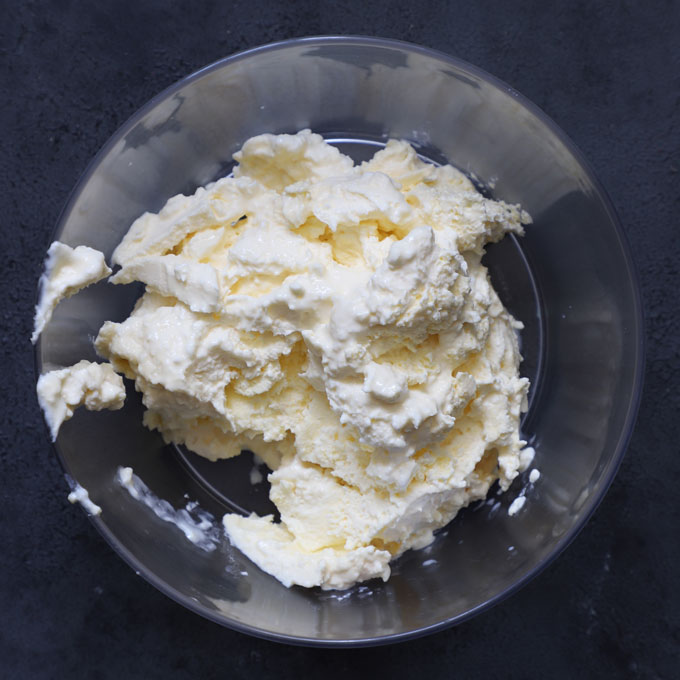
Malai collected for 10 days
Ingredients Required
- Cream: 2 cups of full-fat cream or milk cream (malai)
- Water: 4 cups of iced/chilled water
Equipment: One large, wide, deep mixing bowl, spatula, and hand mixer with the whisk attachment. You can use a stand mixer as well with the whisk attachment. Muslin cloth and a clean bowl to store the butter.
Butter Making Process
Step 1) Bring out cream or malai from the refrigerator. Let it sit at room temperature for 15 minutes. Keep iced water ready.
Step 2) Transfer cream to a stand mixer or a mixing bowl. Start whisking it at medium speed. Initially, the cream will start to thicken, and you will get whipped cream with smooth peaks. This is STAGE 1.
Step 3) Continue to whip the cream. The texture of the cream will now turn grainy, or granules will form. This is STAGE 2 .
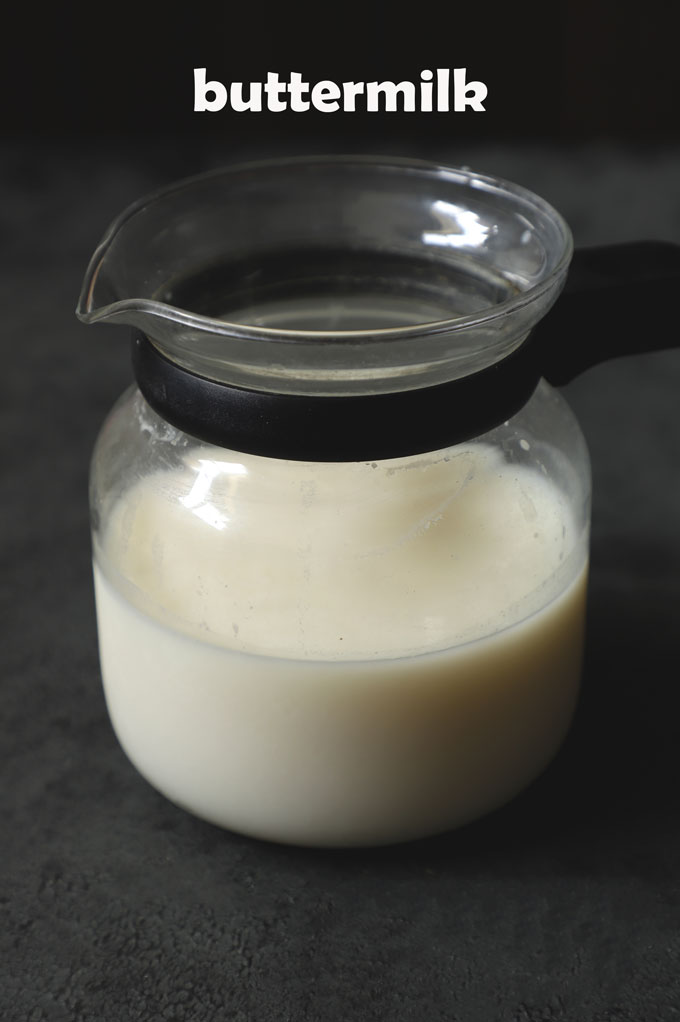
Step 4) Keep whipping the cream at high speed – it will look curdled, and you’ll see some liquid (buttermilk) separating from the cream. This is STAGE 3 .
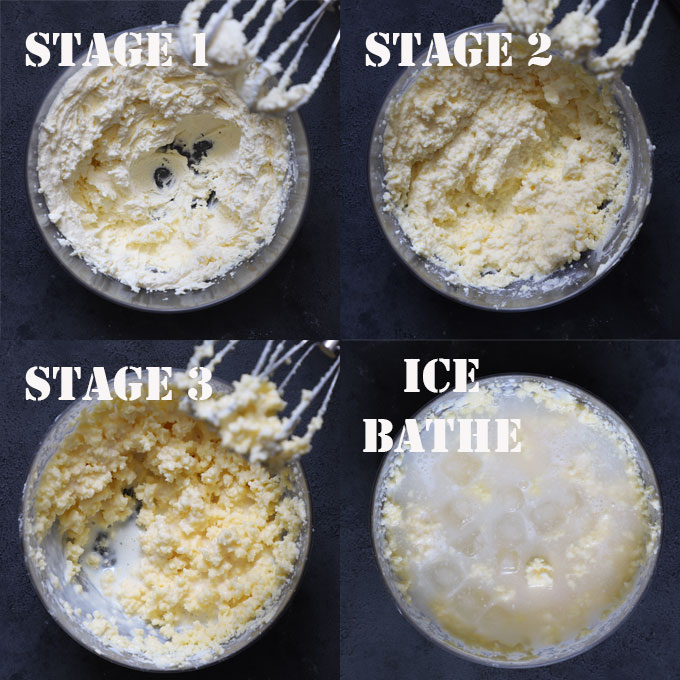
At this point, the buttermilk will begin to splash all around. Cover the bowl with a kitchen napkin or towel to avoid a messy splash all over the place.
Step 5) Continue to whisk until the tiny lumps of butter are separated. The butter will start sticking to the whisk at this final stage. Add 2 cups of ice-cold water. It will solidify the butter. Try to form a ball of butter with your hands.
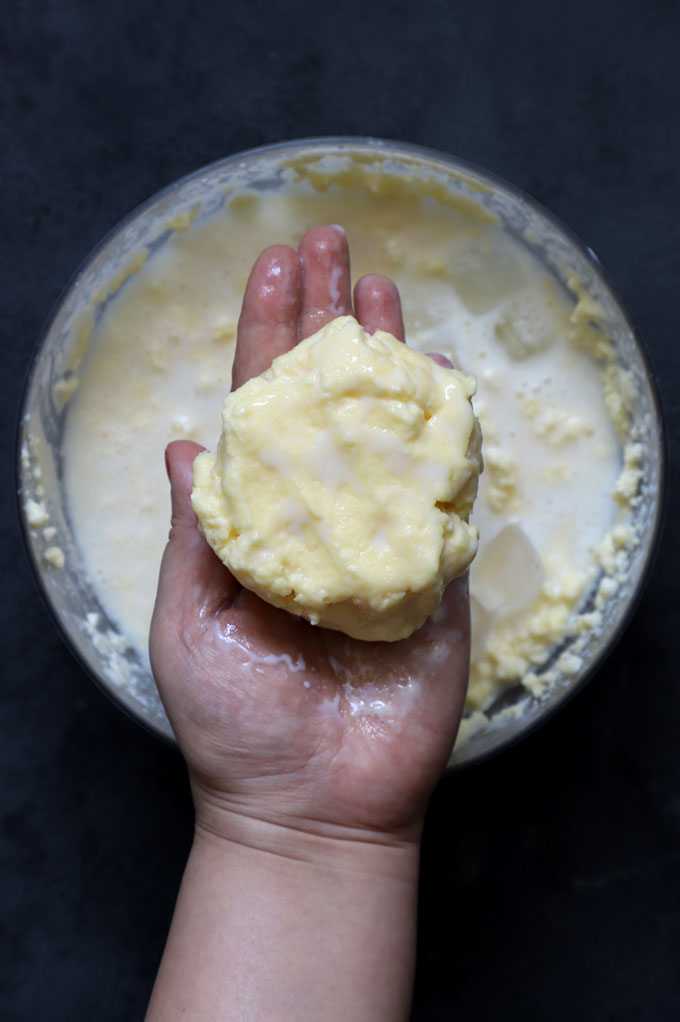
Strain the liquid (buttermilk) using a muslin cloth or strainer.
You can use buttermilk for drinking as chaas , making kadhi , making dough of whole wheat naan , bhatura without using yeast, or for making whole wheat pancake batter. It is excellent for the gut and digestive systems.
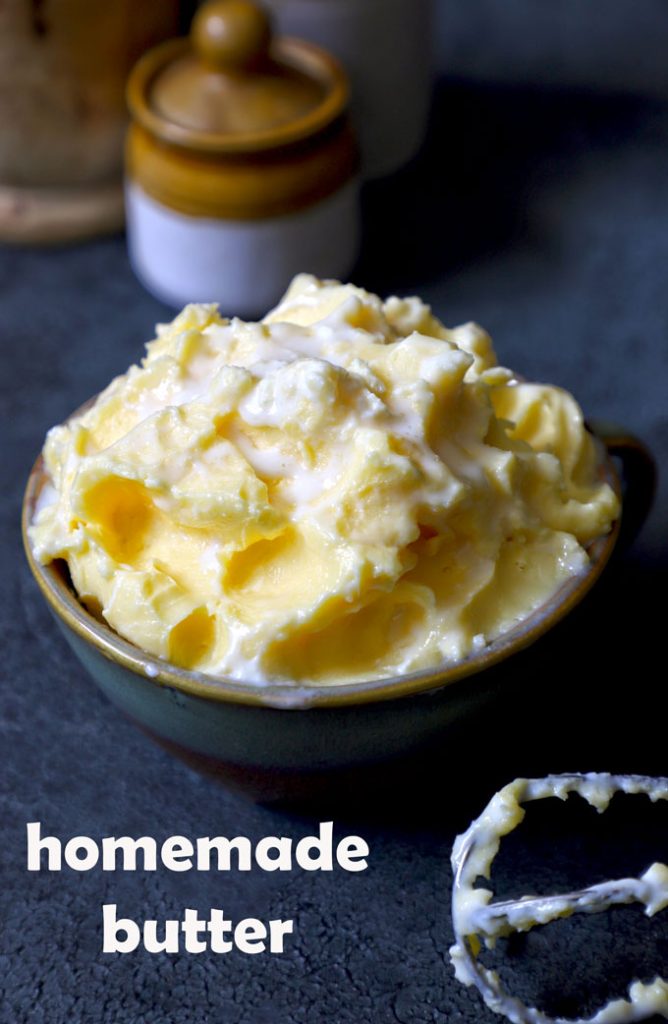
Step 6) Transfer the homemade butter to another bowl filled with clean ice cold water. Wash the butter chunk nicely. You can press it in a muslin or cheesecloth to drain excess liquid.
Shelf Life and Storage
Store homemade butter in an airtight container. Like packaged butter, it is best to store homemade butter in the refrigerator. Or, in cold climatic conditions, you can keep it at room temperature for 1 – 2 days.
The shelf life of homemade butter is not more than 15 days. After that, it starts tasting rancid or slightly bitter, like spoiled fresh cheese. Hence, it is best to make a small batch fortnightly.
If you make butter by collecting malai (cream) from milk daily and storing it in the refrigerator for more than 10 days, it tastes bitter and develops a smell. Add a spoonful of curd to the malai (cream) on the first day and then store it for 7 – 10 days.
The type of cream or malai defines the colour of the butter. It might be white if you use packaged full-fat milk, whereas unpasteurized organic cow or buffalo milk will give yellow colour to the butter.
More Indian Kitchen Hacks
- Ginger Garlic Paste
- 4 Indian Curry Paste
- Indian Chai Masala Powder
- Homemade Tomato Ketchup
- Homemade Garam Masala Powder
- How To Organize Indian Kitchen Cabinet
- 6 Easy Meal Prep Tips for Indian Kitchen

Ingredients
- ▢ 2 Cup full fat cream or malai
- ▢ 4 Cup iced water, divided
Instructions
- To make butter at home you can buy ready made full cream or else you can use cream (malai) from the milk. However, this fresh cream from the milk has to be collected everyday for 10 days and stored in refrigerator in an airtight container.
- To churn out butter, cream should be at room temperature. Bring out cream or malai from the refrigerator. Let it sit at room temperature for 15 minutes. Keep iced water ready in two separate bowls.
- Transfer cream to a stand mixer or a mixing bowl. Start whisking it at medium speed. Initially, the cream will start to thicken and you will get whipped cream with smooth peaks. This is STAGE 1.
- Continue to whip the cream. The texture of the cream will now turn grainy or granules will form. This is STAGE 2 .
- Keep whipping the cream at high speed – it will look curdled and you’ll see some liquid (buttermilk) separating from the cream. This is STAGE 3 . At this point, the buttermilk will begin to splash all around. Cover the bowl with a kitchen napkin or towel to avoid a messy splash all over the place.
- Continue to whisk until the tiny lumps of butter are clearly separated. At this final stage, the butter will now start sticking to the whisk. Add 2 cups of ice-cold water. It will solidify the butter. Try to form a ball of butter with your hands.
- Transfer the homemade butter to another bowl filled with clean ice cold water. Wash the butter chunk nicely. You can press it in a muslin or cheesecloth to drain excess liquid. Bring the edges of the cheesecloth together and press gently to extract as much buttermilk from the butter as possible.
- Store the homemade butter in a clean, airtight bowl in the refrigerator.
Recipe Notes:
- This is an unsalted homemade butter recipe.
- If the butter is not separating clearly from the cream, then add ½ cup ice cold water to the cream and continue to whip. You can also place the bowl in the freezer for a 10 minutes. Remove and then again begin to whip and churn.
- During the summer season the whole butter making process takes more than 30 minutes. The butter solids will not form that easily. Patience is the only key. Also, maintaining a cool temperature in the kitchen also helps. In short, any kind of heat will slow down the butter making process.
- Make sure to rinse the butter with ice cold water and squeeze out all the liquid using a cheesecloth.
Nutrition
We follow a strict NO SPAM Policy
