Looking for a easy and tasty dip for summer? Try this delicious mango dip with a perfect blend of sweetness and spiciness.
- Ingredients Required
- Picking Perfect Mangoes
- How To Make Mango Dip
- Serving Suggestion
- More Mango Recipes
- Mango Dip Recipe
Mangoes are such a delicious fruit. Its classic tropical scent, sweet taste, and slight notes of tanginess make it an excellent summer ingredient to experiment with.
If you’re wondering how you can use mangoes as an ingredient in more than one way to make the most of its rich flavour, you’re at the right place. Try these best mango recipes .
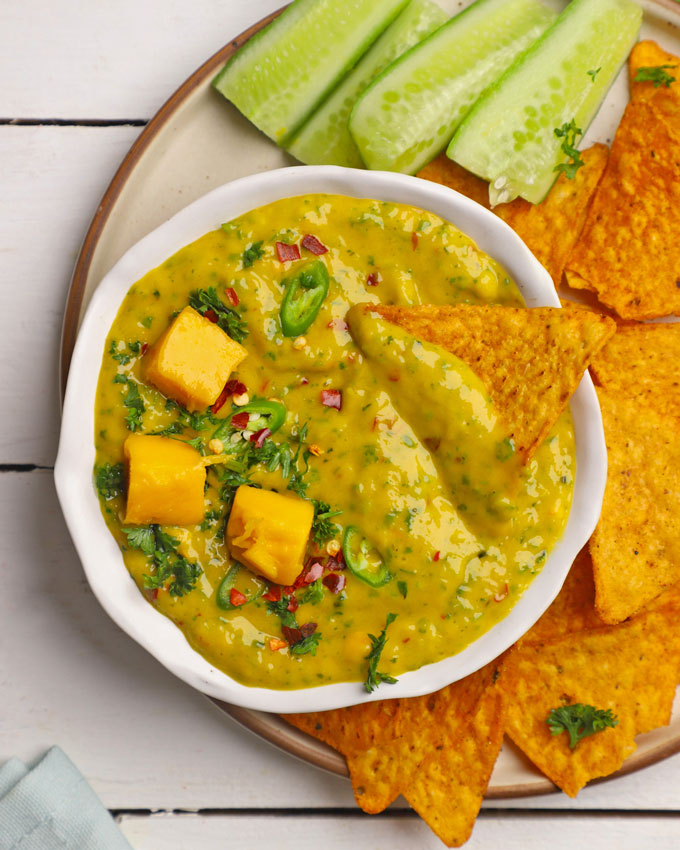
This spicy mango dip smooth mango has elements of sweetness, a wee bit of tanginess, and a pleasant sharpness of hot chilies. It is a perfect dipping sauce for the summer season.
Reasons To LOVE this Mango Dip
- meal prep friendly
- requires no cooking at all
- possible vegan and gluten-free
- perfect for summer picnic or BBQ
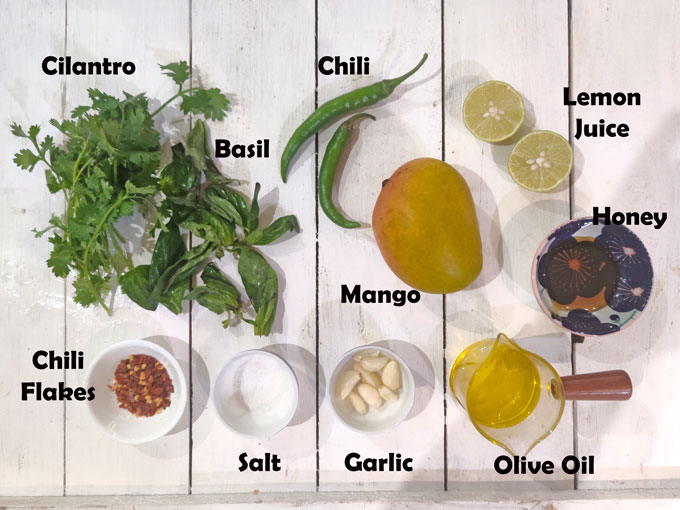
Ingredients Required
- Mango: Sweet, ripe mango pulp is perfect for making this dip. You can use canned mango pulp as well.
- Chilies: Use mild to medium-hot green chilies. Discard the seeds if you do not want to make the dip too spicy. You can also use a combination of red and green chilies.
- Herbs: Fresh basil, mint, cilantro, or parsley add great flavour and a hint of freshness to the dip.
- Honey: You can substitute it with maple syrup or stevia for a vegan version.
- Other Ingredients: Red Chilli Flakes, Garlic, Salt, Lemon Juice, Extra Virgin Olive Oil
Picking Perfect Mangoes
Choosing the right mangoes for this dipping sauce is a vital step – all the undertones of the dip depend on this.
- The skin of a ripe mango is smooth and yellow and doesn’t have too many black patches . The scent of a ripe mango is almost overpoweringly sweet – it is also the factor that helps one differentiate between a perfectly ripe and raw mango.
- Tropical nations like the Philippines, California, Thailand, and the Indian subcontinent produce amazingly ripe and sweet mangoes. They are perfect for making this mango dip.
How To Make Mango Dip
Making mango dip is a fuss-free, no-cook process.
Step 1) Add all the ingredients to a blender or to a food processor with the blade attachment.
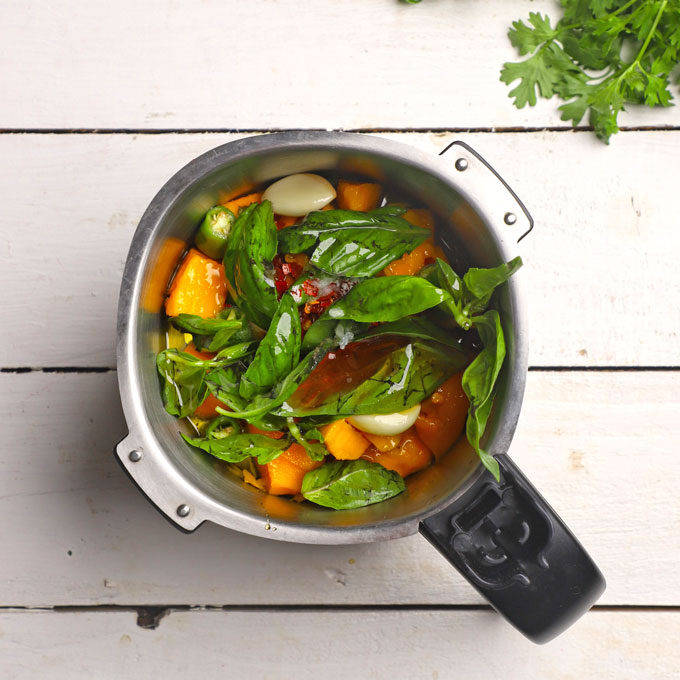
Step 2) Blend or pulse for a few seconds to get the creamiest mango dip ever.

Serving Suggestion
Mango Dip is a perfect sauce for fried snacks, crackers, or grilled meat skewers . You can also use it as a salad dressing.
Another way to use it is as a spread for sandwiches or even to dip pieces of veggies in and munch on a hot summer day.
More Mango Recipes
- Mango Lassi (Smoothie)
- Mango Shrimp Salad
- Mango Ice Cream
- Mango Iced Tea
- Mango Yogurt
- Mango Salsa
Get all my Mango Recipes here

Ingredients
- ▢ 1 Cup mango pulp (see Note 1)
- ▢ ¼ Cup fresh basil leaves
- ▢ 2 garlic cloves
- ▢ 2 green chilli, roughly chopped
- ▢ 1 teaspoon red chili flakes
- ▢ 1 teaspoon salt or to taste
- ▢ 1 tablespoon honey or maple syrup
- ▢ 2 tablespoon extra virgin olive oil
- ▢ 1 tablespoon lemon juice
Instructions
- In a blender combine mango pulp, chili, garlic, chili flakes, salt, honey or maple syrup, lemon juice, and olive oil. Blend to a smooth consistency. Taste and adjust the seasoning accordingly.
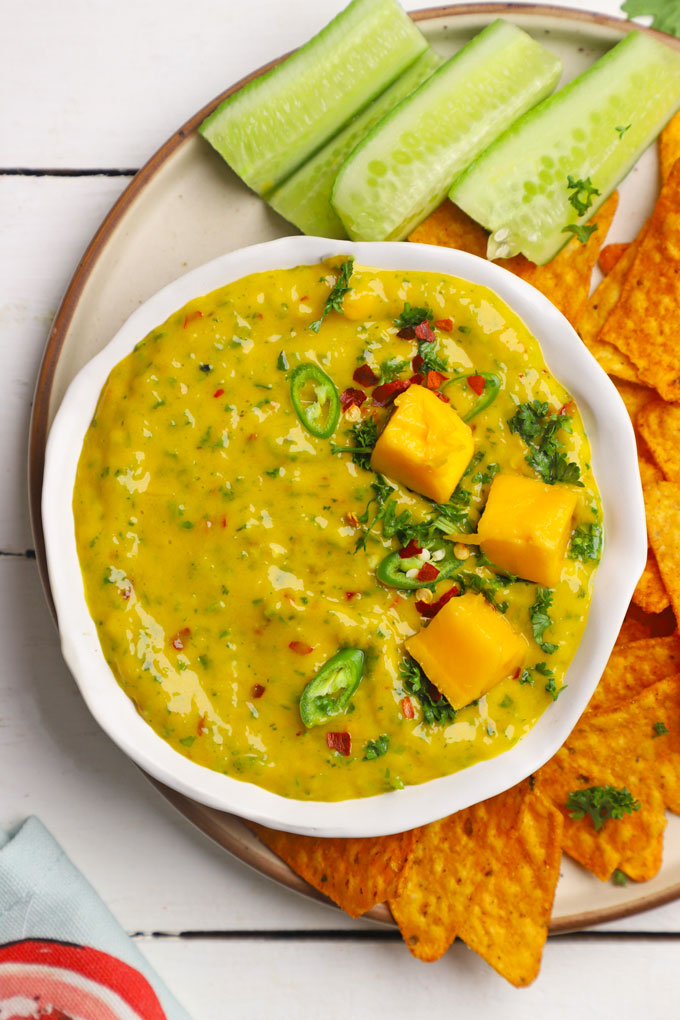
- Garnish mango dip with diced mango pulp, red chili flakes, and cilantro.
- Mango Dip is ready to serve.
- Serve mango dip chilled or at room temperature with crackers or a snack of your choice. Store it in refrigerator for 5 – 7 days.
Recipe Notes:
- NOTE 1) You can use fresh or canned mangoes to make this mango chili sauce recipe. You need ripe, sweet, soft mango pulp.
- Substitute honey with maple syrup for a vegan dip.
- Adjust the amount of sweetener as per the taste of mangoes and the heat of red chilies.
- Do not use water while blending the dip. Instead, use olive oil.
Nutrition
We follow a strict NO SPAM Policy

Mango Dip Recipe
Equipment
- Blender
Ingredients
- 1 Cup mango pulp (see Note 1)
- ¼ Cup fresh basil leaves
- 2 garlic cloves
- 2 green chilli, roughly chopped
- 1 teaspoon red chili flakes
- 1 teaspoon salt or to taste
- 1 tablespoon honey or maple syrup
- 2 tablespoon extra virgin olive oil
- 1 tablespoon lemon juice
Instructions
- In a blender combine mango pulp, chili, garlic, chili flakes, salt, honey or maple syrup, lemon juice, and olive oil. Blend to a smooth consistency. Taste and adjust the seasoning accordingly.
- Garnish mango dip with diced mango pulp, red chili flakes, and cilantro.
- Mango Dip is ready to serve.
- Serve mango dip chilled or at room temperature with crackers or a snack of your choice. Store it in refrigerator for 5 - 7 days.
Notes
- NOTE 1) You can use fresh or canned mangoes to make this mango chili sauce recipe. You need ripe, sweet, soft mango pulp.
- Substitute honey with maple syrup for a vegan dip.
- Adjust the amount of sweetener as per the taste of mangoes and the heat of red chilies.
- Do not use water while blending the dip. Instead, use olive oil.
Nutrition
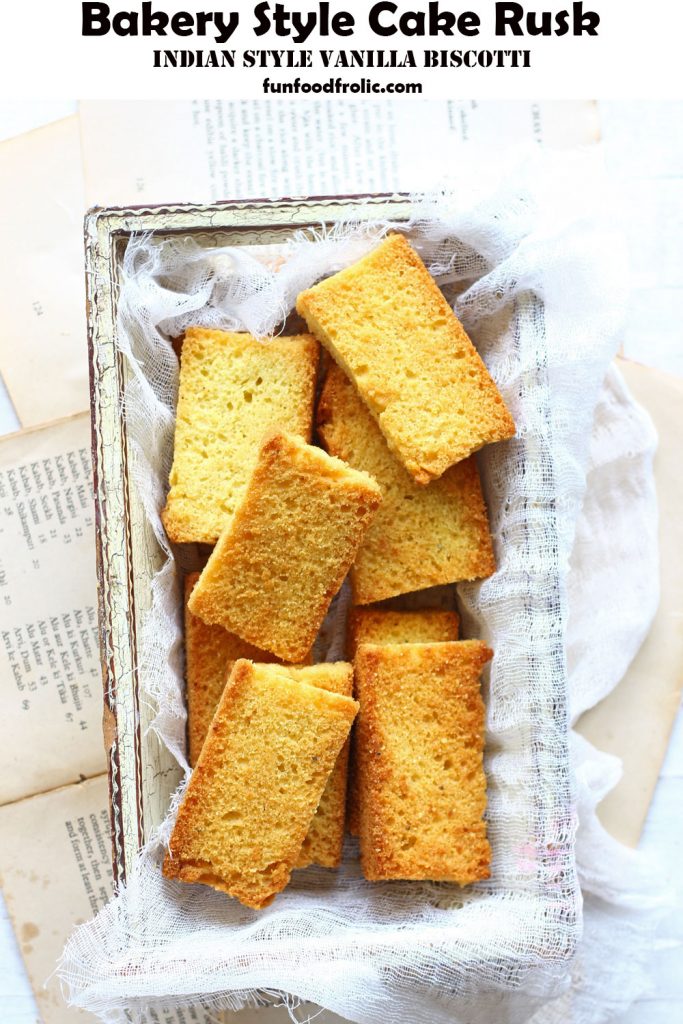
Cake Rusk is a popular Indian style biscotti. Here is a failproof, bakery-style, golden cake rusk recipe. Be sure to watch the video!

- About Cake Rusk
- Ingredients Required
- Two-Step Baking Process
- The Sponge Cake
- Watch Cake Rusk Video
- My Tried and True Tips
- Storage Suggestion
- More Baking Recipes
- Indian Cake Rusk Recipe
About Cake Rusk
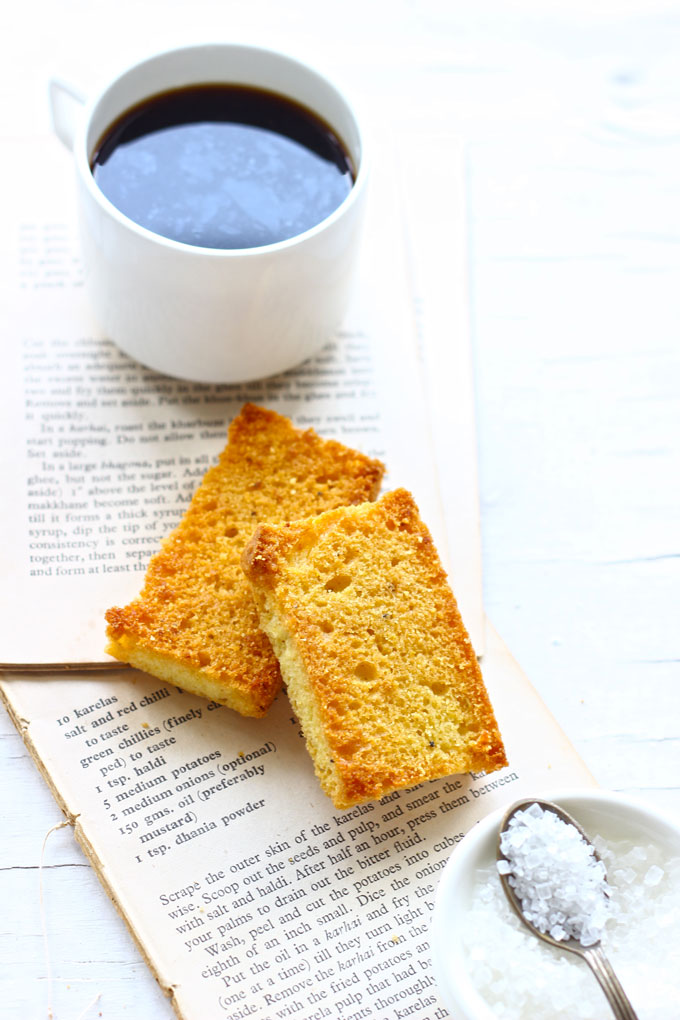
Cake Rusk is a popular Indian baked treat, very similar to a biscotti. A classic vanilla sponge cake is baked twice to make cake rusk. Hence, the name – cake rusk.
They are a simplistic, tasty, vanilla, cardamom flavoured biscuit also known as – toast, rusk, ruskul .
These cake rusk always remind me of childhood in a small town, where the local bakeries use to sell them. And this economic bake without fail accompanied my morning glass of milk or mom’s evening tea.
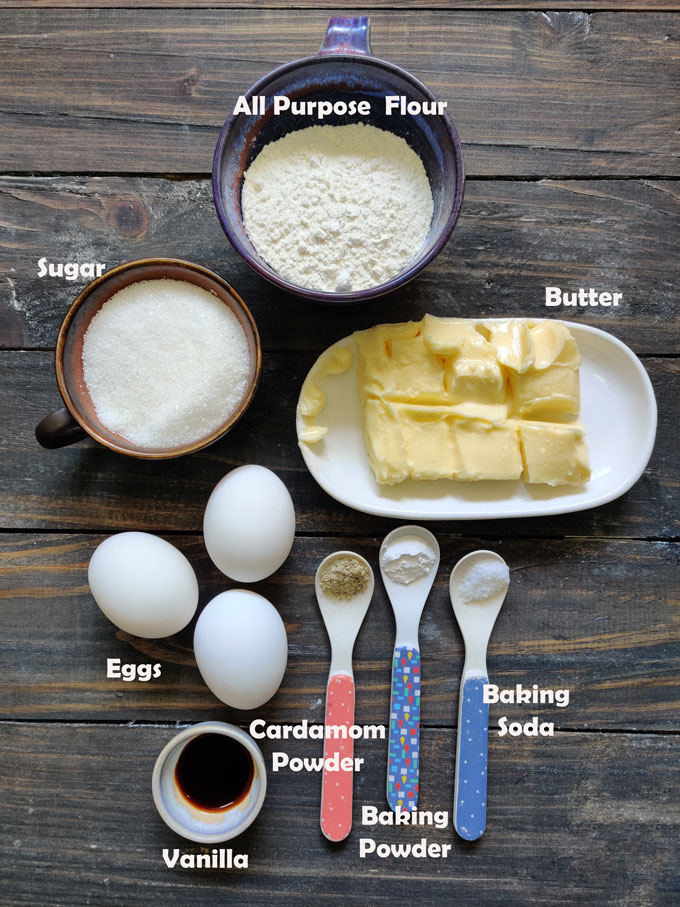
Ingredients Required
- APF (all-purpose flour) is the key ingredient. Do not use cake or bread flour.
- Unsalted Butter slightly softened and not melted.
- Granulated White Sugar: Do not substitute it with brown sugar or castor sugar.
- White Eggs that too at room temperature.
- Baking Agents: Baking Powder and Baking Soda
- Flavouring Agents: Green Cardamom Powder, Vanilla Essence, Salt
- Edible Yellow Food Colour (Optional)
Two-Step Baking Process
This cake rusk recipe is a two step easy to follow process. Or I should say rusk is a twice baked biscuit.
- Bake a vanilla sponge cake. The foundation of the cake rusk is a basic sponge cake.
- Cut and bake again the sponge cake slices until firm, crunchy, and deep golden.
The Sponge Cake
A traditional style vanilla sponge cake with eggs makes the best cake rusk. The aroma of baked eggs, and vanilla, yields bakery-style rusk.
To make egg-free cake rusk, follow my eggless sponge cake recipe to lay the foundation for making the rusk.
Watch Cake Rusk Video
My Tried and True Tips
- Sponge Cake: Make sure the cake is nicely baked, spongy, light, and airy. Allow it to cool down completely before cutting into slices or it might crumble.
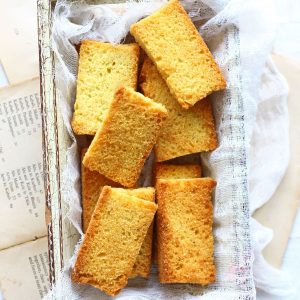
- Shape : There is no hard and fast rule about the size of the cake rusk. Usually, they are rectangular. The height of the sponge cake defines the width of the cake rusk . Hence, you can use a small size tin or double the ingredients to make broad, rectangular cake rusk ( as shown in images ).
- Twice Baking: While baking the rusk, flip or turn each piece at regular intervals for even baking and crispness. The time of twice baking may vary depending upon the size of the oven, and the moistness of the cake.
- Please note the texture of the cake rusk will become more firm once it cools down rather than when it is straight out of the oven. So bake them accordingly.
Storage Suggestion
Before storing make sure to cool down the cake rusk on a wire rack. Do not store them while they are warm to touch as they will become soft, and mushy.
Store in an airtight container at room temperature like any other freshly baked biscuit for 7 – 10 days.
More Baking Recipes
- Orange Cake
- Date Walnut Bread
- Eggless Atta Cake
- Eggless Rava Cake
- Lemon Pound Cake
- Eggless Nankhatai Cookies
- Eggless Chocolate Chip Scones
Ingredients
- ▢ 125 gram (½ Cup) all-purpose flour (maida)
- ▢ 125 gram unsalted butter, softened
- ▢ 125 gram granulated white sugar
- ▢ 3 eggs, at room temperature
- ▢ ¼ teaspoon salt
- ▢ 1 teaspoon baking powder
- ▢ 1 teaspoon baking soda
- ▢ 1 teaspoon vanilla essence
- ▢ 1 teaspoon green cardamom powder (elaichi powder)
- ▢ ½ teaspoon edible yellow food color or turmeric
Instructions
- Pre-heat oven to 350F / 180C. Line a 7 inch square baking tin with parchment paper and grease sides well with butter.
- Combine flour, salt, baking powder, baking soda, cardamom powder in a bowl. Set it aside.
- Whisk the butter and sugar until fluffy and pale in color – about 10 minutes by the manual whisk, 3-4 mins with a hand mixer at medium-high speed.
- Add egg one at a time, beating each time for about 10 – 20 seconds using a hand mixer at medium speed. In between add vanilla essence as well.
- Add the flour mixture, and fold until all the ingredients are combined nicely. Add the food color and gently fold it into the batter.
- Pour the cake batter into the greased pan. Bake in a preheated oven for 30 – 35 minutes, or until a toothpick comes out clean. Let the cake sit in the tin for 10 – 15 minutes.
- Turn the cake onto a cooling rack and let it cool for 15 – 20 minutes. Then, using a sharp knife, cut it down the middle, then into ¼ inch thick strips.
- Divide each strip into 2 – 3 rectangular pieces (rusk) depending upon the size of the strip.
- Arrange the rusks on a baking sheet, and put the sheet back into the oven.
- Bake at 150 degrees Celcius for 15 minutes. Turn them over and bake the other side for another 15 minutes. If they need more time in the oven, turn down the heat a little bit and let them bake for slightly longer until they are golden brown and crisp on all sides.
- Transfer warm cake rusk onto a wire-rack and let them cool. Store in an airtight container. Serve cake rusk with a cup of tea or coffee.
Recipe Notes:
- Cake Rusk is not very hard in texture. So keep checking them while baking as they burn very fast.
- If the cake rusk is still not as crispy as you would want, turn the oven on and let it heat to 180 C. Then turn it off. Arrange the rusks on a baking sheet and put them back into the oven. Close the oven door and let them stay in there for about 15 minutes more with the oven off.
- Please note the texture of the cake rusk will become more firm once it cools down rather than when it is straight out of the oven. So bake them accordingly.
- Always store them in an airtight container at room temperature.
- Do not store cake rusk while they are warm to touch as they will become soft, and mushy.
Nutrition
We follow a strict NO SPAM Policy
