We’ve cracked the code for a creamy, dairy-free coconut kheer that is just as rich, aromatic, and comforting as the classic.
Estimated reading time: 5 minutes
- Ingredients You’ll Need
- How To Make Coconut Kheer
- My Tried and True Tips
- Rice Coconut Kheer Recipe
Kheer, the quintessential Indian rice pudding , is a dessert beloved across generations and cultures. Traditionally made with whole milk, this creamy concoction often poses a challenge for those who are dairy intolerant or vegan .
Using the luscious thickness of coconut milk, this kheer recipe transforms the familiar sweet treat into a plant-based, dairy free, vegan dessert . It’s perfect for festive occasions, or simply when a craving for something sweet hits.
You can try my vegan badam phirni recipe also packed with the nuttiness of almond milk.
Why Go Dairy-Free with Kheer?
Beyond catering to lactose intolerance or a vegan diet, using coconut milk in kheer brings its own set of fantastic benefits:
- Exceptional Creaminess: High-quality, full-fat coconut milk provides an unparalleled richness and velvety texture.
- Tropical Aroma: The subtle, sweet fragrance of coconut elevates the traditional kheer flavour profile, creating a delightful tropical twist.
- Naturally Sweet: Coconut milk has a natural sweetness, which often means you can use less added sugar.
Ingredients You’ll Need
- Rice preferably short to medium grain like gobind bhog, sona masori, jasmine, or any other aromatic rice with starchiness.
- Coconut Milk with full fat and cream. Crucial for richness. Look for a brand with a high coconut extract percentage.
- Chopped Fresh Coconut for the texture and it intensifies the coconut flavour.
- Granulated Sugar or coconut sugar (kheer will be darker) or stevia (add at the very end).
- Cardamom Powder is the soul of Indian desserts.
- Coconut or Neutral Oil to fry the cashews and nuts.
- Mixed Nuts like cashews, almonds, or raisins.
How To Make Coconut Kheer
1. Prepare the Rice:
- Rinse the rice thoroughly with water.
- Soak the rice in ½ cup of water for about 30 minutes. This helps the rice cook faster and become creamier.
2. Cook the Rice:
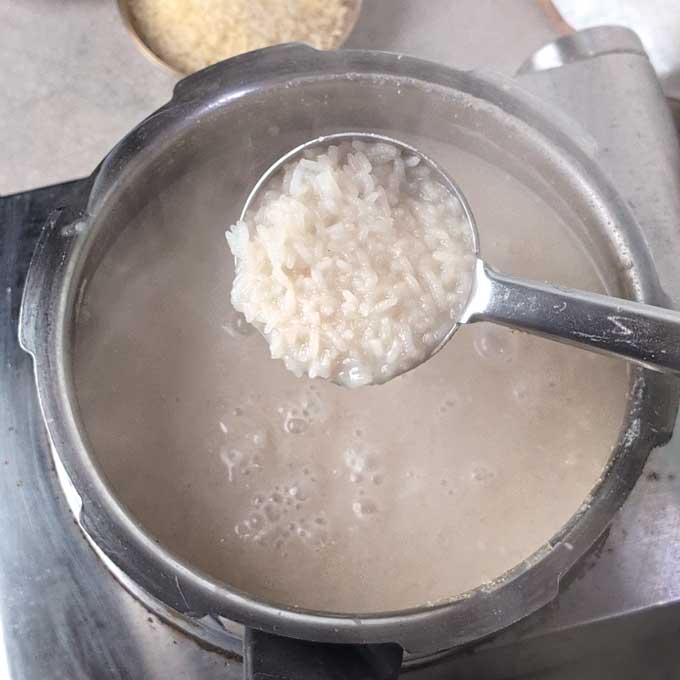
- Drain water from the soaked rice.
- In a pressure cooker add water and soaked rice. Stir to combine.
- Pressure cook for 2 whistles over low heat till rice is nicely done.
3. Introduce the Coconut Milk:
- Once rice is cooked, open the lid of the pressure cooker and turn on the heat.
- Add the full-fat coconut milk, cardamom powder, and sugar. Mix well.
- Bring the mixture to a gentle simmer over low heat. Crucially, do not bring it to a rolling boil , as this can cause the fat in the coconut milk to separate.
- Continue to simmer for another 15-20 minutes . Stir frequently, scraping the sides and bottom of the pan to prevent scorching and help the kheer thicken evenly.
- The rice should break down and the kheer should reduce and become thick.
4. Final Touch:
- Once cooked, allow the coconut kheer to cool completely at room temperature.
- After cooling, add chopped coconut and the malai (coconut fat). Mix nicely.
- In a heavy-bottomed saucepan, heat the oil or vegan butter (if using) over low heat.
- Add the chopped nuts, a tablespoon of chopped coconut, and fry until they turn light golden and aromatic.
- Remove the nuts with a slotted spoon and add them to the kheer.
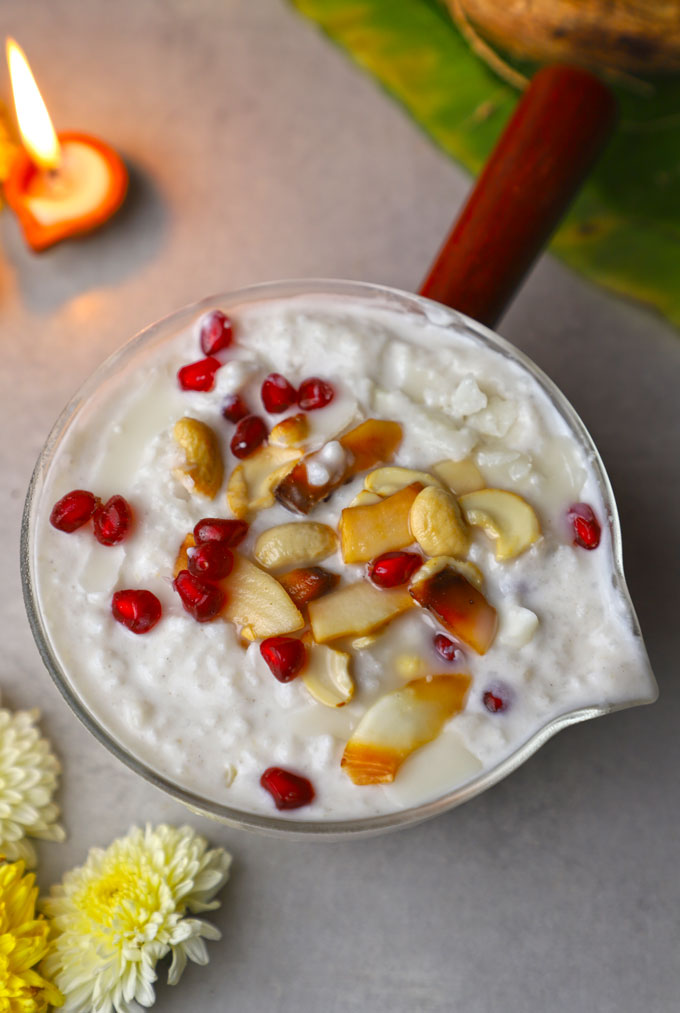
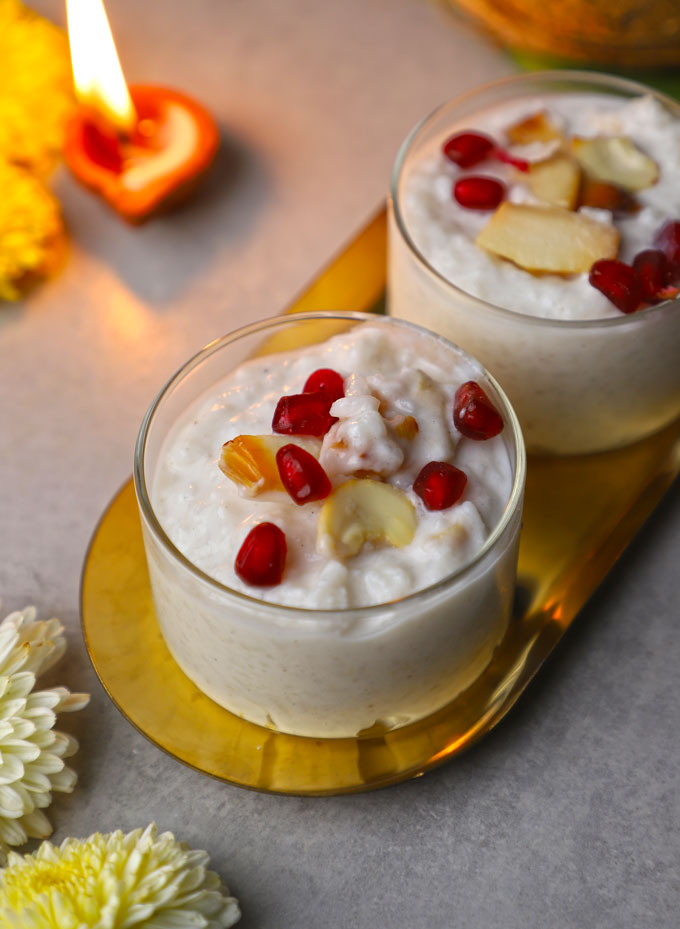
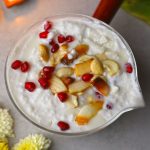
Serve it warm or chilled. Garnish with the remaining fried nuts and a few strands of saffron, pomegranate pearls or grated coconut.
My Tried and True Tips
- Consistency Control: If your kheer is too thick after cooling, simply stir in a little more coconut milk until you reach the desired consistency.
- The Rice Mash: For an ultra-creamy texture, gently mash the cooked rice grains against the side of the pan with the back of your spoon while simmering the kheer. This releases more starch and thickens the kheer beautifully.
- Don’t Rush the Simmer: Low and slow is the mantra for creamy coconut kheer. Gentle simmering allows the rice to cook fully and release its starch without the coconut milk breaking.
- Alternative Sweeteners: If using liquid sweeteners like maple syrup or agave, add them after the kheer is done cooking, just before you take it off the heat, to maintain their flavour and prevent excessive reduction.
- Spruce it Up: For a different aroma, try adding a tiny pinch of nutmeg or saffron along with the cardamom.
More Indian Kheer Recipes
- Rice Kheer
- Badam Kheer
- Gujarati Doodh Pak
- Apple Quinoa Kheer
- Bengali Orange Kheer
more Indian kheer recipes for all festive celebrations.

Ingredients
- ▢ ¼ Cup medium grain rice
- ▢ ½ Cup water
- ▢ 2 Cup thick coconut milk
- ▢ 1 teaspoon cardamom powder
- ▢ ¼ Cup white granulated sugar
- ▢ ¼ Cup chopped fresh coconut
- ▢ 1 tablespoon coconut oil or vegetable oil
- ▢ 1 tablespoon chopped cashews
Instructions
- Rinse the rice thoroughly with water. Soak the rice in ½ cup of water for about 30 minutes. This helps the rice cook faster and become creamier.
- Drain water from the soaked rice. In a pressure cooker add water and soaked rice. Stir to combine. Pressure cook for 2 whistles over low heat till rice is nicely done.
- Once rice is cooked, open the lid of the pressure cooker and turn on the heat. Add the full-fat coconut milk, cardamom powder, and sugar. Mix well.
- Bring the mixture to a gentle simmer over low heat. Crucially, do not bring it to a rolling boil, as this can cause the fat in the coconut milk to separate.
- Continue to simmer for another 15-20 minutes. Stir frequently, scraping the sides and bottom of the pan to prevent scorching and help the kheer thicken evenly. The rice should break down and the kheer should reduce and become thick.
- Once cooked, allow the coconut kheer to cool completely at room temperature. After cooling, add chopped coconut and the malai (coconut fat). Mix nicely.
- In a heavy-bottomed saucepan, heat the oil or vegan butter (if using) over low heat. Add the chopped nuts, a tablespoon of chopped coconut, and fry until they turn light golden and aromatic. Remove the nuts with a slotted spoon and add them to the kheer.
- Serve rice coconut kheer warm or chilled.
Recipe Notes:
- If using liquid sweeteners like maple syrup or agave, add them after the kheer is done cooking.
- Do not bring it to a rolling boil , as this can cause the fat in the coconut milk to separate.
- The rice should break down and the kheer should reduce and become thick.
Nutrition
We follow a strict NO SPAM Policy
Rice Coconut Kheer Recipe
Equipment
- Mixing Bowl
- Heavy Bottom Kadhai
Ingredients
- ¼ Cup medium grain rice
- ½ Cup water
- 2 Cup thick coconut milk
- 1 teaspoon cardamom powder
- ¼ Cup white granulated sugar
- ¼ Cup chopped fresh coconut
- 1 tablespoon coconut oil or vegetable oil
- 1 tablespoon chopped cashews
Instructions
- Rinse the rice thoroughly with water. Soak the rice in ½ cup of water for about 30 minutes. This helps the rice cook faster and become creamier.
- Drain water from the soaked rice. In a pressure cooker add water and soaked rice. Stir to combine. Pressure cook for 2 whistles over low heat till rice is nicely done.
- Once rice is cooked, open the lid of the pressure cooker and turn on the heat. Add the full-fat coconut milk, cardamom powder, and sugar. Mix well.
- Bring the mixture to a gentle simmer over low heat. Crucially, do not bring it to a rolling boil, as this can cause the fat in the coconut milk to separate.
- Continue to simmer for another 15-20 minutes. Stir frequently, scraping the sides and bottom of the pan to prevent scorching and help the kheer thicken evenly. The rice should break down and the kheer should reduce and become thick.
- Once cooked, allow the coconut kheer to cool completely at room temperature. After cooling, add chopped coconut and the malai (coconut fat). Mix nicely.
- In a heavy-bottomed saucepan, heat the oil or vegan butter (if using) over low heat. Add the chopped nuts, a tablespoon of chopped coconut, and fry until they turn light golden and aromatic. Remove the nuts with a slotted spoon and add them to the kheer.
- Serve rice coconut kheer warm or chilled.
Video
Notes
- If using liquid sweeteners like maple syrup or agave, add them after the kheer is done cooking.
- Do not bring it to a rolling boil , as this can cause the fat in the coconut milk to separate.
- The rice should break down and the kheer should reduce and become thick.
Nutrition
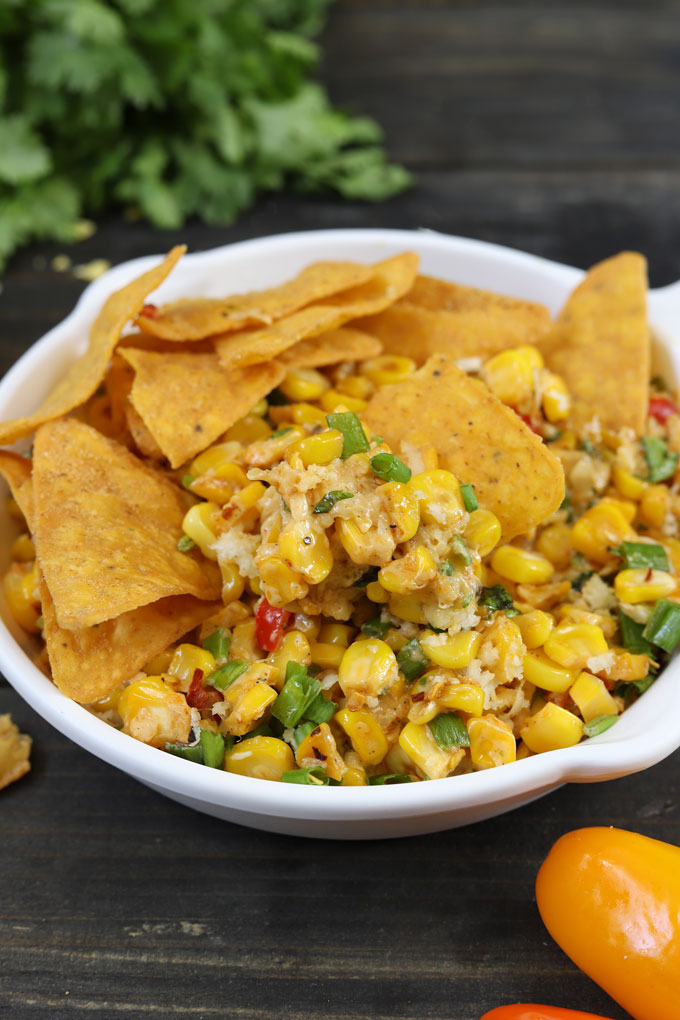
Spicy Chilli Corn Dip is a creamy, cheesy bowl of goodness. A popular side dish for the BBQ, potluck, or picnic.
Estimated reading time: 3 minutes
- Ingredients You’ll Need
- How To Make
- Watch Corn Dip Video
- Storage Suggestion
- Chilli Corn Dip Recipe
What not to love about this creamy corn dip? It is sweet, spicy, sour, creamy, cheesy, and everything you are looking for in a perfect dip. Added bonus – it is gluten-free too!
For the backyard BBQ, potluck get-together , summer picnic, or a large gathering , you can make this dip in advance and serve it warm or cold with a big bag of chips. Or you can enjoy it as a creamy corn salad on a hot summer afternoon.
More Reasons To LOVE Corn Dip
- easy to prepare
- meal-prep friendly
- customizable recipe
- minimal cooking required
- vegetarian and gluten-free
Looking for more easy, creamy dips – try Whipped Paneer Dip , Creamy Avocado Sauce , or the Hummus . You’ll love them!
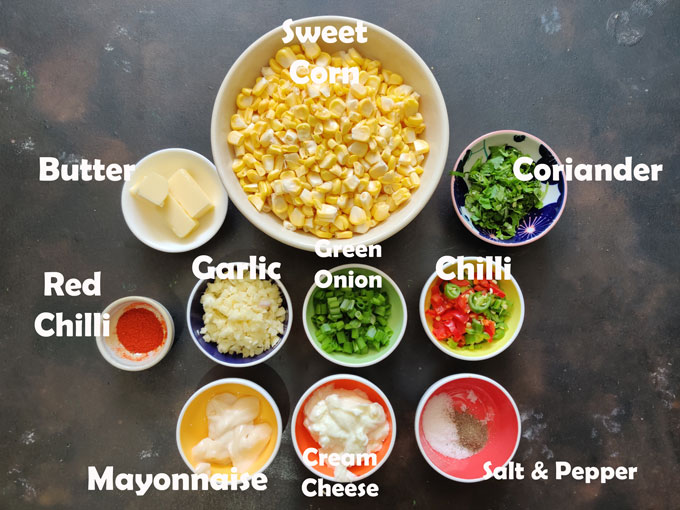
Ingredients You’ll Need
- Sweet Corn Kernels are the hero of this dip recipe. You can use fresh or frozen corn kernels . I always prefer fresh ones over frozen ones for a more natural sweet taste.
- Creaminess: The trilogy of cream cheese, mayonnaise, and grated cheese give the perfect creaminess to the dip. You can use sour cream also instead of cream cheese.
- Spiciness: The chili peppers and the red chili flakes perfectly balance out the sweetness of the corn. Jalapeno, Serano Chilies, and Indian Green Chili are also a perfect fit for this dip recipe.
- Herbs: Fresh Coriander, Cilantro, Green Onion, Parsley. Basil, Chives .
- Seasoning: Butter, Garlic, Chilli Powder, Lime Juice, Salt, Pepper
How To Make
It’s as easy as 1-2-3 to make chili corn dip.
Saute garlic and corn in butter to soften the corn.
Transfer to a bowl and add the remaining ingredients.
Mix, and enjoy!
Watch Corn Dip Video
Storage Suggestion
Refrigerated corn dip will stay fresh for up to 4 days stored in an airtight container. Before serving give it a quick stir and adjust the seasonings.
Leftover corn dip is great to tuck inside sandwiches or tacos.
More Corn Recipes for you to try
- Crispy Corn
- Corn Salsa
- Corn Chaat
- Corn Paneer Cutlet
- Creamy Corn Soup
- Corn Avocado Salad
- Cheese Corn Muffin
- Spinach Corn Sandwich

Ingredients
- ▢ 2 Cup corn kernels (fresh or frozen)
- ▢ 1 ½ tablespoon unsalted butter
- ▢ 2 tablespoon garlic, finely chopped
- ▢ 1 tablespoon green and red chilli
- ▢ Salt & Pepper
- ▢ 1 teaspoon red chili powder or paprika
- ▢ ¼ Cup cream cheese, softened
- ▢ 2 tablespoon plain mayonnaise
- ▢ ¼ Cup green onion, finely chopped
- ▢ 2 tablespoon fresh coriander, chopped
- ▢ ¼ Cup pizza cheese, grated
Instructions
- Cut the corn kernels off the cob. Collect the corn kernels in a bowl. If you are using frozen corn, skip this step and thaw the corn kernels.
- Heat butter in a frying pan. Add garlic and chopped chilli. Saute for less than a minute to infuse the flavor of the garlic and chili into butter. No need to brown the garlic.
- Add corn kernels, spices, salt, and stir fry for 5 – 6 minutes or till corn kernels are tender. Turn off the heat.
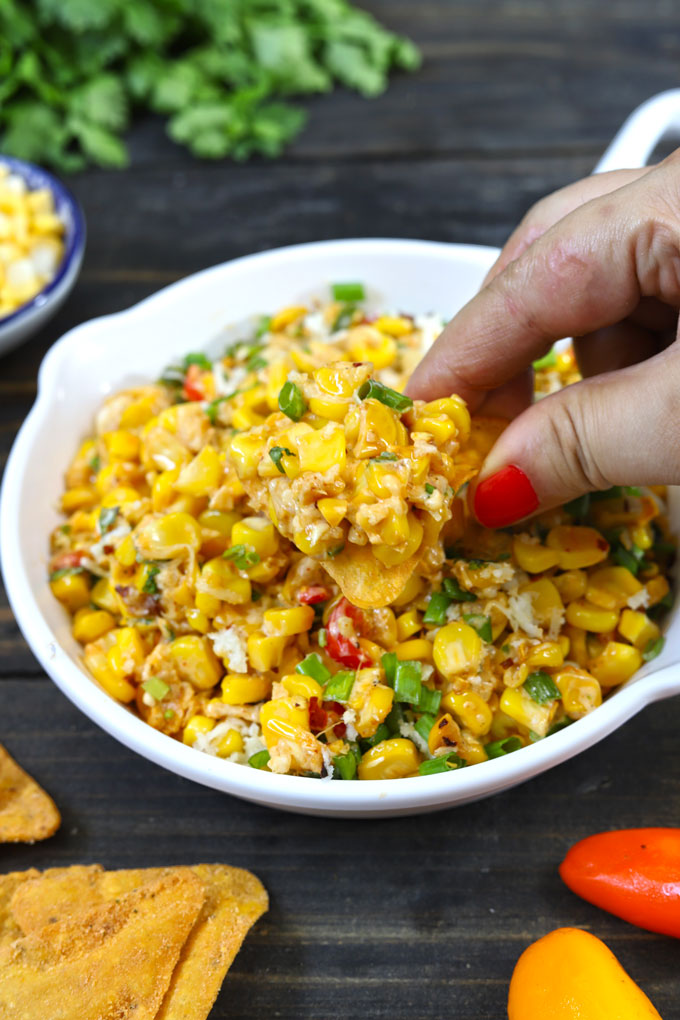
- Transfer hot sauteed corn to a bowl. Add remaining ingredients and mix. The heat of corn will melt the cheese.
- Corn Dip is ready to serve. Enjoy it with nachos or munchies of your choice.
Recipe Notes:
- You can use fresh or frozen corn kernels .
- Feel free to use sour cream instead of cream cheese.
- Make sure the corn kernels are piping hot while mixing the cheese. Else, the dip will not have a creamy mouth feel.
- Jalapeno, Serano Chilies, Indian Green Chili are also a perfect fit for this dip recipe.
Nutrition
We follow a strict NO SPAM Policy
