Rava Idli is a soft pillowy instant suji idli. I am sharing with you an easy microwave rava idli recipe. Be sure to watch the video!
- About Rava Idli
- Are rava and sooji same?
- My Tried and True Tips
- Watch Rava Idli Video
- Serving Suggestion
- How To Use Leftover Rava Idli
- Instant Rava Idli Recipe
About Rava Idli
There are many theories about the curation of rava idli, but all of them are intertwined in Karnataka only. So it could be said that the South Indian rava idli has its roots in the state of Karnataka.
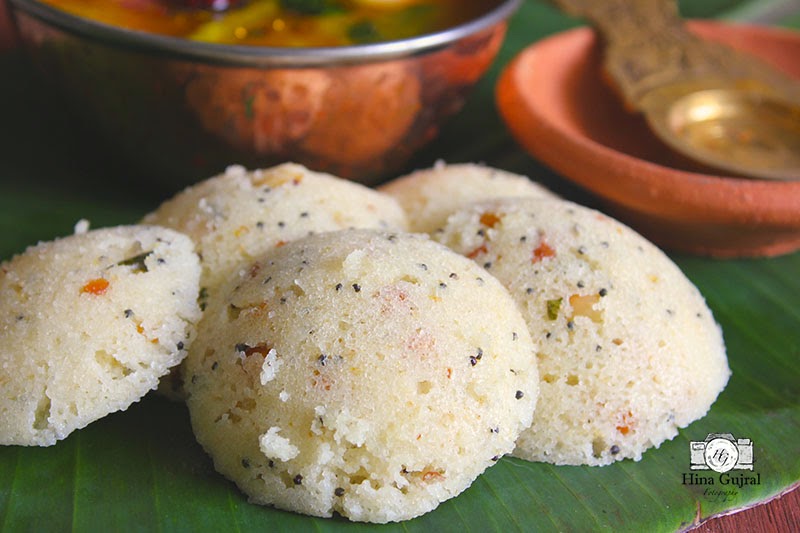
Instant Suji Ki Idli is one of those few dishes I learned to cook as a novice housewife. Even to date, I am equally fond of these cottony soft steamed dumplings dipped in piping hot mix vegetable sambar accompanied by a perfectly brewed cup of filter coffee.
The uncomplicated process to prepare this suji idli is always one of those pleasurable experiences in the kitchen when, deep down in your heart as a cook, you are affirmative about the flawlessness of the result.
Are rava and sooji same?
Sooji and rava are the different names of the flour produced from wheat. The English translation of both terms is semolina only.
In many parts of India, especially Southern states, the sooji is also known as rava . So don’t get confused if the packet of sooji is labeled as rava or vice-versa. For making instant idli, you need fine rava or chiroti rava.
Vegetable Sambar
My Tried and True Tips
- Use ghee for preparing the tempering . It gives an excellent taste to the idli.
- Allow roasted idli mixture to cool down entirely before combining it with curd or water.
- Ensure curd/water used to make idli batter is at room temperature and not chilled. A little bit of sour curd is perfect for making soft instant idlis.
- The instant idli batter should be of dropping consistency and not thick or dry. To get the right consistency, either use water or curd.
- Resting idli batter for a short period before mixing fruit salt/cooking soda helps semolina absorb moisture and produce moist, mouth-melting idlis.
- Try to use neutral-flavoured cooking soda or fruit salt to avoid ending up with fruity-tasting idlis.
- After adding fruit salt or baking soda, please do not mix it for too long. As soon as the batter starts frothing, pour a spoonful of it in idli cavities (stand). Hence, it is essential to keep the steamer ready beforehand.
- Steam the idli in the microwave for 5 minutes. And then allow them to sit in there for another one minute before opening the lid. Next, insert a toothpick and check for doneness. If not cooked, microwave for 1 – 2 minutes more.
Watch Rava Idli Video
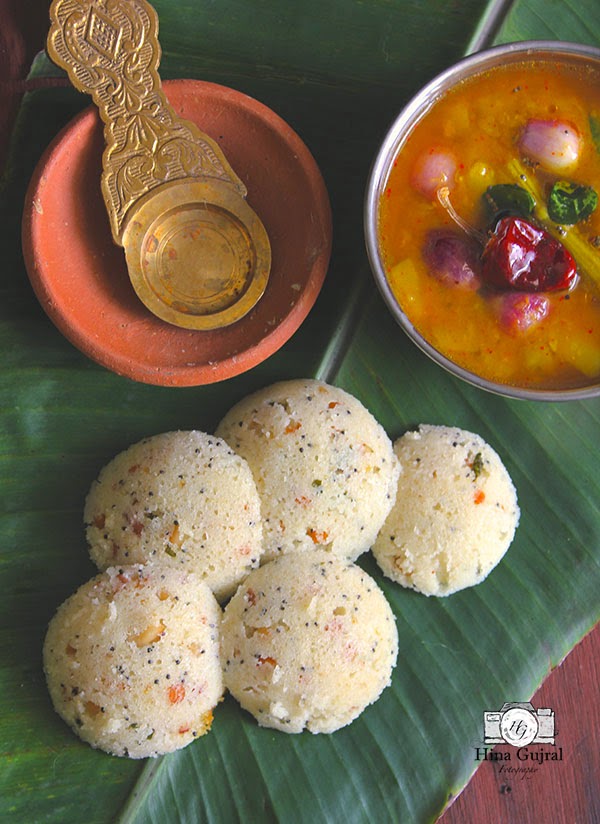
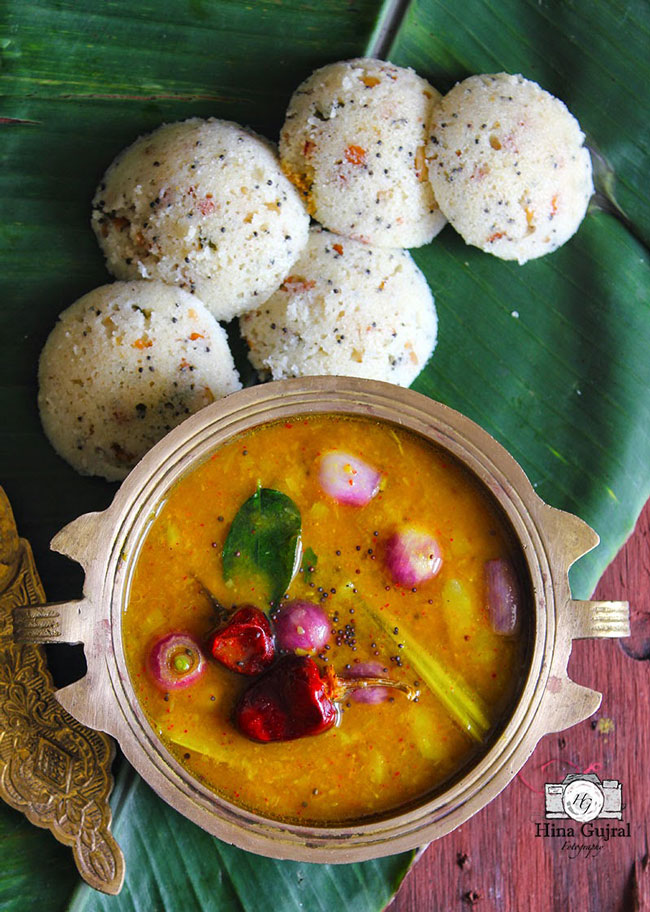
Serving Suggestion
You can serve rava idli with various South Indian curries and condiments.
Here are a few of our favourite serving suggestions:
- Tomato Chutney
- Tomato Garlic Rasam
- Mix Vegetable Sambar
- Coconut Coriander Chutney
How To Use Leftover Rava Idli
The best way to use leftover rava idli is to make Chilli Idli or Idli Manchurian . Then, you can serve it as a teatime snack or breakfast like an upma.
You can store leftover idli in the fridge for 3 – 5 days in an airtight container.

Ingredients
- ▢ 1 Cup semolina (rava/sooji)
- ▢ 1 ¼ Cup yogurt (curd), at room temperature
- ▢ 2 tablespoon ghee (clarified butter)
- ▢ 1 teaspoon mustard seeds (rai)
- ▢ 1 teaspoon white urad dal
- ▢ 1 teaspoon chana dal (Bengal Gram)
- ▢ a pinch of asafoetida (hing)
- ▢ 1 teaspoon cumin seeds (jeera)
- ▢ 4 – 5 curry leaves
- ▢ ¼ Cup fine chopped carrot
- ▢ Salt to taste
- ▢ ¼ Cup water
- ▢ 1 teaspoon baking soda
Ingredients For Garnish:
- ▢ 8 cashew nuts
- ▢ 8 curry leaves
Instructions
- In a pan heat ghee over medium heat once ghee is heated add mustard seeds and saute for few seconds.
- As mustard seeds start crackling add dal, asafoetida, cumin seeds, curry leaves and saute for 2 – 3 minutes.
- Now add chopped carrot and fry for 1 – 2 minutes or till carrot turn a bit soft.
- Add semolina to the tempering mixture and roast it over medium heat for 3 – 5 minutes. Stirring continuously while roasting.
- Turn off the flame and transfer semolina to a bowl. Set aside until it cools down to room temperature.
- Combine tempered semolina, curd, salt and water in a bowl to prepare idli batter. The batter should be of dropping consistency and not too runny if required add more water to get the right consistency. Cover the bowl with a lid and set aside for 5 minutes.
- Prepare your idli steamer and grease the mold with little ghee to avoid idli sticking to the mould.
- Prepare a microwave safe steamer. Grease idli molds with ghee or cooking oil.
- Place a piece of cashew and curry leaf in each idli mold.
- Once the steamer is ready, add fruit salt to the idli batter and stir nicely to combine evenly. The idli batter will turn frothy immediately pour a spoonful of batter in each mold.
- Close the lid of the steamer and steam idlis in the microwave for 5 – 6 minutes while in gas steamer it takes 10 minutes.
- To check idlis for doneness insert toothpick and check if it comes out clean else microwave for 1 – 2 minutes more.
- With the help of a spoon remove idlis from the mold. Transfer to a plate.
- Serve rava idli with sambar and coconut chutney for breakfast or lunch.
Recipe Notes:
- Use ghee for preparing the tempering . It gives a nice taste to the idli.
- Allow roasted idli mixture to cool down completely before combining it with curd or water.
- The instant idli batter should be of dropping consistency and not thick or dry. To get the right consistency either use water or curd.
- Resting idli batter for a short span of time before mixing fruit salt/cooking soda helps semolina absorbing moisture and flavors in a better way and tend to produce moist, mouth-melting idlis.
- Try to use neutral-flavored cooking soda or fruit salt to avoid ending up with fruity tasting idlis.
- After adding fruit salt or baking soda do not mix it for too long. As soon the batter starts frothing pour spoonful of it in idli cavities (stand). Hence, it is important to keep the steamer ready beforehand.
- Steam the idli in the microwave for 5 minutes. And then allow them to sit in there for another one minute before opening the lid. Insert a toothpick and check for doneness. If not cooked, microwave for 1 – 2 minutes more.
- Microwave safe steamer does not require any preheating. But if you are using a gas steamer to make idlis than you need to heat water in the steamer before pouring the batter into the molds.
- Equipment Required: Microwave Safe Steamer ( Buy It Here )
- Heat water in a gas stove steamer or electric pressure cooker. Once the steam starts forming, add fruit salt in the idli batter and mix nicely.
- Fill each idli mold with the prepared paste. Then, gently place the idli stand or mold in the steamer or pressure cooker.
- Steam instant suji idli for 10 to 15 minutes. Later, insert a toothpick and check for doneness. Else steam for a few more minutes.
Nutrition
We follow a strict NO SPAM Policy
Instant Rava Idli Recipe
Equipment
- Mixing Bowl
- Microwave
Ingredients
- 1 Cup semolina (rava/sooji)
- 1 ¼ Cup yogurt (curd), at room temperature
- 2 tablespoon ghee (clarified butter)
- 1 teaspoon mustard seeds (rai)
- 1 teaspoon white urad dal
- 1 teaspoon chana dal (Bengal Gram)
- a pinch of asafoetida (hing)
- 1 teaspoon cumin seeds (jeera)
- 4 - 5 curry leaves
- ¼ Cup fine chopped carrot
- Salt to taste
- ¼ Cup water
- 1 teaspoon baking soda
Ingredients For Garnish:
- 8 cashew nuts
- 8 curry leaves
Instructions
- In a pan heat ghee over medium heat once ghee is heated add mustard seeds and saute for few seconds.
- As mustard seeds start crackling add dal, asafoetida, cumin seeds, curry leaves and saute for 2 - 3 minutes.
- Now add chopped carrot and fry for 1 - 2 minutes or till carrot turn a bit soft.
- Add semolina to the tempering mixture and roast it over medium heat for 3 - 5 minutes. Stirring continuously while roasting.
- Turn off the flame and transfer semolina to a bowl. Set aside until it cools down to room temperature.
- Combine tempered semolina, curd, salt and water in a bowl to prepare idli batter. The batter should be of dropping consistency and not too runny if required add more water to get the right consistency. Cover the bowl with a lid and set aside for 5 minutes.
- Prepare your idli steamer and grease the mold with little ghee to avoid idli sticking to the mould.
- Prepare a microwave safe steamer. Grease idli molds with ghee or cooking oil.
- Place a piece of cashew and curry leaf in each idli mold.
- Once the steamer is ready, add fruit salt to the idli batter and stir nicely to combine evenly. The idli batter will turn frothy immediately pour a spoonful of batter in each mold.
- Close the lid of the steamer and steam idlis in the microwave for 5 – 6 minutes while in gas steamer it takes 10 minutes.
- To check idlis for doneness insert toothpick and check if it comes out clean else microwave for 1 - 2 minutes more.
- With the help of a spoon remove idlis from the mold. Transfer to a plate.
- Serve rava idli with sambar and coconut chutney for breakfast or lunch.
Video
Notes
- Use ghee for preparing the tempering . It gives a nice taste to the idli.
- Allow roasted idli mixture to cool down completely before combining it with curd or water.
- The instant idli batter should be of dropping consistency and not thick or dry. To get the right consistency either use water or curd.
- Resting idli batter for a short span of time before mixing fruit salt/cooking soda helps semolina absorbing moisture and flavors in a better way and tend to produce moist, mouth-melting idlis.
- Try to use neutral-flavored cooking soda or fruit salt to avoid ending up with fruity tasting idlis.
- After adding fruit salt or baking soda do not mix it for too long. As soon the batter starts frothing pour spoonful of it in idli cavities (stand). Hence, it is important to keep the steamer ready beforehand.
- Steam the idli in the microwave for 5 minutes. And then allow them to sit in there for another one minute before opening the lid. Insert a toothpick and check for doneness. If not cooked, microwave for 1 - 2 minutes more.
- Microwave safe steamer does not require any preheating. But if you are using a gas steamer to make idlis than you need to heat water in the steamer before pouring the batter into the molds.
- Equipment Required: Microwave Safe Steamer ( Buy It Here )
- Heat water in a gas stove steamer or electric pressure cooker. Once the steam starts forming, add fruit salt in the idli batter and mix nicely.
- Fill each idli mold with the prepared paste. Then, gently place the idli stand or mold in the steamer or pressure cooker.
- Steam instant suji idli for 10 to 15 minutes. Later, insert a toothpick and check for doneness. Else steam for a few more minutes.
Nutrition
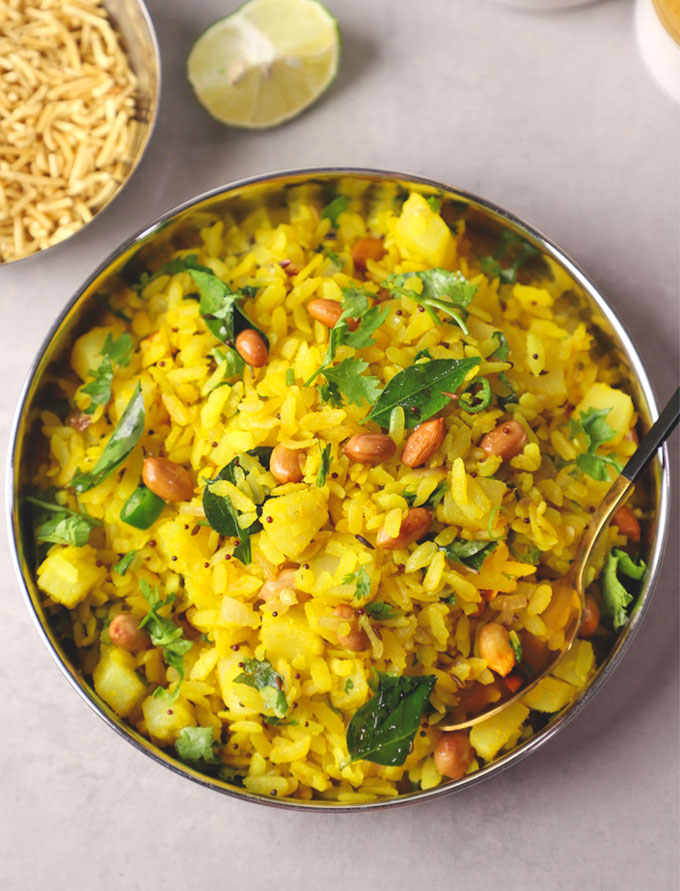
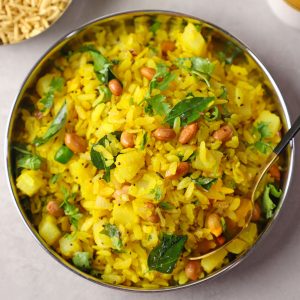
Kanda Poha is a staple in every Mumbaikar’s breakfast routine. It is a simple, comforting, healthy, and delicious vegetarian dish.
- About Kanda Poha
- Ingredients Required
- How To Make Kanda Poha
- My Tried and True Tips
- More Indian Breakfast Recipes
- Kanda Poha Recipe
Poha is one of the most loved vegetarian Indian dishes . It is served as a breakast and teatime snack There are many poha recipes followed across India – Banarsi Chura Matar, batata poha, masala poha, dahi chura, Indori poha, and so on. Each version of poha recipe is equally delicious and has a distinct taste.
About Kanda Poha
‘Kanda’ refers to onions in Marathi, while ‘Poha’ is flattened rice flakes.
In the bustling streets of Mumbai, often you will find a staple breakfast dish – Kanda Poha. It is made with onion, peanuts, green chilli, spices and flattened rice flakes (poha). A wholesome and fulfilling vegan and gluten free breakfast.
For local commuters catching a quick bite before work or a visitor exploring the city, Kanda Poha is always on top of the must-try breakfast. The dish never fails to provide comfort.

Ingredients Required
- Poha also known as flattened rice flakes is the key ingredient in this Indian recipe. Use thick texture, white flattened rice. It is sold as Thick Poha in supermarkets.
- Onion or kanda gives a delicious sweetness and sharpness to the poha.
- Peanuts gives crunch and protein value to the poha.
- Potato, Green Chilli, Curry Leaves, Fresh Coriander Leaves
- Tempering: Tiny black mustard seeds (choti rai), Cumin Seeds
- Seasoning: Salt, Granulated White Sugar, Turmeric Powder, Lemon Juice
- For cooking poha, use either refined vegetable oil, ghee, or groundnut oil.
How To Make Kanda Poha
Prepare Flattened Rice Flakes (Poha)
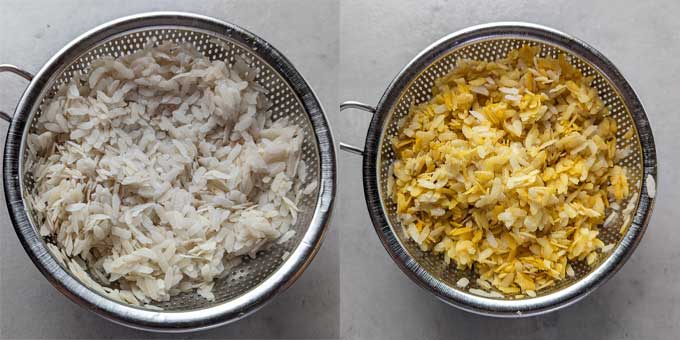
- Transfer rice flakes to a bowl. Soak them in water for 1 – 2 minutes. Be gentle to avoid breaking the flakes.
- Discard the water. Transfer rice flakes to a colander. Let the water drain thoroughly.
- Add turmeric powder. Mix nicely to coat each piece of rice flake with it.
Fry Potatoes:
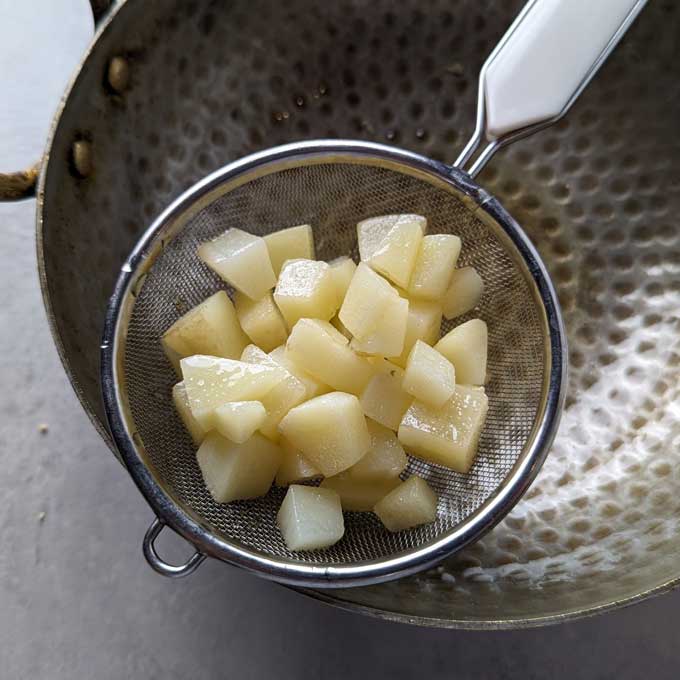
- Heat half of the oil in a kadhai over medium heat.
- Once oil is hot, add diced potatoes, fry and cook them till fully cooked. Transfer them to a plate and keep aside.
Tempering (Tadka):
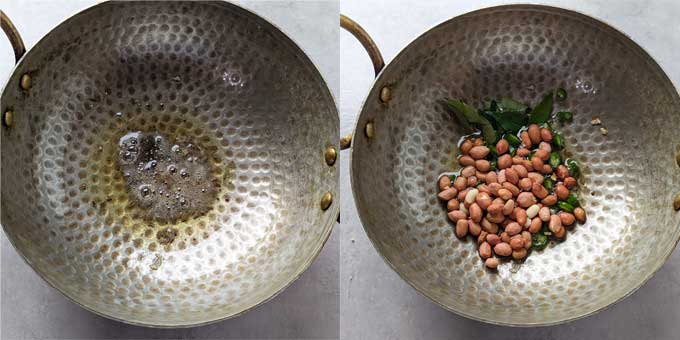
- Heat remaining oil in the same kadhai.
- Add cumin and mustard seeds. Once they start spluttering, add peanuts, green chilli, and curry leaves. Fry for 1 – 2 minutes.
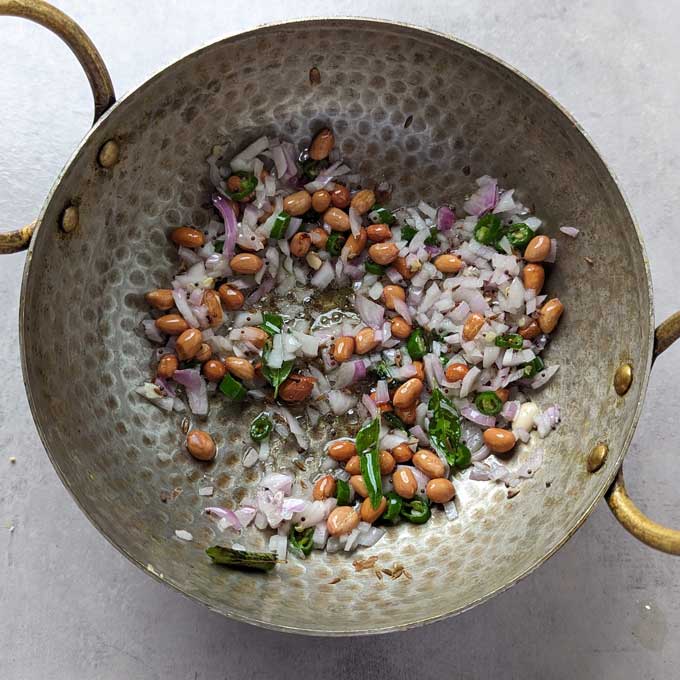
- Next add onion and fry until they turn translucent.
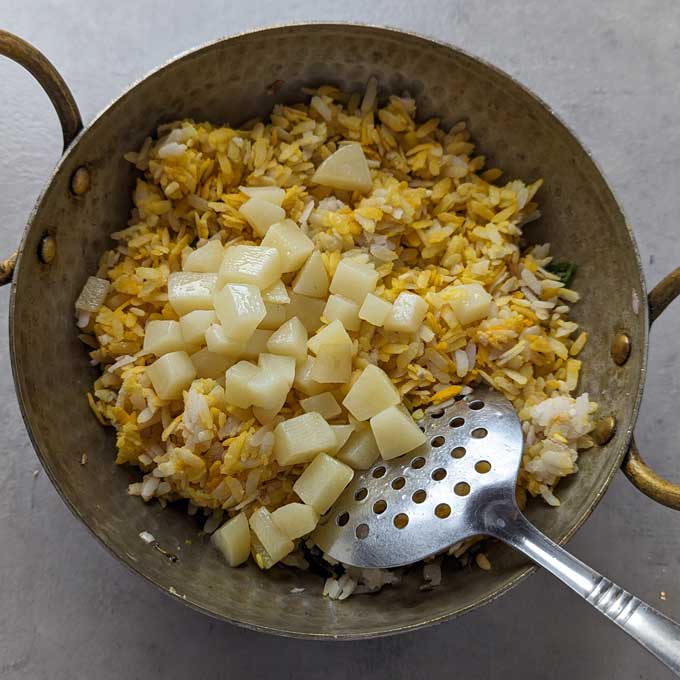
- Add the soaked poha to the kadhai along with fried potato, salt and sugar. Gently toss it until the poha is evenly coated with the spices. Be careful not to make it mushy.
- Now, add lemon juice, and chopped coriander leaves. Turn off the heat.
- Let kanda poha sit covered for 2 – 3 minutes for rice flakes to absorb all the flavour. Garnish with fresh coriander leaves.
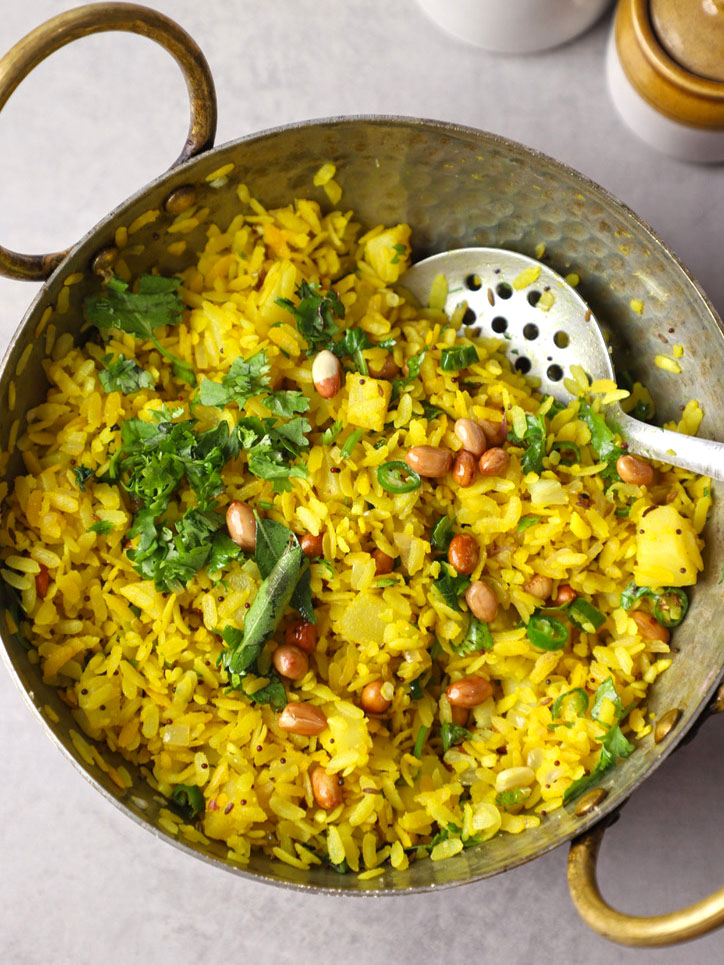
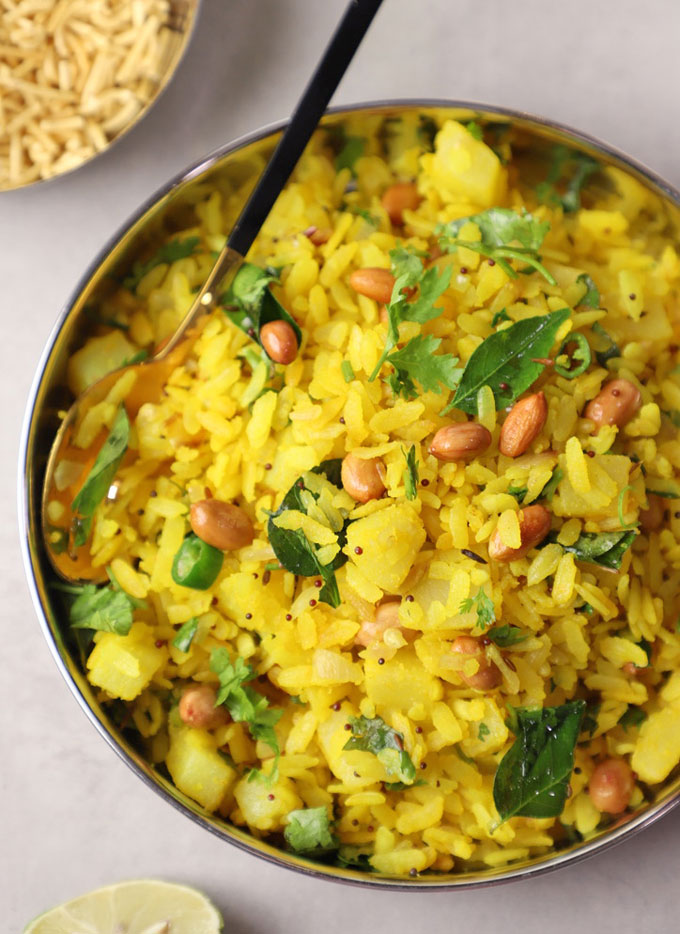
Serve hot with a wedge of lemon for that extra tangy kick. Whether enjoyed at a roadside stall, a local eatery, or at home, this humble Indian breakfast never fails to provide comfort.
My Tried and True Tips
- Use thick poha (jada poha) for the best texture. Thin poha tends to become mushy when soaked and cooked.
- Soak the rice flakes in water for 2 minutes instead of washing it under running water. Follow this tip for a soft and moist kanda poha.
- You can customize this kanda poha recipe by adding vegetables like peas, carrots, or potato for extra flavour and nutrition.
- Don’t skip the lemon and sugar; a good Kanda Poha has the perfect combination of sweet and savoury.
- Indian spices like red chilli powder and garam masala are not added in a Mumbai style poha.
- While soaking, draining or mixing make sure not to apply too much pressure on the rice flakes as they might break apart or become mushy.
More Indian Breakfast Recipes
- Rava Upma
- Besan Chilla
- Gobi Paratha
- Vermicelli Upma
- Sabudana Khichdi
Get all my Indian Breakfast Recipes here and you can watch the videos on Instagram .
Ingredients
- ▢ 2 Cup thick flattened rice flakes (poha)
- ▢ 1 teaspoon turmeric powder
- ▢ 2 tablespoon vegetable refined oil
- ▢ 1 large size potato, peeled and diced into small cubes
- ▢ 1 teaspoon black mustard seeds (rai)
- ▢ ½ teaspoon cumin seeds (jeera)
- ▢ ¼ Cup peanuts
- ▢ 1 medium size onion, finely chopped
- ▢ 2 green chillies, finely chopped
- ▢ 1 sprig curry leaves
- ▢ 1 teaspoon cooking salt or to taste
- ▢ ½ teaspoon powdered sugar
- ▢ 1 lemon, juiced
- ▢ handful of fresh coriander leaves, chopped
Instructions
- Transfer rice flakes to a bowl. Soak them in approximately 1 cup of water for 1 – 2 minutes. Be gentle to avoid breaking the flakes.
- Discard the water. Transfer rice flakes to a colander. Let the water drain thoroughly.
- Add turmeric powder. Mix nicely to coat each piece of rice flake with it.
- Heat half of the oil in a kadhai over medium heat. Once oil is hot, add diced potatoes, fry and cook them till fully cooked. Transfer them to a plate and keep aside.
- Heat remaining oil in the same kadhai. Add cumin and mustard seeds. Once they start spluttering, add peanuts, green chilli, and curry leaves. Fry for 1 – 2 minutes.
- Next add onion and fry until they turn translucent.
- Add the soaked poha to the kadhai along with fried potato, salt and sugar. Gently toss it until the poha is evenly coated with the spices. Be careful not to make it mushy.
- Now, add lemon juice, and chopped coriander leaves. Turn off the heat.
- Let kanda poha sit covered for 2 – 3 minutes for rice flakes to absorb all the flavour. Garnish with fresh coriander leaves.
- Serve Kanda Poha hot with a wedge of lemon for that extra tangy kick.
Recipe Notes:
- Kanda Poha is mild to medium spicy with a balanced flavour of sweet, savoury and sourness. Hence, do not add too many green chillies in it.
- You can add green peas also to the kanda poha.
- Ensure to dice the potatoes into small cubes.
Nutrition
We follow a strict NO SPAM Policy
