Learn how to make gluten-free Ragi Roti, a healthy and tasty traditional flatbread from Karnataka made with finger millet flour.
Estimated reading time: 6 minutes
- Ingredients You’ll Need
- How To Make Ragi Roti
- Serving Suggestion
- My Tried and True Tips
- Ragi Roti Recipe
The flatbread, made from ragi (finger millet) flour, is a staple in many Karnataka households. Ragi, known for its impressive nutritional profile, is a powerhouse of calcium, fibre, and essential minerals. Hence, you will find profound use of finger millet in various local dishes like ragi dosa and idli , ragi mudde, sweets, cakes , soup, or ambali.
Known as a “poor man’s grain” due to its affordability, ragi has a strong position in Indian kitchens for its superior nutritional value.
- High Calcium Content is essential for bone health.
- High Fibre content helps in digestion, managing blood sugar levels, and reducing cholesterol.
- High Iron Content is excellent for people with deficiencies, providing an ideal plant-based, natural supplement.
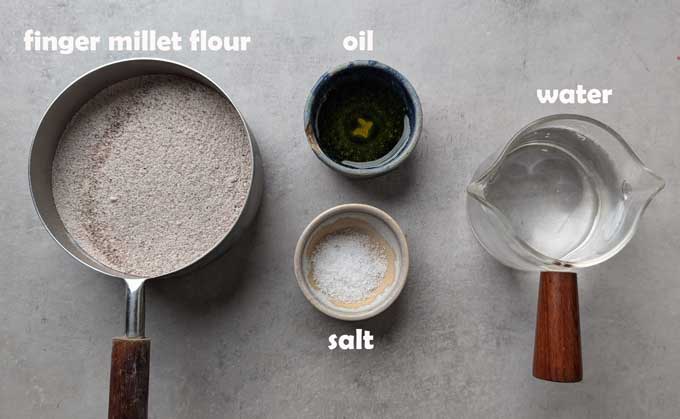
Ingredients You’ll Need
- Finger Millet (Ragi) Flour should be finely milled and not coarse in texture.
- Oil : Use either vegetable refined oil, ghee or coconut oil. It keeps the dough soft.
- Salt, Water
Optional Additions:
- Grated carrot , chopped coriander/spinach/methi/dill, or grated coconut for added flavour and nutrition.
How To Make Ragi Roti
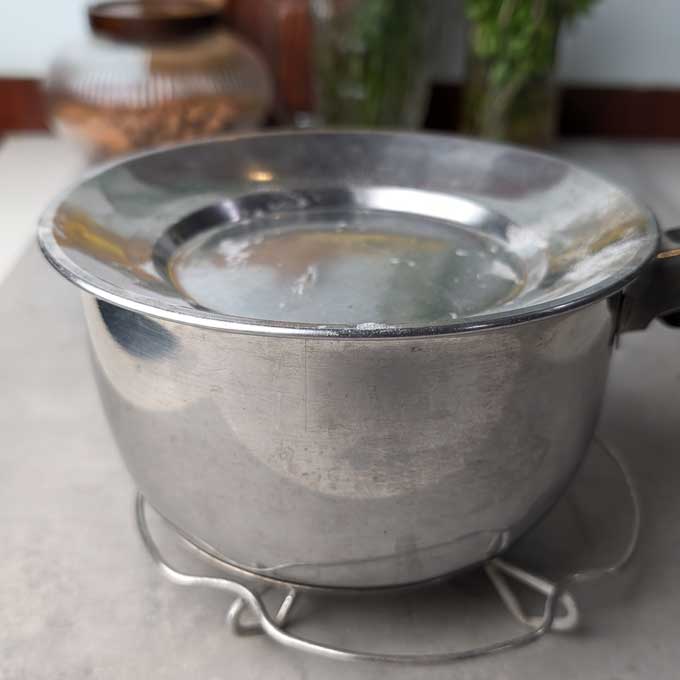
Step 1: Prepare the Dough
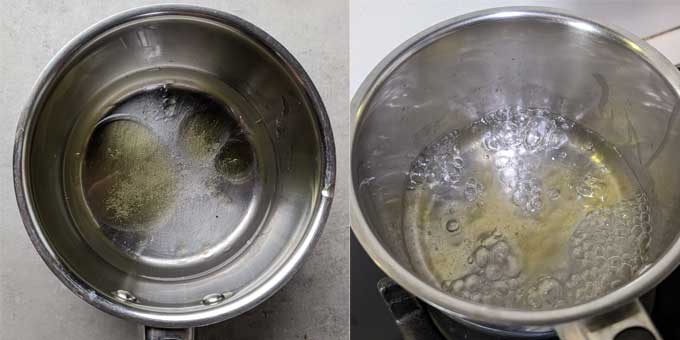
- Add water, salt, and oil to a wide saucepan. If you’re adding any extra ingredients, like grated carrots or greens, add them now.
- Bring it to a boil. Once the water starts boiling, turn off the heat.
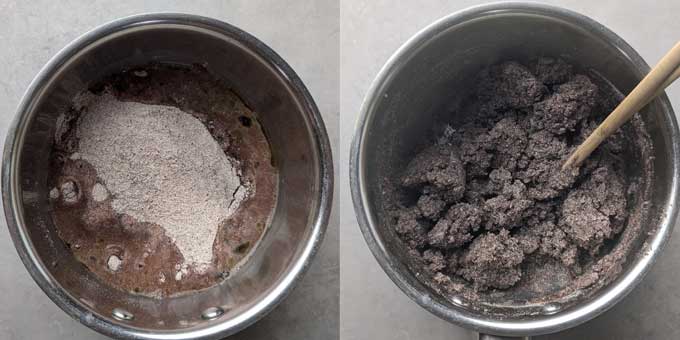
- Add ragi flour. Mix it using chopsticks or a wooden rolling pin. Cover and let it rest for 10 minutes.
- Once the dough becomes a little easier to handle, transfer it to a wide mixing bowl or clean, flat kitchen counter.
- Bring the dough together and form a smooth, pliable, non-sticky dough. Cover with a clean muslin cloth and let it rest for 10 minutes. This helps the ingredients blend better and makes the dough easier to work with.

Step 2: Shape the Rotis
- Divide the dough into small, equal-sized balls (about the size of a golf ball).
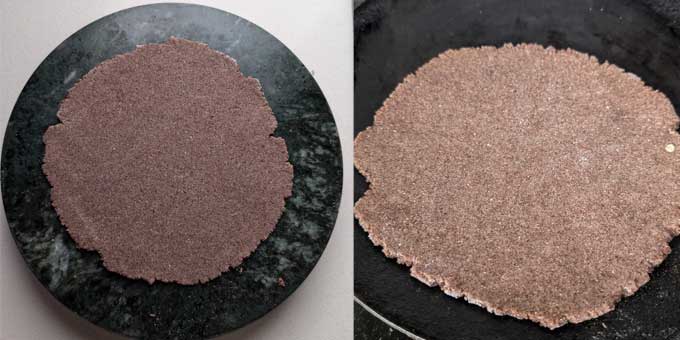
- Take one dough ball and place it on a flat surface. Ragi flour is gluten-free, so it doesn’t roll out as easily as wheat flour. You can either: Roll it between two pieces of parchment paper : Place the dough ball between two sheets and gently press or roll it out with a rolling pin. Flatten it with your hands : Use your fingers to gently press the dough out from the centre, forming a round shape (around 6 inches in diameter).
Step 3: Cook the Roti
- Heat a non-stick skillet or tawa on medium-high heat.
- Gently transfer the rolled-out ragi roti onto the skillet. Cook for 1-2 minutes until you see bubbles forming on the surface.
- Flip the roti, and cook for another 1 – 2 minutes on the other side.
- Press gently with the clean muslin cloth, especially on any uncooked spots, to ensure even cooking.
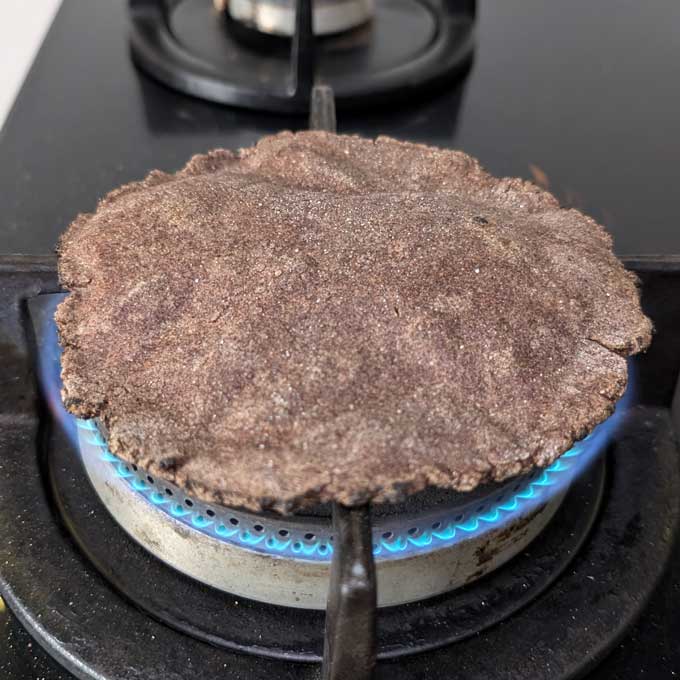
- Flip it back one more time, cooking for 30 seconds to 1 minute until both sides are well cooked with some brown spots. If you want you can puff it directly over the flame.
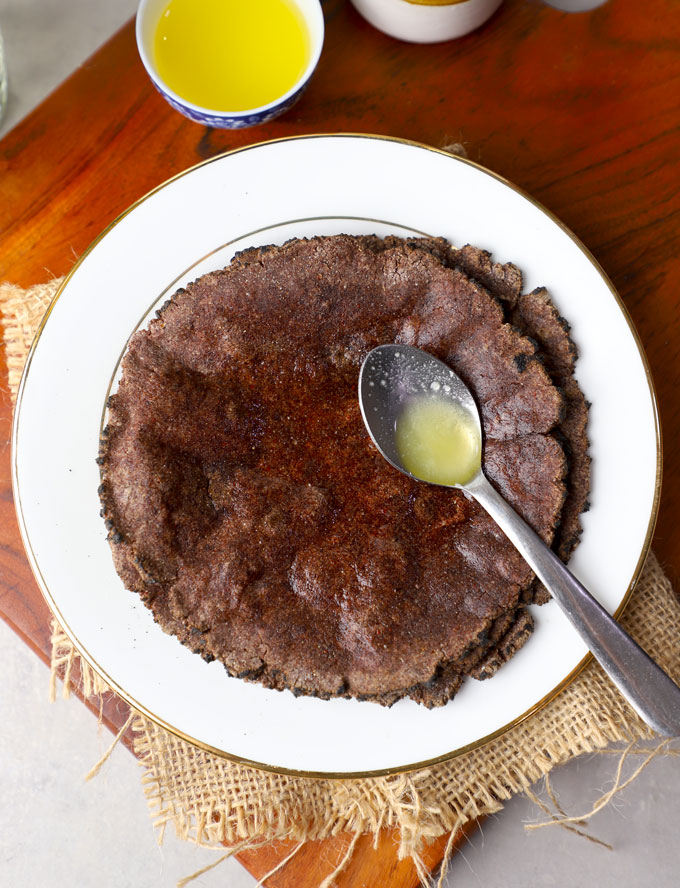
- Remove the roti from the skillet, smear a little bit of ghee (optional) and repeat the process for the remaining dough balls.

Serving Suggestion
Serve ragi roti as a side dish with Indian main course dishes, dals, and curries . It provides a delightful contrast to rich and flavorful gravy dishes.
Alternatively, use it to make wraps, tacos, or pizza.
My Tried and True Tips
- Measurements play a key role in binding a gluten-free dough – for perfect results request you to follow them to the tee.
- Use finely milled rice flour with a texture like an all-purpose flour.
- Start binding the dough while it is warm unlike, other roti recipes. This step will always yield soft ragi roti.
- Allow the dough to rest for 10 minutes after binding. It helps to hydrate the flour and improve its elasticity.
- If the dough becomes too sticky, add a little more ragi flour; if too dry, add a few drops of water.
- The process of making ragi roti is very similar to rice flour roti . You can watch the detailed video .
More Indian Bread Recipes
- Dal Paratha
- Gobi Paratha
- Methi Paratha
- Rice Flour Roti
- Whole Wheat Naan

Ingredients
- ▢ 1 Cup finger millet flour (ragi/nachini atta)
- ▢ 1 teaspoon refined oil
- ▢ ½ teaspoon salt or to taste
- ▢ 1 Cup water
Instructions
- Add water, salt, and oil to a wide saucepan. If you’re adding any extra ingredients, like grated carrots or greens, add them now.
- Bring it to a boil. Once the water starts boiling, turn off the heat.
- Add ragi flour. Mix it using chopsticks or a wooden rolling pin. Cover and let it rest for 10 minutes.
- Once the dough becomes a little easier to handle, transfer it to a wide mixing bowl or clean, flat kitchen counter.
- Bring the dough together and form a smooth, pliable, non-sticky dough. Cover with a clean muslin cloth and let it rest for 10 minutes. This helps the ingredients blend better and makes the dough easier to work with.
- Divide the dough into small, equal-sized balls (about the size of a golf ball). Take one dough ball and place it on a flat surface. Place the dough ball between two sheets of parchment paper and gently press or roll it out with a rolling pin.
- Heat a non-stick skillet or tawa on medium-high heat. Gently transfer the rolled-out ragi roti onto the skillet.
- Cook for 1-2 minutes until you see the surface puffing up. Flip the roti, and cook for another 1 – 2 minutes on the other side.
- Press gently with the clean muslin cloth, especially on any uncooked spots, to ensure even cooking. Flip it back one more time, cooking for 30 seconds to 1 minute until both sides are well cooked with some brown spots. If you want you can puff it directly over the flame.
- Remove the roti from the skillet, smear a little bit of ghee (optional) and repeat the process for the remaining dough balls.
- Serve ragi roti warm.
Recipe Notes:
- Add g rated carrot , chopped coriander/spinach/methi/dill/curry leaves, or grated coconut for flavour and nutrition to the dough.
- While binding, if the dough is hot, dip your fingers in room temperature water to easily handle the dough.
- While resting the dough, cover it, else it becomes dry and difficult to roll out.
- Ragi dough is not fridge-friendly. Hence, it is best to make a fresh batch each time you want to make chapati.
- You can watch the detailed video of rice flour roti . The process of making these gluten-free rotis is very similar.
Nutrition
We follow a strict NO SPAM Policy

Ragi Roti Recipe
Equipment
- Saucepan
- Mixing Bowl
Ingredients
- 1 Cup finger millet flour (ragi/nachini atta)
- 1 teaspoon refined oil
- ½ teaspoon salt or to taste
- 1 Cup water
Instructions
- Add water, salt, and oil to a wide saucepan. If you’re adding any extra ingredients, like grated carrots or greens, add them now.
- Bring it to a boil. Once the water starts boiling, turn off the heat.
- Add ragi flour. Mix it using chopsticks or a wooden rolling pin. Cover and let it rest for 10 minutes.
- Once the dough becomes a little easier to handle, transfer it to a wide mixing bowl or clean, flat kitchen counter.
- Bring the dough together and form a smooth, pliable, non-sticky dough. Cover with a clean muslin cloth and let it rest for 10 minutes. This helps the ingredients blend better and makes the dough easier to work with.
- Divide the dough into small, equal-sized balls (about the size of a golf ball). Take one dough ball and place it on a flat surface. Place the dough ball between two sheets of parchment paper and gently press or roll it out with a rolling pin.
- Heat a non-stick skillet or tawa on medium-high heat. Gently transfer the rolled-out ragi roti onto the skillet.
- Cook for 1-2 minutes until you see the surface puffing up. Flip the roti, and cook for another 1 – 2 minutes on the other side.
- Press gently with the clean muslin cloth, especially on any uncooked spots, to ensure even cooking. Flip it back one more time, cooking for 30 seconds to 1 minute until both sides are well cooked with some brown spots. If you want you can puff it directly over the flame.
- Remove the roti from the skillet, smear a little bit of ghee (optional) and repeat the process for the remaining dough balls.
- Serve ragi roti warm.
Notes
- Add g rated carrot , chopped coriander/spinach/methi/dill/curry leaves, or grated coconut for flavour and nutrition to the dough.
- While binding, if the dough is hot, dip your fingers in room temperature water to easily handle the dough.
- While resting the dough, cover it, else it becomes dry and difficult to roll out.
- Ragi dough is not fridge-friendly. Hence, it is best to make a fresh batch each time you want to make chapati.
- You can watch the detailed video of rice flour roti . The process of making these gluten-free rotis is very similar.
Nutrition
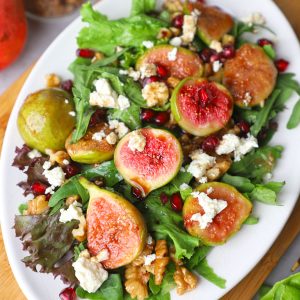
This roasted fig salad recipe with toasted walnuts and feta cheese is a great way to use fresh, seasonal figs and is perfect for everything from a light lunch to a festive dinner menu.
Estimated reading time: 4 minutes
- Why This Salad Works
- Ingredients You’ll Need
- How To Make Fig Salad
- Roasted Fresh Fig Salad Recipe
Why This Salad Works
- The combination of flavours and textures makes this fig salad a showstopper. The roasted fresh figs add natural sweetness and a soft, juicy texture, which contrasts beautifully with the crunch of the toasted walnuts, and the creaminess of the cheese.
- The balsamic dressing ties everything together , balancing the sweet and savoury elements with its acidity.
- The steps are straightforward, but the result is elegant , flavourful, and full of good nutrients. Whether you’re making it for a family dinner, a festive gathering, or just for lunch, this fig salad never fails to impress.
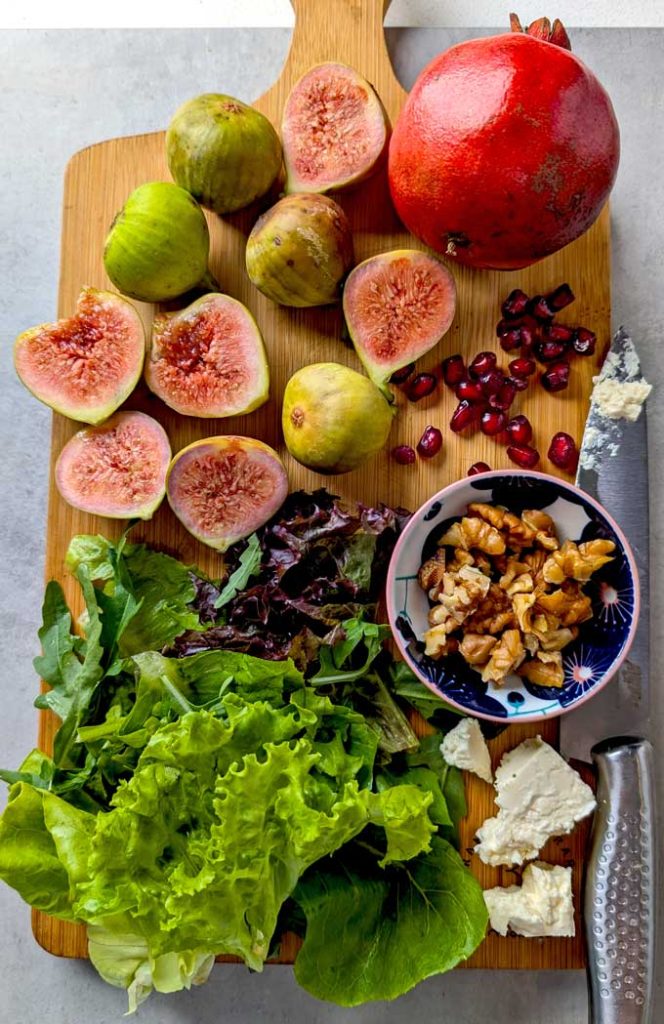
Ingredients You’ll Need
- Fresh Figs that are ripe and unblemished with clean outer skin.
- Mixed Salad Greens like lettuce, arugula, baby spinach work well.
- Nuts like walnuts, pecan, pine or Brazilian are perfect for the crunch.
- Soft Cheese like goat, feta, or ricotta are a good choice for this salad.
- Pomegranate adds crunch and sweetness to the salad.
- Salad Dressing is a mix of extra virgin olive oil, balsamic vinegar, honey, salt, and crushed pepper.
Recipe Variations
- Add Protein like grilled chicken, seared shrimp, or slices of prosciutto.
- Herbs and Greens : Experiment with different greens and fresh herbs. Fresh mint or basil leaves can add a refreshing, aromatic quality to the salad.
- Vegan Version : Substitute the cheese with a dairy-free option and replace the honey in the salad dressing with agave or maple syrup.
How To Make Fig Salad
Step 1: Pan Roast figs and walnuts
- Pan-roasting the figs will intensify their natural sweetness and add a caramelized note to the salad.
- Heat olive oil in a skillet over medium heat.
- Place the figs in the pan, cut side down, and sprinkle a pinch of salt. If you prefer drizzle a teaspoon of honey or balsamic vinegar over the figs while roasting.
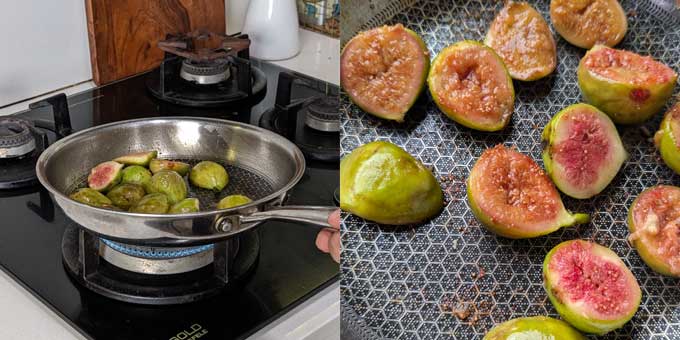
- Allow the figs to cook for about 2-3 minutes, or until they start to caramelize and become soft and juicy. Then, flip them over gently and cook for an additional 1-2 minutes. Be careful not to overcook, as they can quickly become too soft.
- Remove the figs from the pan and set them aside to cool slightly.
- In the same skillet (no need to wash it), toast the walnuts without oil over medium-low heat for about 2 – 3 minutes.
Step 2: Prepare Salad Dressing
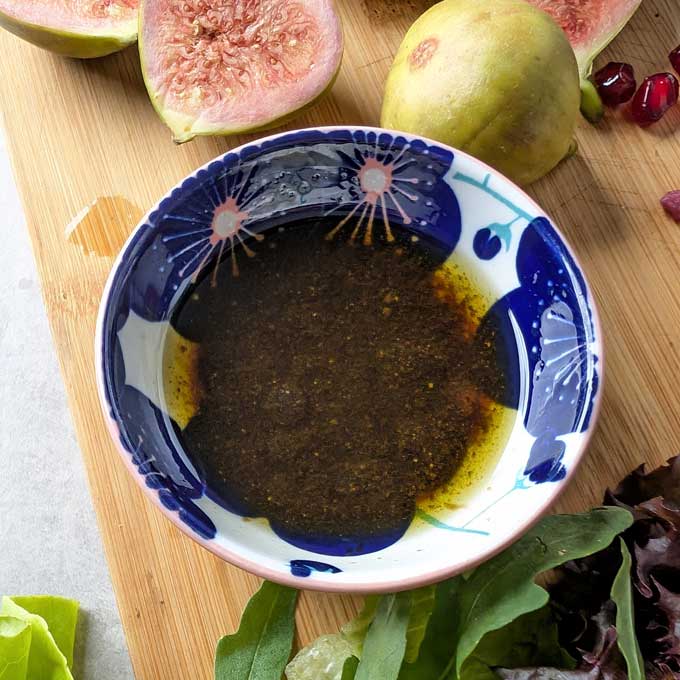
- In a small bowl or jar, whisk together the olive oil, balsamic vinegar, honey, salt, and pepper. Adjust the seasoning to taste, and set the dressing aside.
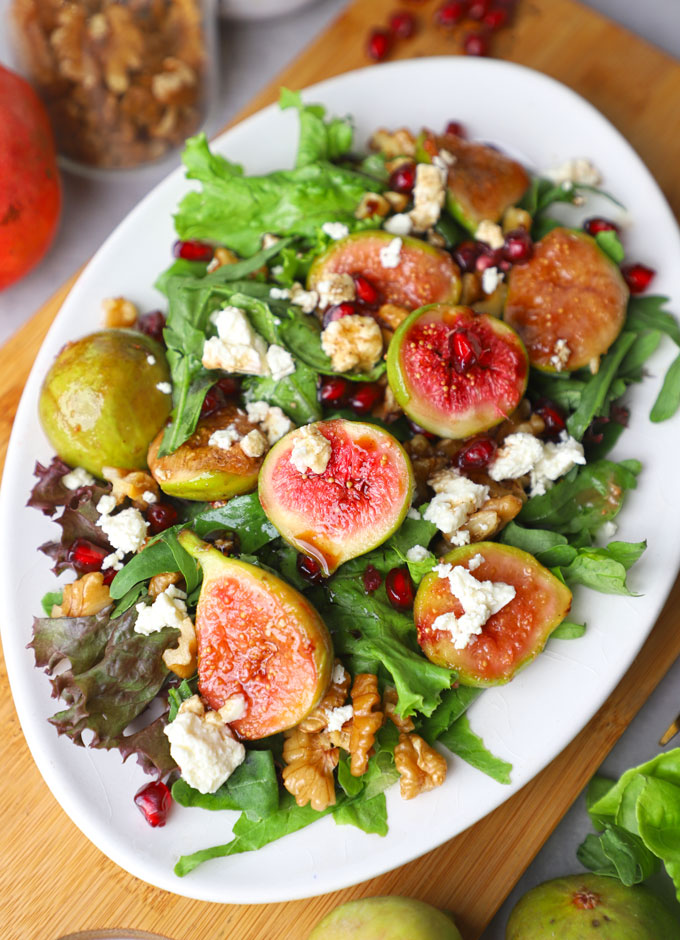
Step 3: Assemble the Salad
- Arrange the mixed greens on a large platter or bowl.
- Drizzle half of the dressing and gently toss the salad greens.
- Add the roasted figs, toasted walnuts, crumbled cheese, and pomegranate.
- Drizzle the remaining dressing over the salad.
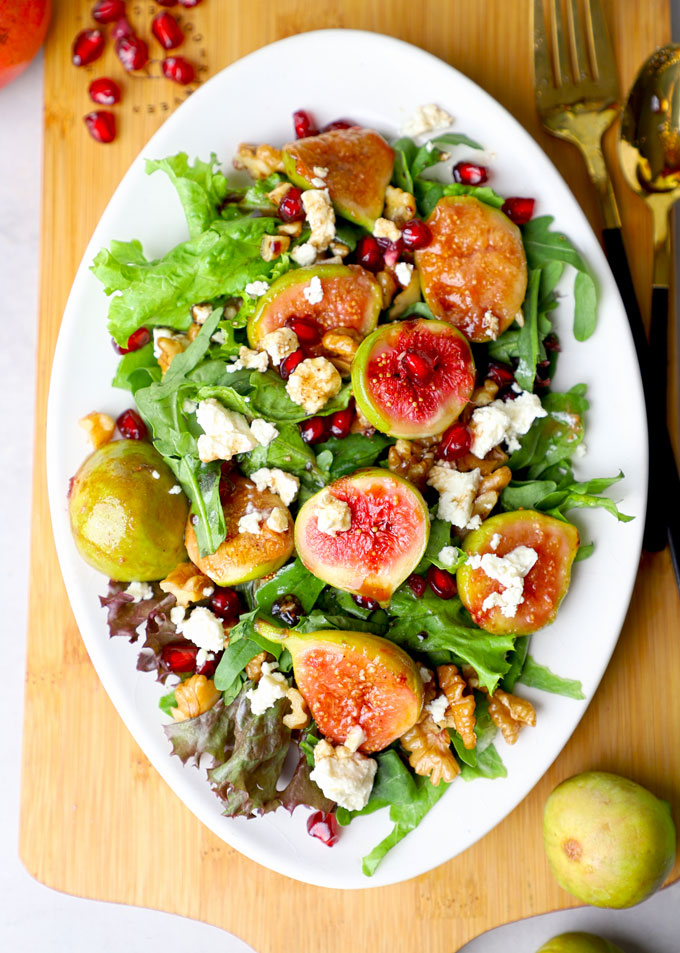
Serve this salad as a standalone dish for a light lunch or pair it with a hearty main course. It complements grilled chicken or fish, mushroom pasta , zucchini fritters , a cosy bowl of minestrone soup or lentil stew beautifully .
More Salad Recipes
- Pomelo Salad
- Orange Salad
- Fattoush Salad
- Cherry Tomato Salad
- Healthy Cabbage Salad
Get all my Salad Recipes here and you can watch the videos on Instagram .
Ingredients
- ▢ 6 – 8 fresh figs cut into halves, ripe
- ▢ ½ teaspoon olive oil
- ▢ ¼ teaspoon salt
- ▢ 2 Cup mixed salad greens
- ▢ ¼ Cup coarsely chopped walnuts
- ▢ ¼ Cup pomegranate
- ▢ 2 tablespoon feta cheese, crumbled
Ingredients For Salad Dressing
- ▢ 3 tablespoon extra virgin olive oil
- ▢ 1 tablespoon balsamic vinegar
- ▢ 1 teaspoon honey or maple syrup
- ▢ Salt and black pepper to taste
Instructions
- Pan-roasting the figs will intensify their natural sweetness and add a caramelized note to the salad.
- Heat olive oil in a skillet over medium heat.
- Place the figs in the pan, cut side down, and sprinkle a pinch of salt. If you prefer drizzle a teaspoon of honey or balsamic vinegar over the figs while roasting.
- Allow the figs to cook for about 2-3 minutes or until they start to caramelize and become soft and juicy. Flip them over gently and cook for an additional 1-2 minutes. Be careful not to overcook, as they can quickly become too soft.
- Remove the figs from the pan and set them aside to cool slightly.
- In the same skillet (no need to wash it), toast the walnuts without oil over medium-low heat for about 2 – 3 minutes.
- In a small bowl or jar, whisk together the olive oil, balsamic vinegar, honey, salt, and pepper. Adjust the seasoning to taste, and set the dressing aside.
- Arrange the mixed greens on a large platter or bowl. Drizzle half of the dressing and gently toss the salad greens.
- Add the roasted figs, toasted walnuts, crumbled cheese, and pomegranate. Drizzle the remaining dressing over the salad.
- Serve fig salad as a lunch or main course.
Recipe Notes:
- Do not cook the figs or walnuts for too long else they will become dry.
- Allow figs to cool down a bit before mixing with the salad greens.
Nutrition
We follow a strict NO SPAM Policy
