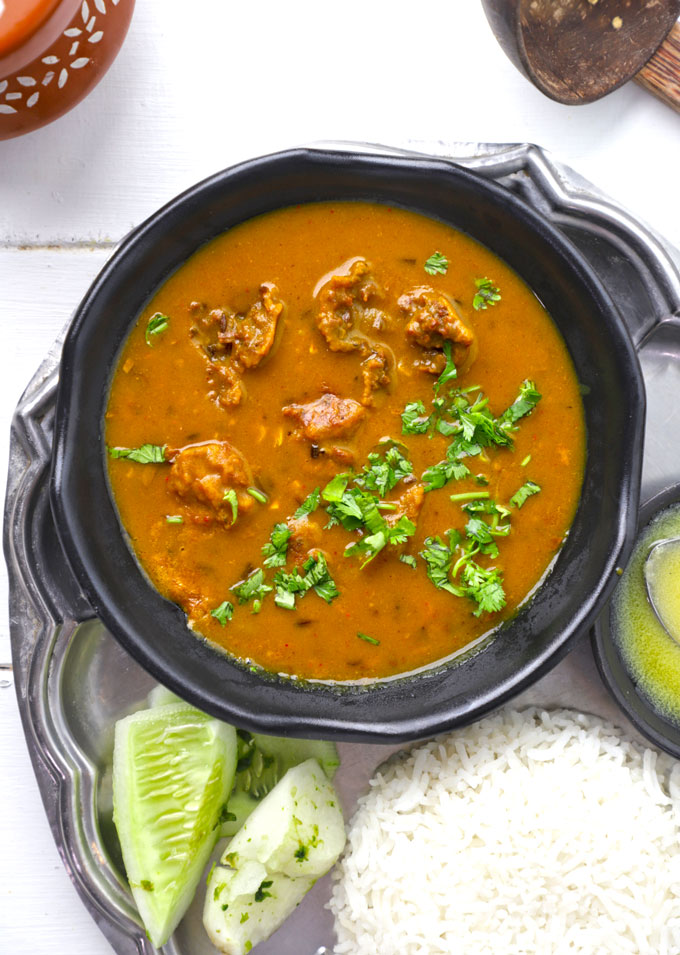
Badi Ki Sabji is a Kumaoni-style vegetarian main course dish from Uttarakhand made with dal vadi. I am sharing a family heirloom badi bhaat recipe without onion and tomato.
What is Pahadi Badi?
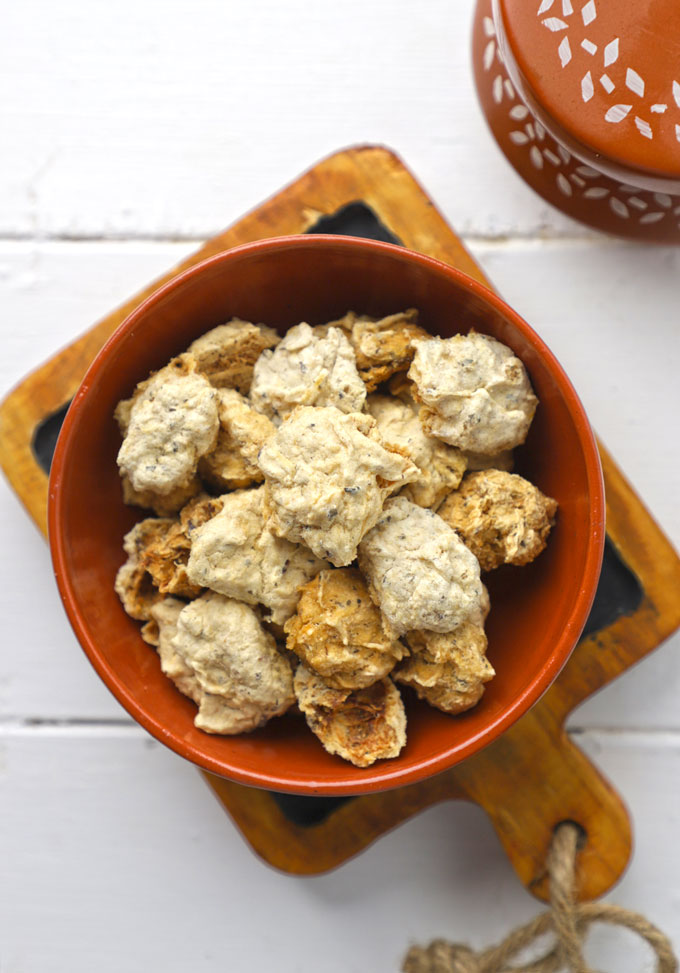
Badi is a sun-dried, vegetarian lentil nugget. It is known as dal vadi or vadiyan in other Indian local dialects. Vadi is usually pronounced as Badi in the pahadi dialect, and the whole dish, when served with rice, is called Badi – Bhaat (Rice) or Badi Ki Sabji.
The making process of Pahadi badi is very similar to Punjabi vadiyan but with minimal spices and ingredients. Pahadi Badi is more like a sattvic ingredient.
When I asked my mom the reason behind making these lentil nuggets and storing them, she explained during earlier days, life was not so easy in the foothill of the Himalayas.
The natural produce was limited due to harsh weather and confined resources, during the season when lentils are in abundance Pahadi ladies make lentil nuggets, sundry them in the soft winter sun and store it for the coming bad days, that is how making and storing of badi got so popular over the entire Kumaun region.
Over the years it has become a Kumaoni tradition , and every household follows it like a yearly ritual by making a small batch of dal badi every year. Sadly the art is slowly dying. This post is my ode to all the Pahadi ladies who been making badi from years just to keep this tradition alive.
How To Get Pahadi Badi
I have grown up in the era where I have seen my mother and aunts grinding lentil for the badi in stone mortar and pestle for hours and my great grandmother sitting close by to provide her experienced guidance to do it perfectly.
In those days without any food processor my mother used to grind 3 – 4 kgs of lentil, shape them manually into equal size nuggets and then arrange them neatly in giant sized trays. Our only contribution as a kid was to take those giant trays to the terrace for sun drying.
Today I have capitulated to this metro life and do not even dare to make my own batch of Pahadi badi at home. I get my yearly supply of it from my mother. Nowadys, few online portals from Uttarakhand sell them, or you can buy them from local shops during your visit to the region.
Ingredients Required
Pahadi Badi or dried lentil nuggets are the key ingredient of this badi ki sabji. It is vegan, and gluten free. You can make this curry with any other dal vadi also.
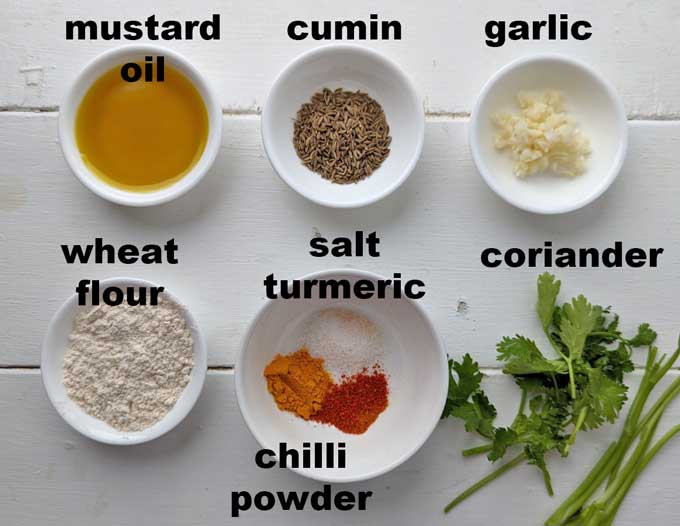
Flour: Whole Wheat Flour thickens the curry and gives it a delicious nutty, roasted taste without using onion, ginger, or tomato.
My Special Ingredients : Finely chopped coriander stalks and garlic are my two star ingredients of this badi ki sabji recipe. However, you can skip adding them as the authentic Pahadi badi has non of these two ingredients.
Seasoning: Salt, Cumin Seeds, Chilli Powder, Turmeric
Oil: I prefer the robust taste of mustard oil. You can use either flavourless refined oil or ghee to make badi ki sabji
Water and Coriander Leaves
How To Make
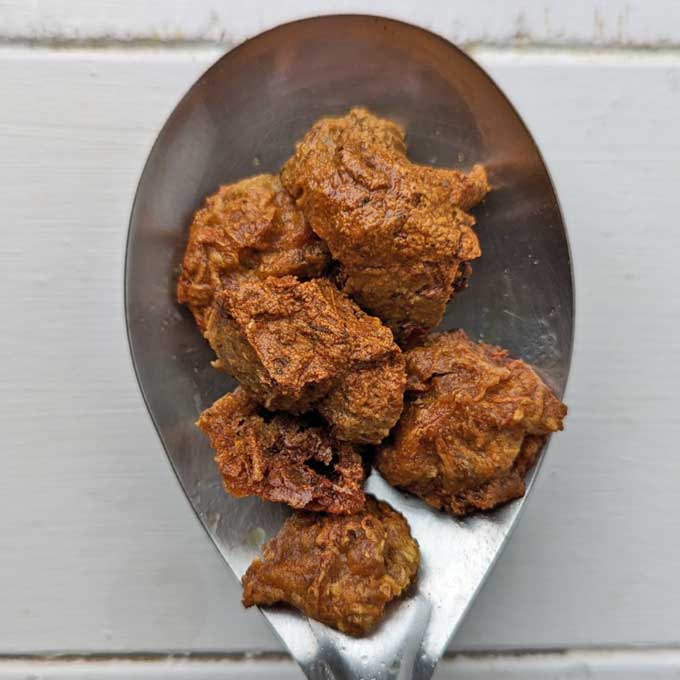
Step 1) Heat 2 tablespoons of oil in a kadhai. Fry badi (vadi) over low heat till they become deep brown from all sides. Transfer them to a plate and set aside.
Step 2) In the same kadhai heat remaining mustard oil. Once the oil is hot, add cumin seeds, chopped garlic, and coriander stalks. Fry them for 30 – 40 seconds or till garlic is nicely roasted.
Step 3) Add flour, and start roasting it over low heat until it turns light golden and a nutty, roasted aroma is released. Add spices, salt, and stir to combine.
Step 4) Now, slowly add water and from the other hand continuously stir the curry in circular clockwise motion to avoid lump formation.
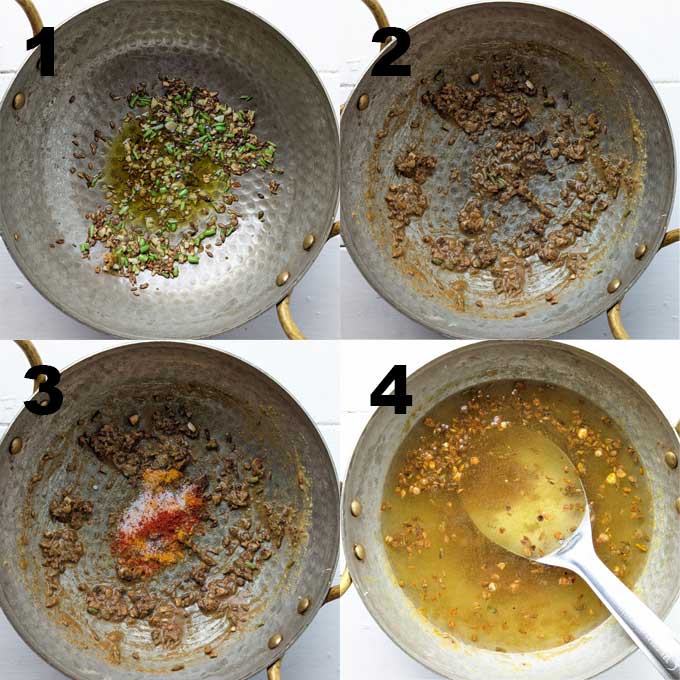
Step 5) Add fried badi into the curry. Bring the badi ki sabji to a boil over high heat, now let it simmer over low heat for the next 20 minutes, stirring at regular intervals. You will notice after sometime the curry is thick, luscious, reduced to half, and a thick layer starts forming on top. That is the signal badi ki sabji is ready.
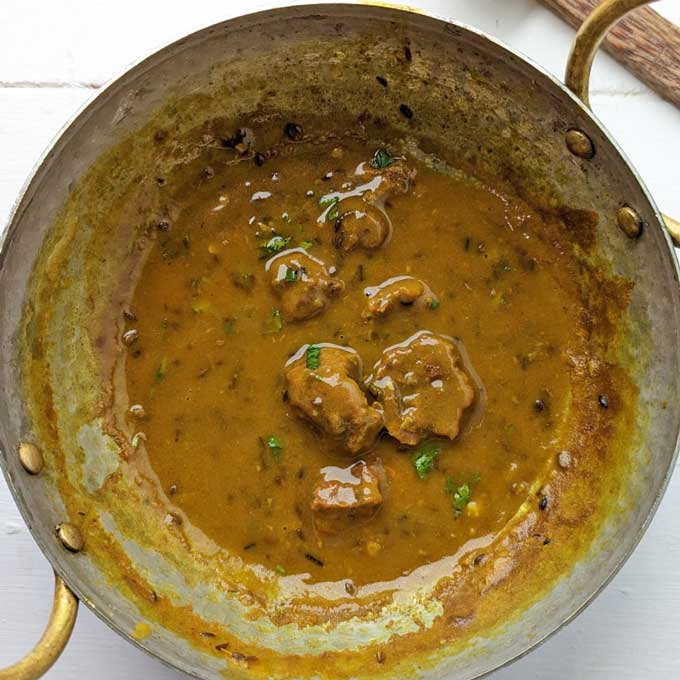
Add chopped coriander leaves and a tablespoon of ghee (optional). Serve badi bhaat warm.
Serving Suggestion
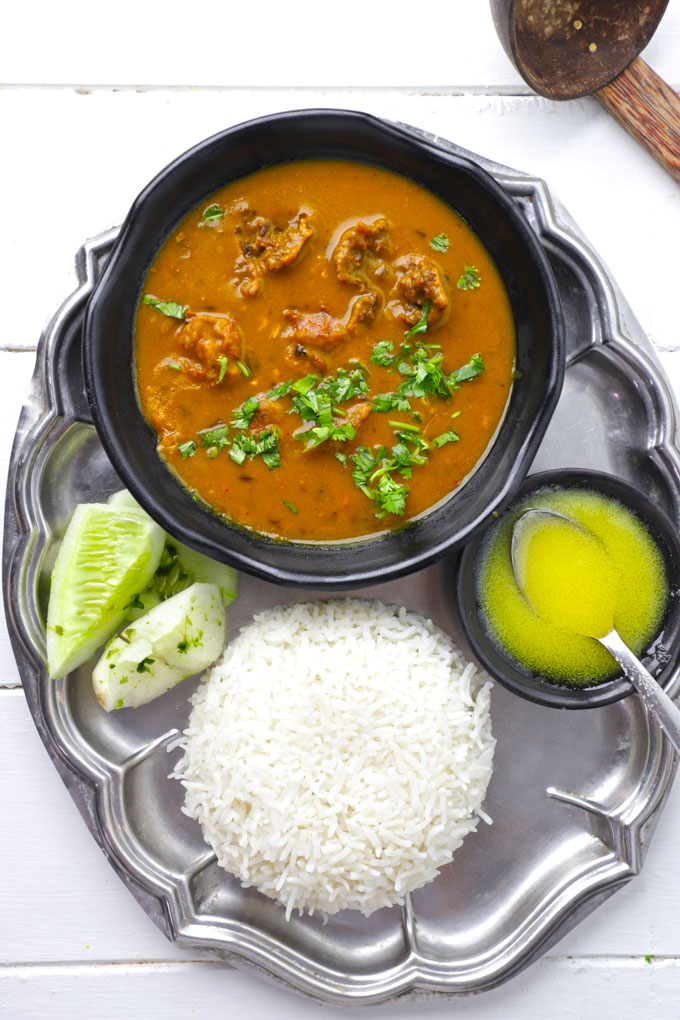
Badi Ki Sabji is a Kumaoni style main course dish mainly served with plain white rice (bhaat). If you are planning to make a Kumaoni thali, then serve Pahadi Badi Ki Sabji with rice, arhar dal fry , local radish salad and loads of ghee on the side.
Store leftover badi curry in the refrigerator for 3 – 4 days. While reheating add little water as with time the consistency of the curry thickens.
More Pahadi Kumaoni Recipes
- Mooli Ki Jholi
- Aloo Ke Gutke
- Kheere Ka Raita
- Kumaoni Dal Bada
- Pahadi Aloo Paani
- Pahadi Gahat Ki Dal
- Pahadi Lai Ki Sabzi
If you try this recipe and love it, please leave a comment and a rating. This helps us grow and reach other food lovers like you.

Ingredients
- ▢ 8 dried Pahadi badi (vadi)
- ▢ 6 tablespoon mustard oil
- ▢ 1 teaspoon cumin seeds (jeera)
- ▢ 1 teaspoon finely chopped garlic (optional)
- ▢ 1 tablespoon finely chopped coriander stalks
- ▢ 2 tablespoon whole wheat flour (gehun atta)
- ▢ 1 teaspoon salt or to taste
- ▢ 1 teaspoon red chili powder
- ▢ ½ teaspoon turmeric powder
- ▢ 3 Cup water
- ▢ 2 tablespoon finely chopped coriander
Instructions
- Heat 2 tablespoons of oil in a kadhai. Fry badi (vadi) over low heat till they become deep brown from all sides. Transfer them to a plate and set aside.
- In the same kadhai heat remaining mustard oil. Once the oil is hot, add cumin seeds, chopped garlic, and coriander stalks. Fry them for 30 – 40 seconds or till garlic is nicely roasted.
- Add flour, and start roasting it over low heat until it turns light golden and a nutty, roasted aroma is released. Add spices, salt, and stir to combine.
- Now, slowly add water and from the other hand continuously stir the curry in circular clockwise motion to avoid lump formation.
- Add fried badi into the curry.
- Bring the badi ki sabji to a boil over high heat, now let it simmer over low heat for the next 20 minutes, stirring at regular intervals. You will notice after sometime the curry is thick, luscious, reduced to half, and a thick layer starts forming on top. That is the signal badi ki sabji is ready.
- Add chopped coriander leaves and a tablespoon of ghee (optional).
- Serve badi bhaat warm for lunch.
Recipe Notes:
- Do not fry badi over high heat. They will turn golden from outside and remain uncooked from inside.
- Do not rush the process of frying flour. It is a key step of the recipe. Fry over low heat, and stir it continuously to avoid burning of the flour.
- Adding garlic is optional. In the original recipe of my family, there is no garlic. But I like the taste of it in my badi ki sabji.
Nutrition
We follow a strict NO SPAM Policy

Pahadi Badi Ki Sabji Recipe
Equipment
- Heavy Bottom Kadhai
Ingredients
- 8 dried Pahadi badi (vadi)
- 6 tablespoon mustard oil
- 1 teaspoon cumin seeds (jeera)
- 1 teaspoon finely chopped garlic (optional)
- 1 tablespoon finely chopped coriander stalks
- 2 tablespoon whole wheat flour (gehun atta)
- 1 teaspoon salt or to taste
- 1 teaspoon red chili powder
- ½ teaspoon turmeric powder
- 3 Cup water
- 2 tablespoon finely chopped coriander
Instructions
- Heat 2 tablespoons of oil in a kadhai. Fry badi (vadi) over low heat till they become deep brown from all sides. Transfer them to a plate and set aside.
- In the same kadhai heat remaining mustard oil. Once the oil is hot, add cumin seeds, chopped garlic, and coriander stalks. Fry them for 30 - 40 seconds or till garlic is nicely roasted.
- Add flour, and start roasting it over low heat until it turns light golden and a nutty, roasted aroma is released. Add spices, salt, and stir to combine.
- Now, slowly add water and from the other hand continuously stir the curry in circular clockwise motion to avoid lump formation.
- Add fried badi into the curry.
- Bring the badi ki sabji to a boil over high heat, now let it simmer over low heat for the next 20 minutes, stirring at regular intervals. You will notice after sometime the curry is thick, luscious, reduced to half, and a thick layer starts forming on top. That is the signal badi ki sabji is ready.
- Add chopped coriander leaves and a tablespoon of ghee (optional).
- Serve badi bhaat warm for lunch.
Notes
- Do not fry badi over high heat. They will turn golden from outside and remain uncooked from inside.
- Do not rush the process of frying flour. It is a key step of the recipe. Fry over low heat, and stir it continuously to avoid burning of the flour.
- Adding garlic is optional. In the original recipe of my family, there is no garlic. But I like the taste of it in my badi ki sabji.
Nutrition
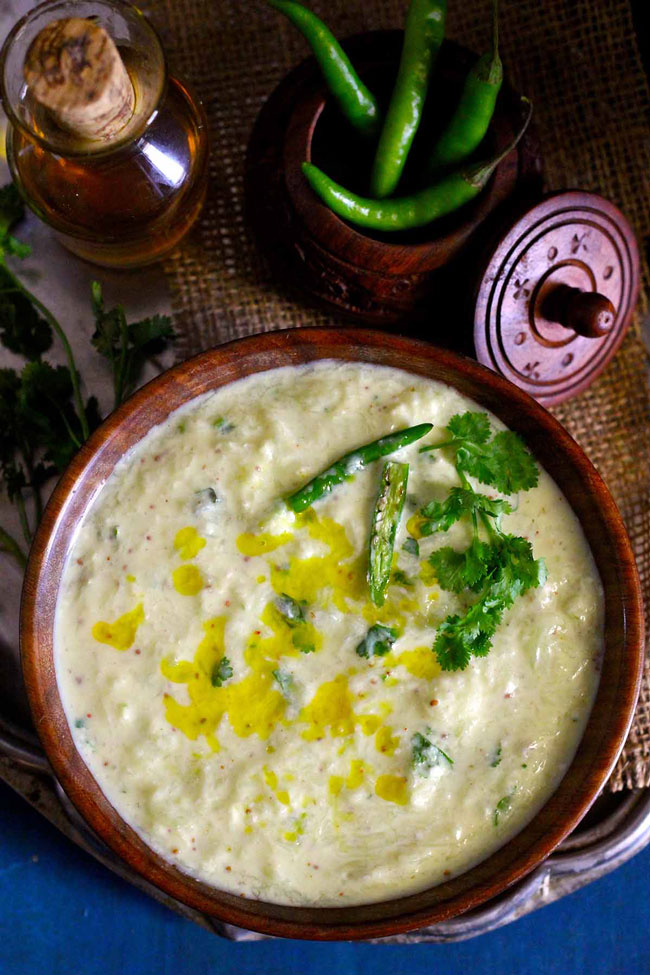
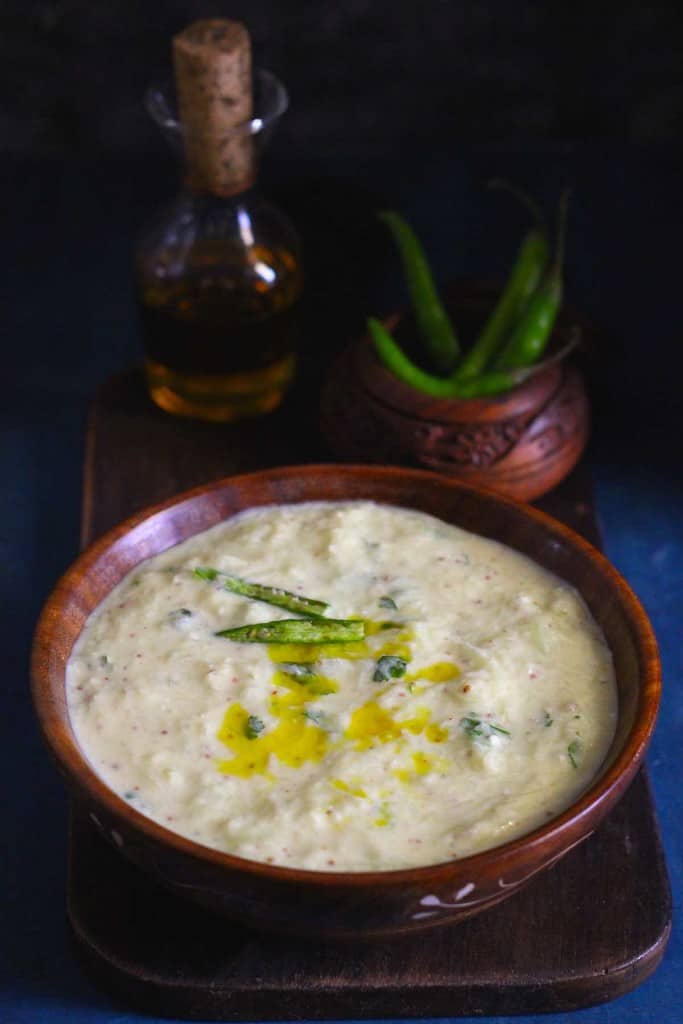
Kumaoni Raita is a delicious cucumber raita from Uttarakhand. It’s spicy, tangy, and full of flavours. It is known as Pahadi kheere ka raita.
Famous Kumaoni Raita
Kumaon Hills are nestled in the foothills of the Himalayas in Uttarakhand, India. They are bestowed with a maze of mountains, lush greenery, and breathtaking landscapes.
The region’s culture, cuisine, and rich heritage remain untold. However, many renowned food historians and novelists have captured the essence of the Kumaoni cuisine in their writings.
If you have visited Kumaon’s lush green hill stations, such as Nainital or Ranikhet , you might taste the famous Kumaoni Raita with aloo ke gutke . It is a quintessential part of Kumaoni cuisine.
Kumaoni Raita has a very unique taste and texture. It is spicy, zingy, and has a thick, luscious texture. It is also one of the most popular street food across the Kumaon region. You can call it Pahadi raita, Kumaoni raita, kheere ka raita, or kakdi ka raita.
The first taste impression of Kumaoni Raita is like a hit of the strong taste, and not subtle at all. And it might be possible due to the robust flavour of mustard, and it might not be a love-at-first-bite kind of dish. Eventually, your palate starts developing a kind of affection with this rare sapor.
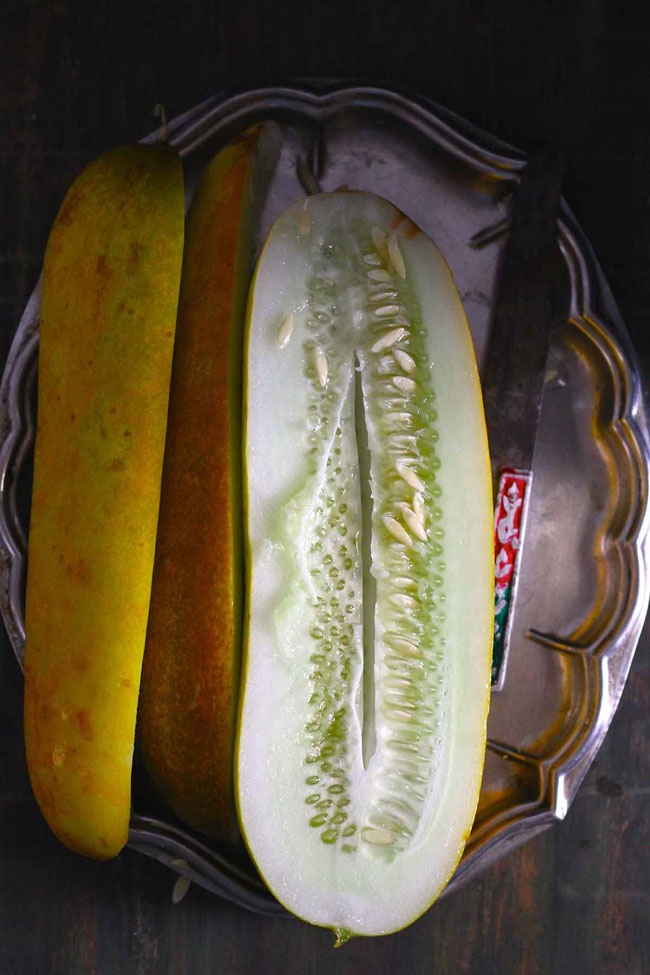
About Pahadi Cucumber
To make the Kumaoni raita, on e needs the giant yellowish skin tone local cucumber variety . It is also known as Pahadi kheera.
You can use the regular big-size Indian cucumber for making Kumaoni raita.
The other predominant flavour in the pahadi raita is tiny pale yellow local mustard seeds known as bachha rai or lai . These mustard seeds are combined with mustard oil and green chilli to escalate the flavours of raita to a new high.
While travelling across the region, you can buy this local cucumber and mustard from the markets.
Other Ingredients
- Curd
- Green Chilli and Coriander
- Salt, Turmeric, Mustard Oil
How To Make
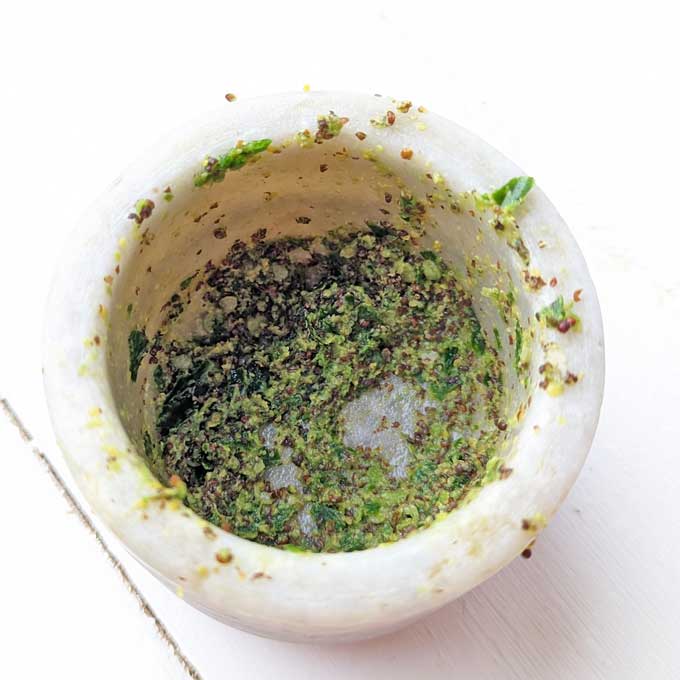
Step 1) Add mustard seeds, green chilli, and salt in a stone mortar and pestle. Grind to a coarse paste. Or you can use a tiny blender as well for the purpose. Transfer the paste to a bowl and set it aside.
Step 2) Peel and cut the cucumber lengthwise into half. Remove the seeds from each piece using a spoon. Grate the cucumber, and squeeze out all the liquid from the grated cucumber using a muslin cloth. Set aside in a bowl.
Step 3) Whisk curd to get a smooth consistency. Use approximately ¼ cup of water to get the desired consistency. Kumaoni Kheere ka raita is usually on the thicker side.
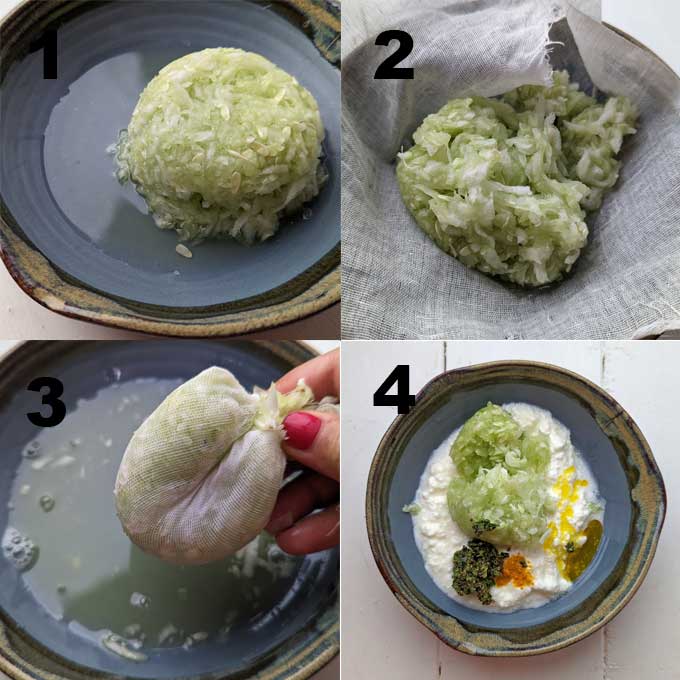
Step 4) Add the mustard paste to the whisked curd, grated cucumber, mustard oil, coriander leaves, salt, and turmeric. Mix nicely.
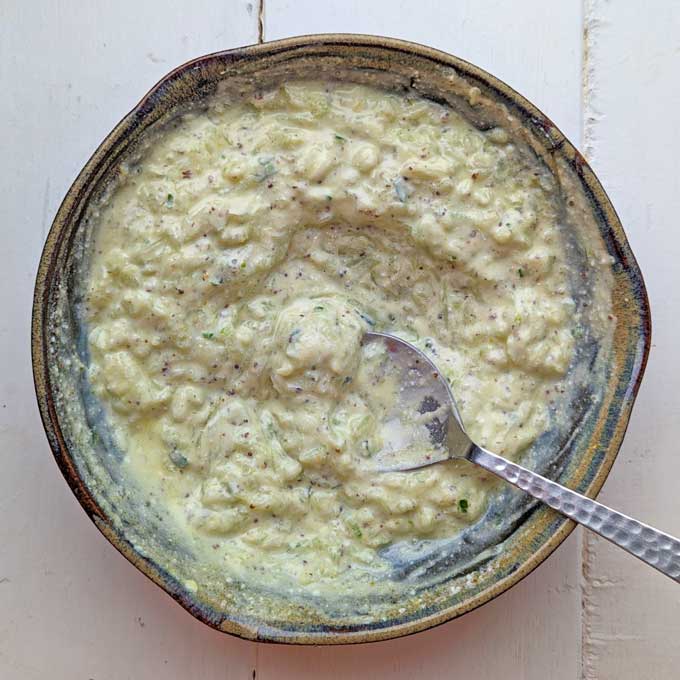
For the flavours to mature, let the raita sit at room temperature or in the fridge for 30 minutes before serving.
Serving Suggestion
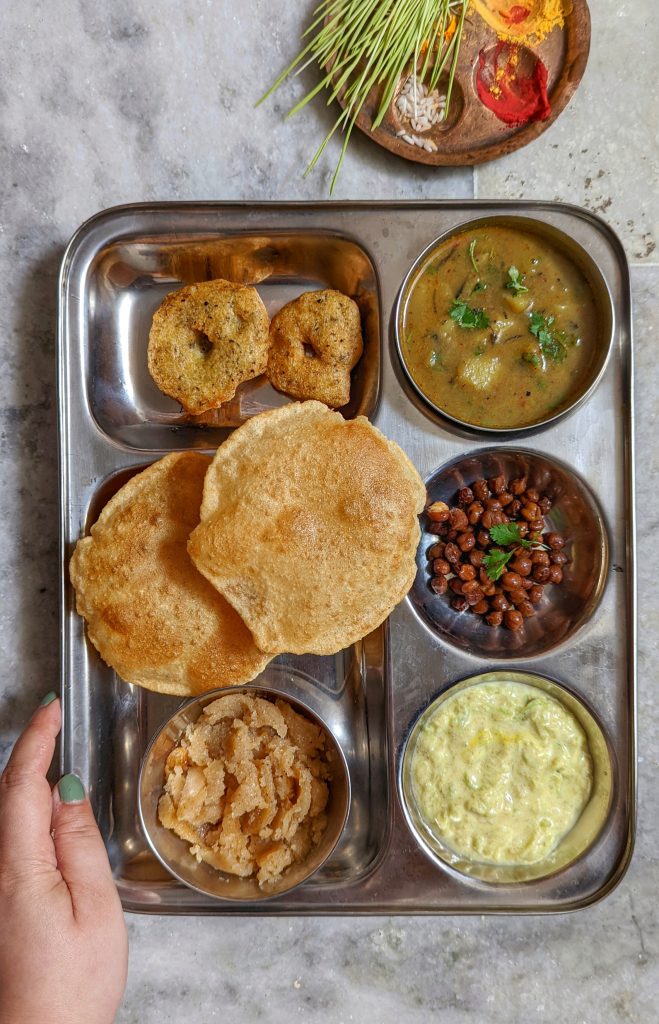
In a Kumaoni household, kheere ka raita is served with anything and everything. It is part of traditional Kumaoni thali on festive occasions, along with dishes like dal bada , poori , aloo ki sabji , and kheer .
Sometimes we enjoy it for lunch along with dal – bhaat .
And the forever popular combination is the Aloo Ke Gutke and Raita. The spicy, crispy, sweet Pahadi aloo is served with raita. It is one of my favourite teatime snacks.
My Tried and True Tips
A coarse paste of mustard seeds and green chilli is required —no need to make a fine chutney-like paste. Grinding mustard seeds and green chilli in a mortar and pestle or a stone grinder for the rustic texture is best.
Adding mustard oil to the Kumaoni raita is optional. It is added for that extra kick in the flavour.
No need to dry roast or fry the mustard seeds to make the raita. Make a coarse paste and directly combine it with the curd.
Before adding the cucumber, ensure all the liquid from the grated cucumber is squeezed out. This step will ensure a thick and luscious Pahadi Kheere Ka Raita.
Last but not least, the flavours of this cucumber raita mature after a few hours. Hence, it is always best to make it in advance and store it in the fridge.
More Kumaoni Recipes
- Aloo Paani
- Gahat Ki Dal
- Badi Ki Sabji
- Aloo Ke Gutke
- Mooli Ki Kadhi
- Kumaoni Bada (Vada)
- Pahadi Vrat Ki Panjri
If you try this recipe and love it, please leave a comment and a rating. This helps us grow and reach other food lovers like you.
Ingredients
- ▢ 400 gram curd
- ▢ 2 Cup grated cucumber
- ▢ 2 ¼ teaspoon salt or to taste
- ▢ 1 tablespoon small size mustard seeds (rai)
- ▢ 2 green chilli
- ▢ 2 tablespoon mustard oil (optional)
- ▢ ½ teaspoon turmeric powder
- ▢ 2 tablespoon chopped coriander leaves
Instructions
- Add mustard seeds, green chilli, and ¼ teaspoon salt in a stone mortar and pestle. Grind to a coarse paste. Or you can use a tiny blender as well for the purpose. Transfer the paste to a bowl and set it aside.
- Peel and cut the cucumber lengthwise into half. Remove the seeds from each piece using a spoon. Grate the cucumber, and squeeze out all the liquid from the grated cucumber using a muslin cloth. Set aside in a bowl.
- Whisk curd to get a smooth consistency. Use approximately ¼ cup of water to get the desired consistency. Kumaoni Kheere ka raita is usually on the thicker side.
- Add the mustard paste to the whisked curd, grated cucumber, mustard oil, coriander leaves, remaining salt, and turmeric. Mix nicely. Taste, and if required, add more salt or mustard oil.
- For the flavours to mature, let the raita sit at room temperature or in the refrigerator for 30 minutes before serving.
- Serve Kumaoni Raita chilled with aloo ke gutke .
Recipe Notes:
- Do not make a fine chutney like paste of mustard seeds and chilli.
- Adding mustard oil to the Kumaoni raita is optional. It is added for that extra kick in the flavour.
Nutrition
Postcard From Kumaon Hills, Uttarakhand
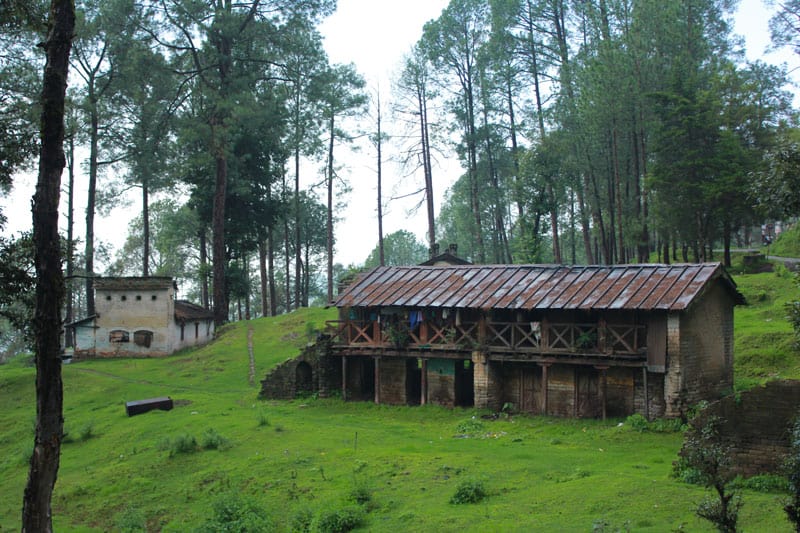
Summer Vaccation in Ranikhet, Uttarakhand
We follow a strict NO SPAM Policy
