What if I told you there’s a way to get that velvety, rich texture you love without the guilt? You can have your creamy vegetable soup and feel good about it too.
Estimated reading time: 5 minutes

- Ingredients You’ll Need
- How To Make Vegetable Soup
- Creamy Vegetable Soup Recipe
This creamy vegetable soup is packed with nutrients, fiber, and flavour. And the secret to its luscious texture isn’t flour or cream—it’s the vegetables themselves.
The words “creamy” and “low-calorie” don’t exactly go together. We picture heavy cream, butter, flour, and a calorie count that makes us feel a little guilty. This low calorie creamy vegetable soup recipe is a game-changer.
The Magic Ingredient: Starchy Vegetables
The key to creating a creamy soup without adding a ton of fat is to use vegetables that naturally become thick and smooth when cooked and blended.
- Cauliflower : When boiled and puréed, it provides a subtle, almost nutty flavour and a fantastic, smooth consistency. It’s also incredibly low in calories and a great source of Vitamin.
- Potatoes: A small amount of potato adds body and a wonderful starchy thickness to the soup.
- Zucchini gives a creamy, velvety texture to the soup with keeping the calorie count in control.
Why You’ll Love This Soup Recipe
- Low Calorie soup that is incredibly filling and satisfying.
- Nutrient-Dense: It’s a fantastic way to pack a variety of vegetables into one delicious meal.
- Dairy and Gluten Free: This soup is totally plant based without any added flour or starch.
- Customizable: Don’t have cauliflower? Try broccoli or potato. Want to add more flavour? Toss in some ginger, a pinch of curry powder, or a drizzle of chilli oil .
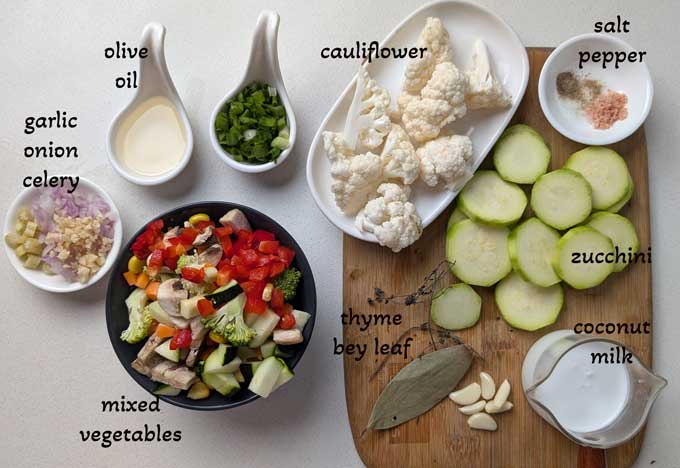
Ingredients You’ll Need
- Soup Base: Cauliflower, Zucchini, Garlic, Thyme. Bay Leaf, Salt, and Water.
- Coconut Milk or any other plant based milk like oat or almond.
- Olive Oil or vegetable oil to saute the aromatics and vegetables.
- Onion, Minced Garlic, Celery to build the soup flavour.
- Vegetables : Carrot, Sweet Corn, Mushroom, Broccoli. Red Bell Pepper
- Seasoning: Salt, Black Pepper, and Oregano
- Fresh Herbs like parsley, chives, or cilantro
How To Make Vegetable Soup
1) Make Creamy Soup Base
- Add the cauliflower florets, diced zucchini, garlic, thyme, bay leaf, salt, and water to the pot. Bring to a boil.
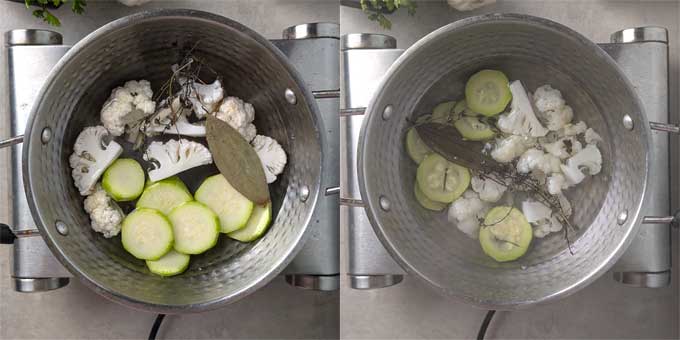
- Once boiling, reduce the heat to a simmer, cover the pot, and let it cook for 15 minutes, or until the cauliflower is fork tender.
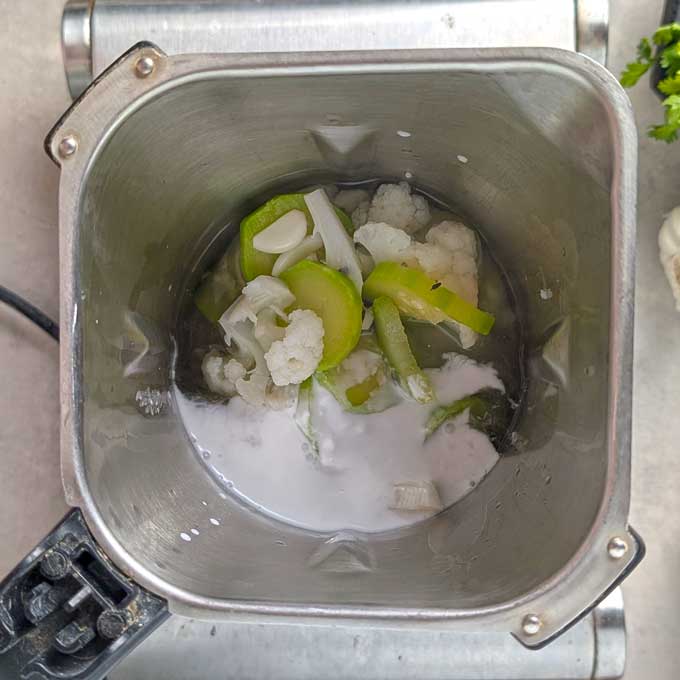
- Carefully transfer the soup to a blender, or use an immersion blender directly in the pot. Add coconut milk. Blend until the soup is completely smooth and creamy.
2)Sauté the Aromatics
- Heat the olive oil in a large pot or Dutch oven over medium heat.
- Add the chopped onion, garlic, and celery. Saute for a minute to release the aroma.
- Add the mixed vegetables. Sauté for 5 -7 minutes, until the vegetables begin to soften.
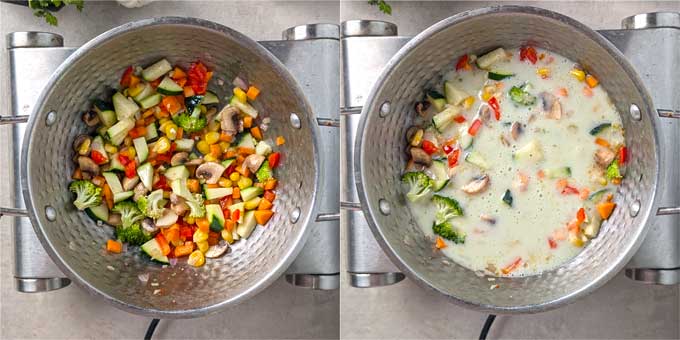
3)Simmer and Serve
- Add the blended soup base to the pot. Season generously with salt and black pepper to your liking.

- Simmer over low heat for 3 – 5 minutes.
- Garnish with fresh herbs or a sprinkle of crushed black pepper.
Serve it as a light lunch, or a comforting, low calorie meal for dinner. For protein intake, serve it with crispy tofu , Indian style grilled paneer , or thecha paneer . It’s also delicious served cold on a hot day!

More Healthy Soup Recipes
- Oats Soup
- Thai Coconut Soup
- Green Goddess Soup
- Vegetable Barley Soup
- Healthy Manchow Soup
- Tomato Couscous Soup
Get 15+ Vegetable Soup Recipes here

Ingredients
Ingredients For Creamy Base:
- ▢ 1 Cup cauliflower florets
- ▢ 1 small size zucchini peeled and cut into rounds
- ▢ 4 garlic cloves
- ▢ 2 – 3 sprigs of thyme
- ▢ 1 bay leaf
- ▢ 2 Cup water
- ▢ ½ teaspoon salt
- ▢ ¼ Cup coconut milk
Ingredients For Soup:
- ▢ 1 teaspoon olive oil
- ▢ 1 teaspoon minced garlic
- ▢ 1 small size onion, finely chopped
- ▢ 1 small size celery stalk, finely chopped
- ▢ ¼ Cup sweet corn kernels
- ▢ ¼ Cup finely chopped carrot
- ▢ ¼ Cup finely chopped red bell pepper
- ▢ ¼ Cup broccoli florets
- ▢ ¼ Cup chopped zucchini
- ▢ ¼ teaspoon oregano
- ▢ ¼ teaspoon salt or to taste
- ▢ ¼ teaspoon black pepper
- ▢ handful of parsley, chopped
Instructions
Make Creamy Soup Base
- Add the cauliflower florets, diced zucchini, garlic, thyme, bay leaf, salt, and water to the pot. Bring to a boil.
- Once boiling, reduce the heat to a simmer, cover the pot, and let it cook for 15 minutes, or until the cauliflower is fork tender.
- Carefully transfer the soup to a blender, or use an immersion blender directly in the pot. Add coconut milk. Blend until the soup is completely smooth and creamy.
Prepare Soup
- Heat the olive oil in a large pot or Dutch oven over medium heat.
- Add the chopped onion, garlic, and celery. Saute for a minute to release the aroma.
- Add the mixed vegetables. Sauté for 5 -7 minutes, until the vegetables begin to soften.
- Add the blended soup base to the pot. Season generously with salt and black pepper to your liking. Simmer over low heat for 3 – 5 minutes.
- Garnish with fresh herbs or a sprinkle of crushed black pepper.
- Serve creamy vegetable soup warm.
Recipe Notes:
- If using a regular blender , be very careful with the hot liquid—do not fill the blender more than halfway, and vent the lid slightly to allow steam to escape.
- Do not cook the soup for too long after adding blended vegetable base as it has coconut milk.
- You can use vegetable or chicken stock instead of water to simmer the cauliflower and zucchini.
- If the soup is too thick , add little water or vegetable stock to get the desired consistency.
Nutrition
We follow a strict NO SPAM Policy

Creamy Vegetable Soup Recipe
Equipment
- stockpot or saucepan
- Blender
Ingredients
Ingredients For Creamy Base:
- 1 Cup cauliflower florets
- 1 small size zucchini peeled and cut into rounds
- 4 garlic cloves
- 2 - 3 sprigs of thyme
- 1 bay leaf
- 2 Cup water
- ½ teaspoon salt
- ¼ Cup coconut milk
Ingredients For Soup:
- 1 teaspoon olive oil
- 1 teaspoon minced garlic
- 1 small size onion, finely chopped
- 1 small size celery stalk, finely chopped
- ¼ Cup sweet corn kernels
- ¼ Cup finely chopped carrot
- ¼ Cup finely chopped red bell pepper
- ¼ Cup broccoli florets
- ¼ Cup chopped zucchini
- ¼ teaspoon oregano
- ¼ teaspoon salt or to taste
- ¼ teaspoon black pepper
- handful of parsley, chopped
Instructions
Make Creamy Soup Base
- Add the cauliflower florets, diced zucchini, garlic, thyme, bay leaf, salt, and water to the pot. Bring to a boil.
- Once boiling, reduce the heat to a simmer, cover the pot, and let it cook for 15 minutes, or until the cauliflower is fork tender.
- Carefully transfer the soup to a blender, or use an immersion blender directly in the pot. Add coconut milk. Blend until the soup is completely smooth and creamy.
Prepare Soup
- Heat the olive oil in a large pot or Dutch oven over medium heat.
- Add the chopped onion, garlic, and celery. Saute for a minute to release the aroma.
- Add the mixed vegetables. Sauté for 5 -7 minutes, until the vegetables begin to soften.
- Add the blended soup base to the pot. Season generously with salt and black pepper to your liking. Simmer over low heat for 3 – 5 minutes.
- Garnish with fresh herbs or a sprinkle of crushed black pepper.
- Serve creamy vegetable soup warm.
Video
Notes
- If using a regular blender , be very careful with the hot liquid—do not fill the blender more than halfway, and vent the lid slightly to allow steam to escape.
- Do not cook the soup for too long after adding blended vegetable base as it has coconut milk.
- You can use vegetable or chicken stock instead of water to simmer the cauliflower and zucchini.
- If the soup is too thick , add little water or vegetable stock to get the desired consistency.
Nutrition
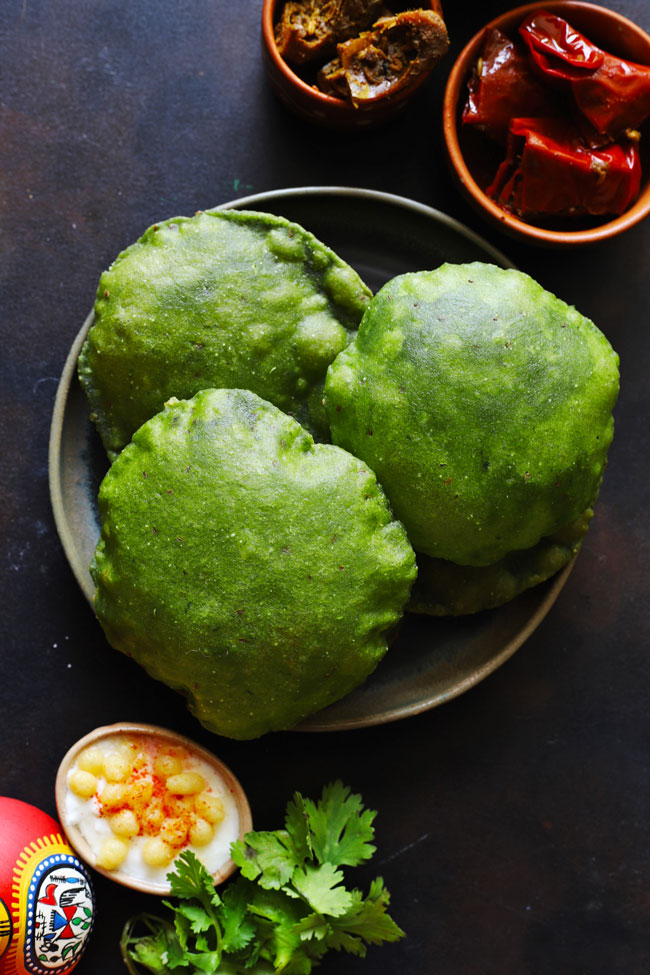
Palak Puri is a bright green, whole wheat Indian bread packed with spinach perfect for breakfast, lunch or festive thali.
Estimated reading time: 4 minutes
- What is ‘Poori’?
- How To Get Bright Green Colour
- My Tried and True Tips
- Serving Suggestion
- Watch Palak Puri Video
- FAQs Related To Palak Puri
- Aloo Palak Puri Recipe
What is ‘Poori’?
Poori or Puri is the name of deep-fried, traditional Indian bread. There are many versions of the poori recipes like cheese poori , masala poori, kuttu puri , or methi poori. Palak puri is one of the most popular puri recipes mainly because of its bright green colour.
The bright green color of the palak poori comes from the spinach leaves. It gets the crisp texture from the grated boiled potato in the dough. It adds vibrant color to the Indian thali meal . Hence, this green poori is widely popular among food lovers.
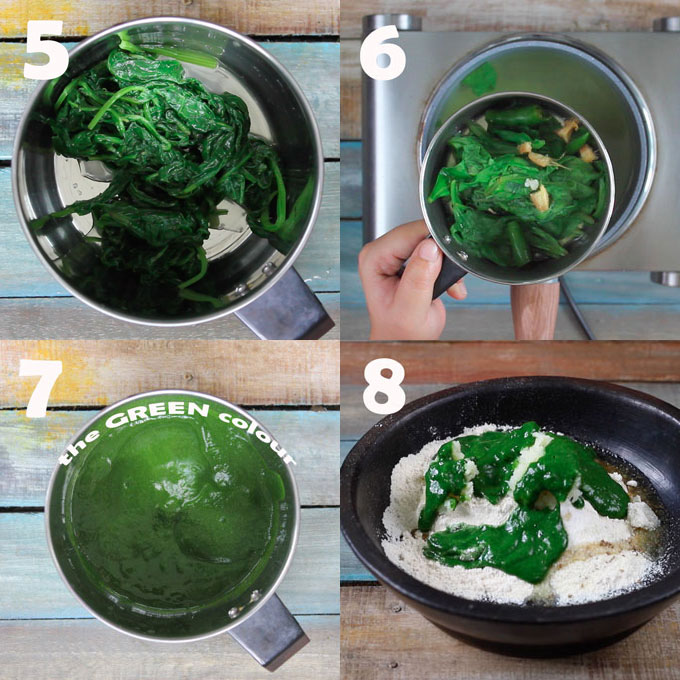
How To Get Bright Green Colour
The perfect blanching of the spinach gives the poori its bright green color and helps in retaining the nutrients of the vegetable.
- To blanch the spinach first, clean it and rinse with water to remove dirt particles. Next, place a bowl of ice-cold water next to the stovetop.
- Boil water in a saucepan with a teaspoon of salt (image 1) . Once the water starts boiling, add the cleaned spinach leaves to the hot water (image 2). Cook for about 40 – 50 seconds until the color of the leaves turns bright green. Turn off the heat.

- Transfer the leaves immediately to the bowl of ice-cold water ( image 4 ). This step stops the cooking process and retains the leaves’ green color.
- After this last step, you can use the blanched spinach leaves for making puree.
My Tried and True Tips
- Don’t over-cook the spinach – about five minutes is enough. Heat kills the bright green color and most of the spinach nutrients.
- Grate the potatoes instead of mashing to avoid lumps in the puri dough.
- For a crisp and non-greasy puri, don’t forget to add semolina (sooji/rava) .
- Binding dough for any poori is an art in itself. It should soft, pliable, non-sticky, and firm to touch . ( also read: how to make perfect poori )
- Don’t over-fry the pooris on very high heat, or you will lose the green color, and brown spots might appear.
- While frying the pooris, gently press them with a spoon to help them puff up nicely .

Serving Suggestion
Can anything else match the feeling of poking a finger into a puffy hot palak puri and then tearing a piece of it to sweep into a Mathura-style aloo ki sabzi or dahi wale aloo ? Surely a gratifying and indulging Indian breakfast recipe .
Palak Puri compliments most of the Indian main-course dishes . But my personal favorite is chana masala or jeera aloo , along with a bowl of chilled mint raita .
Watch Palak Puri Video
You can store the spinach puri dough for a week in the refrigerator. Make sure the storing container is airtight. You can use the same dough to make palak paratha or palak roti .
You can use frozen spinach or readymade spinach puree to make this poori dough. Please follow the packet instructions to defrost the frozen leaves. But in my personal experience, the taste, texture, and color of the poori will not be as good as the one made with fresh spinach leaves.
More Spinach Recipes for you to try
- Chana Saag
- Palak Chana Dal
- Tofu Palak Paneer
- Skinny Spinach Soup
- Oats Spinach Khichdi
- Creamy Spinach Pasta

Ingredients
Ingredients For Spinach Puree:
- ▢ 200 gram (1 bunch) spinach leaves (palak)
- ▢ 1 green chilli
- ▢ 1 tablespoon chopped ginger
Other Ingredients:
- ▢ 2 Cups wheat flour (atta) + more for dusting
- ▢ 2 medium-size boiled potato
- ▢ 1 teaspoon carom seeds (ajwain)
- ▢ 2 tablespoon semolina (rava/sooji)
- ▢ Salt to taste
- ▢ 1 teaspoon cooking oil + oil for deep-frying
Instructions
How To Make Spinach Puree:
- Wash the spinach leaves in running water.
- Heat a large pan full of water. Add a pinch of salt. Once water starts boiling, add spinach leaves. Cook exactly for 5 minutes. Turn off the heat. Drain in a colander and let them cool down before grinding to smooth paste.
- In a mixer, puree blanched spinach leaves, ginger and green chili to a smooth paste. Transfer to a bowl and keep aside.
How To Make Palak Puri Dough:
- In a wide mixing bowl combine flour, grated potato, carom seeds, salt, oil, and spinach puree. Mix them well together to form a stiff dough. Use little lukewarm water (if required) to knead the dough. Make sure dough should be firm in texture yet pliable.
- Keep covered in the fridge until required.
How To Make Palak Puri:
- Divide the dough into small balls of equal size. Roll each portion into a round using a rolling pin.
- Now heat oil in a deep frying pan over medium-high flame.
- Add a pinch of dough in the hot oil. If the dough floats to the top, oil is ready else heat it for a little longer.
- Slide one poori from the side into the hot oil and gently press it with the slotted spoon. Once spinach poori puffs up, flip it gently.
- Using a slotted spoon, drain the puri from the oil. Transfer hot poori to a plate lined with an oil absorbent sheet.
- Similarly, prepare rest of the poori as well.
- Serve palak puri warm with aloo ki sabzi and raita.
Recipe Notes:
- Don’t over blanch the spinach – about five minutes is enough. Heat kills the bright green color and most of the spinach nutrients.
- Always, grate the boiled potatoes instead of mashing to avoid any lumps in the puri dough.
- Use ajwain (carom seeds) for a nice flavor and they aid in digestion as well.
- For a crisp and non-greasy puri, don’t forget to add semolina (sooji/rava) .
- Poori dough should be soft, pliable, non-sticky, and firm to touch .
- You can store the dough for a week in the refrigerator.
- Don’t over-fry the pooris on very high heat or you will lose the green color and brown spots might appear. While frying the pooris, gently press them with a spoon to help them puff up nicely .
- You can use vegetable oil or any flavorless cooking oil to fry the poori.
Nutrition
We follow a strict NO SPAM Policy
