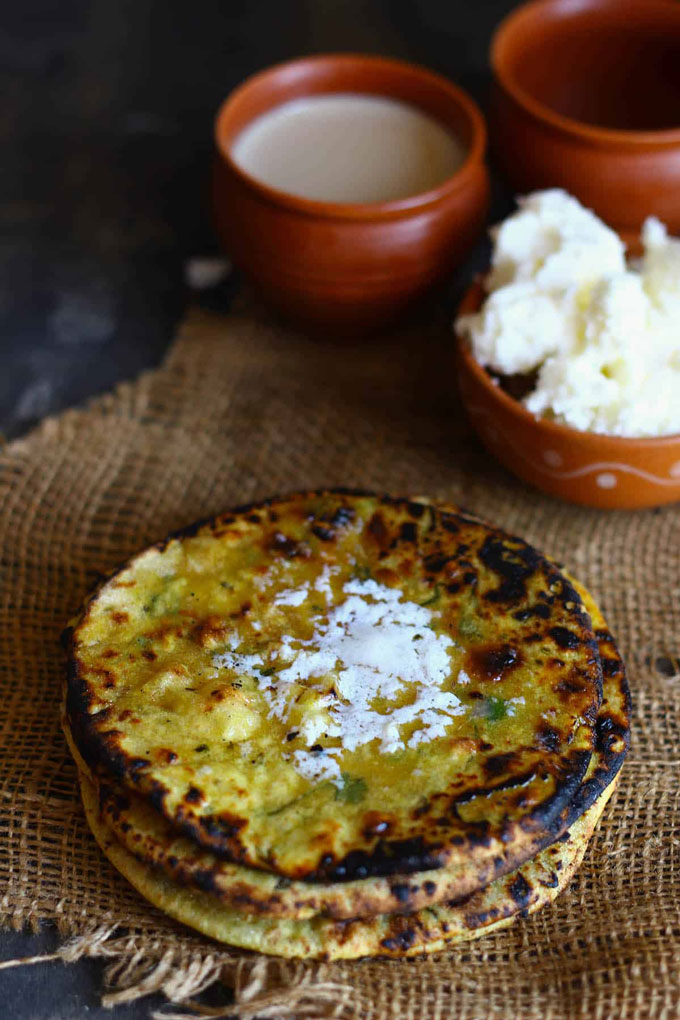
Dal Paratha is a delicious Indian flatbread made with wheat flour (atta) and leftover yellow dal tadka. In Punjabi, we call it missa paratha. Be sure to watch the video!
- Story of Leftover Dal Paratha
- Ingredients Required
- How To Shape Dal Paratha
- Storage and Freezing
- Serving Suggestion
- Watch Dal Paratha Video
- More Paratha Recipes
- Dal Paratha Recipe
Story of Leftover Dal Paratha
Dal Paratha or as they say in Punjabi, missa paratha is probably the best way to use leftover cooked yellow dal or masoor dal sitting in the fridge.
In a Punjabi household, if you are left with plenty of yellow dal from dinner or lunch, making paratha dough using the leftover dal is a common practice. It is one of the easiest Indian breakfast recipes .
A dal paratha is packed with protein, fiber, and is a wholesome, healthy breakfast choice .
Ingredients Required
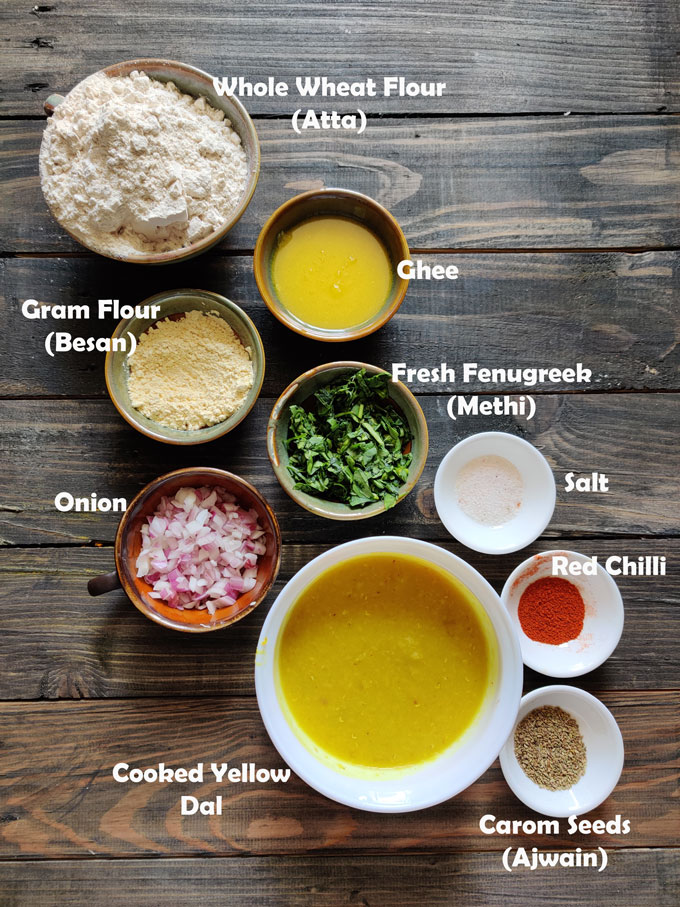
Here are the few pantry staples required to make Punjabi missa paratha at home:
- Cooked Yellow Dal : You can use either toor dal, moong dal, chana dal, or pink masoor dal for making missa paratha dough.
- Whole Wheat Flour (Atta) : A combination of wheat flour and any other flour-like ragi flour, or maize flour also works.
- Fresh or Dry Fenugreek (Methi) Leaves : During the winter season I make this dal paratha with fresh fenugreek leaves.
- Seasoning: Salt, Red Chilli Powder, Turmeric Powder, Carom Seeds (Ajwain/Omam)
- Other Ingredients: Gram Flour (Besan), Onion, Ghee or Refined Oil
Add-On Suggestions: You can add chopped spinach, spring onion, grated boiled potato, crumbled paneer, or finely chopped fresh coriander in the paratha dough to make it tastier.
How To Shape Dal Paratha
Missa Paratha tastes best when it has flaky and crispy layers within.
You can follow these steps to make a simple layered missa paratha at home:
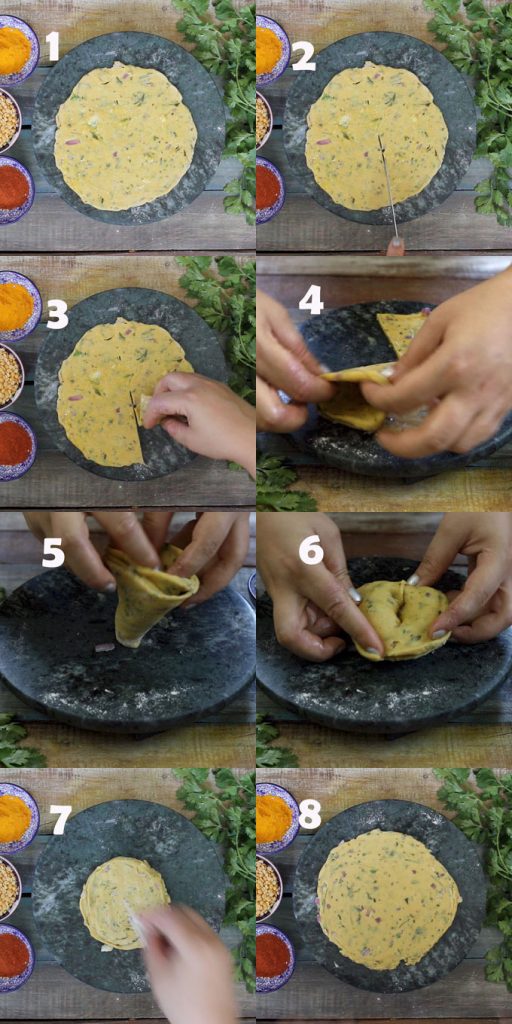
Similarly, shape all the paratha. At this stage, you can cook the paratha immediately, or freeze them.
Storage and Freezing
Leftovers: You can store the leftover cooked paratha in a hot case or an airtight container packed with aluminium foil or butter paper. Reheat on a griddle or microwave.
Freezing: Make the paratha and only half cook them from both sides on a hot griddle ( as shown in video ) until brown spots appear. When that happens, remove the paratha and keep it on the side to cool down. Stack the parathas with wax papers in between each paratha and since these aren’t delicate, you can directly put them in a ziplock bag and store them in the freezer.
Serving Suggestion
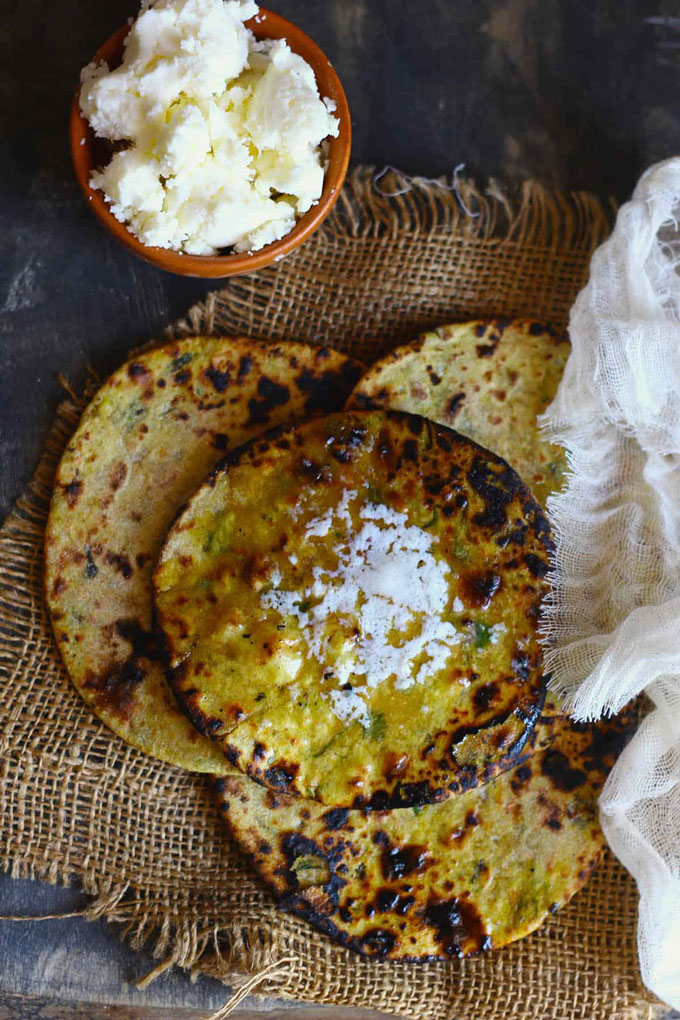
Dal Paratha is best enjoyed fresh off the tawa, piping hot with a bowl of creamy curd or yoghurt, mint pomegranate raita , a spicy Indian pickle , or a dollop of homemade white butter to add layers of taste and texture to each bite of paratha.
For those looking to indulge further, a side of masala chai or a refreshing lassi provides the perfect balance to the richness of the paratha.
Watch Dal Paratha Video
More Paratha Recipes
- Gobi Paratha
- Peas Paratha
- Aloo Methi Paratha
- Cheese Egg Paratha
- Spring Onion Paneer Paratha

Ingredients
- ▢ 2 Cup Whole Wheat Flour (Atta)
- ▢ ¼ Cup Gram Flour (besan)
- ▢ ¼ Cup Chopped Onion
- ▢ 1 ½ Cup Leftover Cooked Yellow Dal (see recipe )
- ▢ ¼ Cup Dry/Fresh Fenugreek Leaves (methi)
- ▢ 1 Tablespoon Carom Seeds (ajwain)
- ▢ ½ Teaspoon Red Chili Powder
- ▢ Salt to taste
- ▢ ¼ Cup Chopped Fresh Coriander
- ▢ ¼ Cup Ghee (clarified butter)
Instructions
- In a large mixing bowl combine together all the ingredients and 1 tablespoon ghee. Mix nicely using a spatula or your fingers.
- Try to bring together the ingredients to form a dough. If the dough seems dry add more dal and bind the dough. You can use 1 – 2 tablespoon of water also to bind the dough.
- The dough should be non-sticky, soft, and pliable chapati like dough. Knead the dough for 5 – 6 minutes.
- Apply a teaspoon of ghee on the dough. Cover the dough with a muslin cloth and set aside to rest for 10 – 15 minutes. You can store it in the fridge also to use later.
- Meanwhile, heat the griddle (tawa) over medium heat.
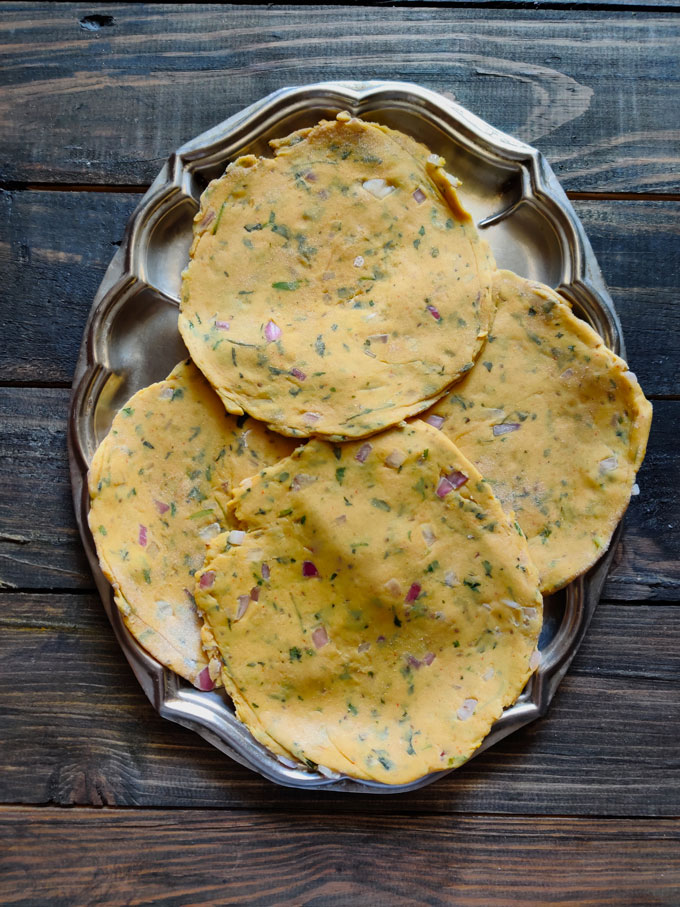
- Divide the dough into lemon size equal balls. Take one ball and roll it into a round disk of thickness similar to that of stuffed paratha.
- Smear half a teaspoon ghee on the surface of the paratha.
- Make a cut in the paratha using a knife. And start rolling the paratha into a cone from one side to the other. Once again, gently press the dough into a flat disc ( refer video or step-by-step images ).
- Roll the paratha into a round disc with a thickness of less than ¼ inch.
- Place the paratha in the hot griddle. Cook from both sides till the surface of the paratha turns dry and charred marks appear.
- Now at this stage, smear the paratha with ghee and cook on the griddle like any other stuffed paratha from both sides till it is crisp.
- Serve Dal Paratha warm with butter and raita .
Recipe Notes:
- You can use cooked toor/arhar dal, chana dal, masoor dal, or moong dal for making the paratha dough.
- Adding gram flour in the dough is optional. Instead of gram flour, you can use sattu (roasted chana flour) as well.
- Any variety of seasonal green leafy vegetables can be combined in the paratha dough.
- Try to avoid adding water to bind the dough. If required, use one to two tablespoon water.
- Paratha dough should be non-sticky, soft, and easy to handle. If the dough seems too sticky, add more wheat flour.
- Paratha dough can be stored in the fridge for 5 – 6 days easily.
- You can use regular refined oil also to cook the paratha.
Nutrition
We follow a strict NO SPAM Policy
Dal Paratha Recipe
Equipment
- Mixing Bowl
- Indian Roti Tawa
Ingredients
- 2 Cup Whole Wheat Flour (Atta)
- ¼ Cup Gram Flour (besan)
- ¼ Cup Chopped Onion
- 1 ½ Cup Leftover Cooked Yellow Dal (see recipe )
- ¼ Cup Dry/Fresh Fenugreek Leaves (methi)
- 1 Tablespoon Carom Seeds (ajwain)
- ½ Teaspoon Red Chili Powder
- Salt to taste
- ¼ Cup Chopped Fresh Coriander
- ¼ Cup Ghee (clarified butter)
Instructions
- In a large mixing bowl combine together all the ingredients and 1 tablespoon ghee. Mix nicely using a spatula or your fingers.
- Try to bring together the ingredients to form a dough. If the dough seems dry add more dal and bind the dough. You can use 1 - 2 tablespoon of water also to bind the dough.
- The dough should be non-sticky, soft, and pliable chapati like dough. Knead the dough for 5 - 6 minutes.
- Apply a teaspoon of ghee on the dough. Cover the dough with a muslin cloth and set aside to rest for 10 - 15 minutes. You can store it in the fridge also to use later.
- Meanwhile, heat the griddle (tawa) over medium heat.
- Divide the dough into lemon size equal balls. Take one ball and roll it into a round disk of thickness similar to that of stuffed paratha.
- Smear half a teaspoon ghee on the surface of the paratha.
- Make a cut in the paratha using a knife. And start rolling the paratha into a cone from one side to the other. Once again, gently press the dough into a flat disc ( refer video or step-by-step images ).
- Roll the paratha into a round disc with a thickness of less than ¼ inch.
- Place the paratha in the hot griddle. Cook from both sides till the surface of the paratha turns dry and charred marks appear.
- Now at this stage, smear the paratha with ghee and cook on the griddle like any other stuffed paratha from both sides till it is crisp.
- Serve Dal Paratha warm with butter and raita .
Video
Notes
- You can use cooked toor/arhar dal, chana dal, masoor dal, or moong dal for making the paratha dough.
- Adding gram flour in the dough is optional. Instead of gram flour, you can use sattu (roasted chana flour) as well.
- Any variety of seasonal green leafy vegetables can be combined in the paratha dough.
- Try to avoid adding water to bind the dough. If required, use one to two tablespoon water.
- Paratha dough should be non-sticky, soft, and easy to handle. If the dough seems too sticky, add more wheat flour.
- Paratha dough can be stored in the fridge for 5 - 6 days easily.
- You can use regular refined oil also to cook the paratha.
Nutrition
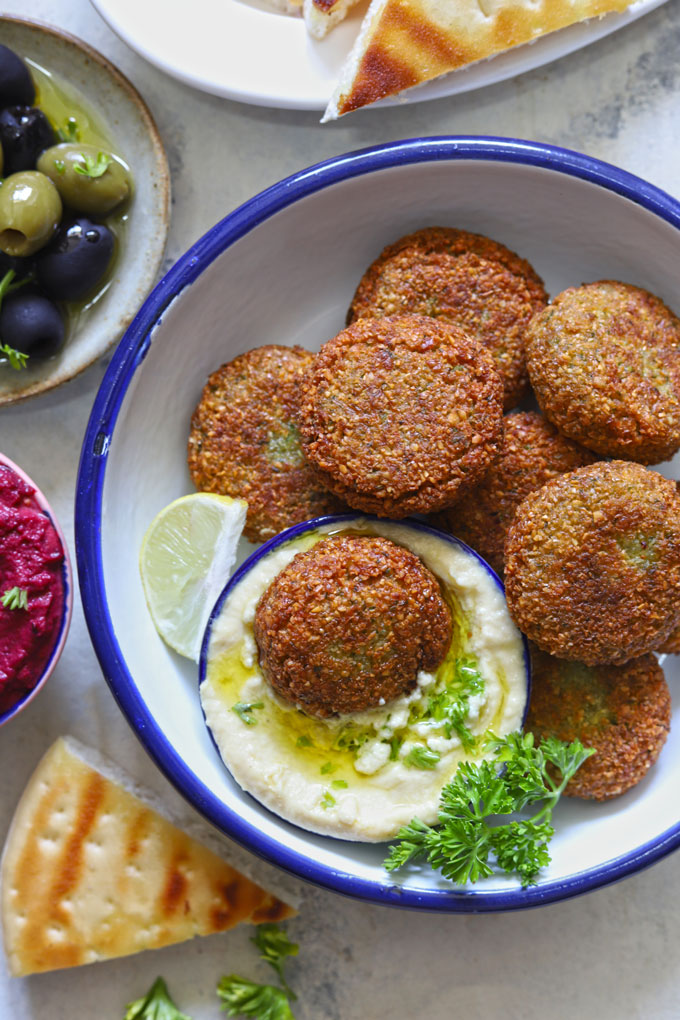
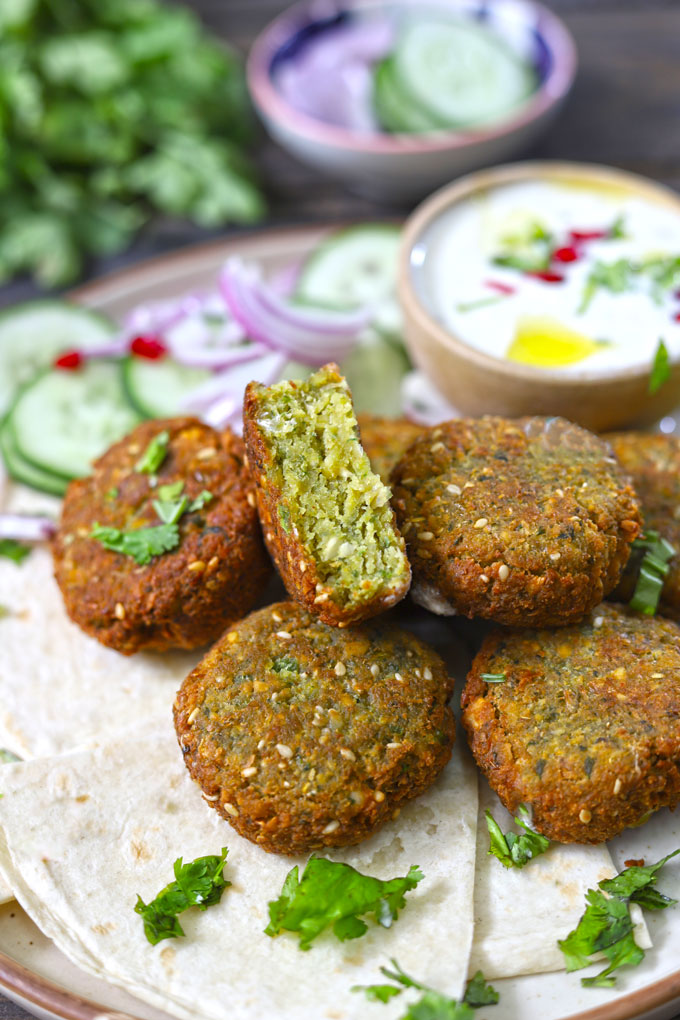
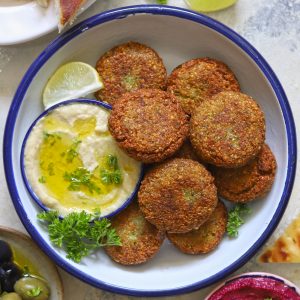
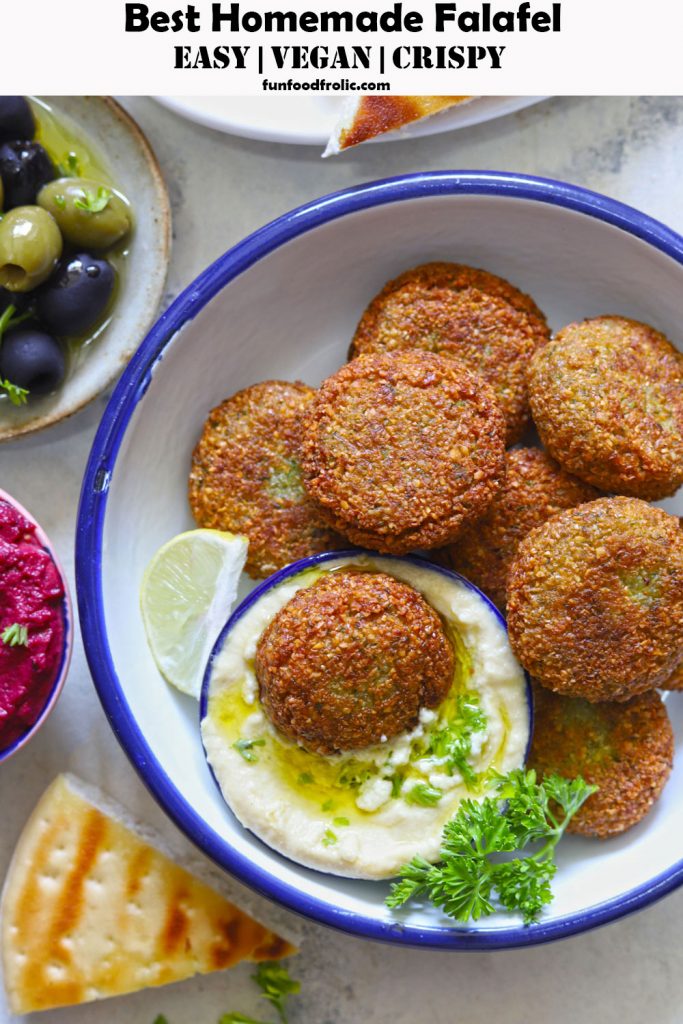
This is a tried and tested foolproof vegan falafel recipe. Crispy from the outside and fluffy from the inside. Be sure to watch the video.
About Falafel
Falafel is a widely popular Mediterranean & Middle Eastern snack. It is a deep-fried, vegetarian fast food made with chickpeas (chana) or fava beans , onion, garlic, spices, and a lot of fresh herbs.
Today, the humble falafel has become one of the most popular fulfilling vegan snacks for adding to salad bowls, sandwiches, or Mezze platter .
There are many versions of a falafel recipe. I am sharing a simple and basic chickpea falafel recipe that requires a few pantry staples.
Reasons To LOVE Falafel
- possible gluten-free
- vegan and vegetarian
- easy to bake or air-fry
- fulfilling and wholesome
- meal-prep and freezer-friendly
Ingredients Required
You will be surprised to know that a few basic ingredients are required to make falafel from scratch at home.
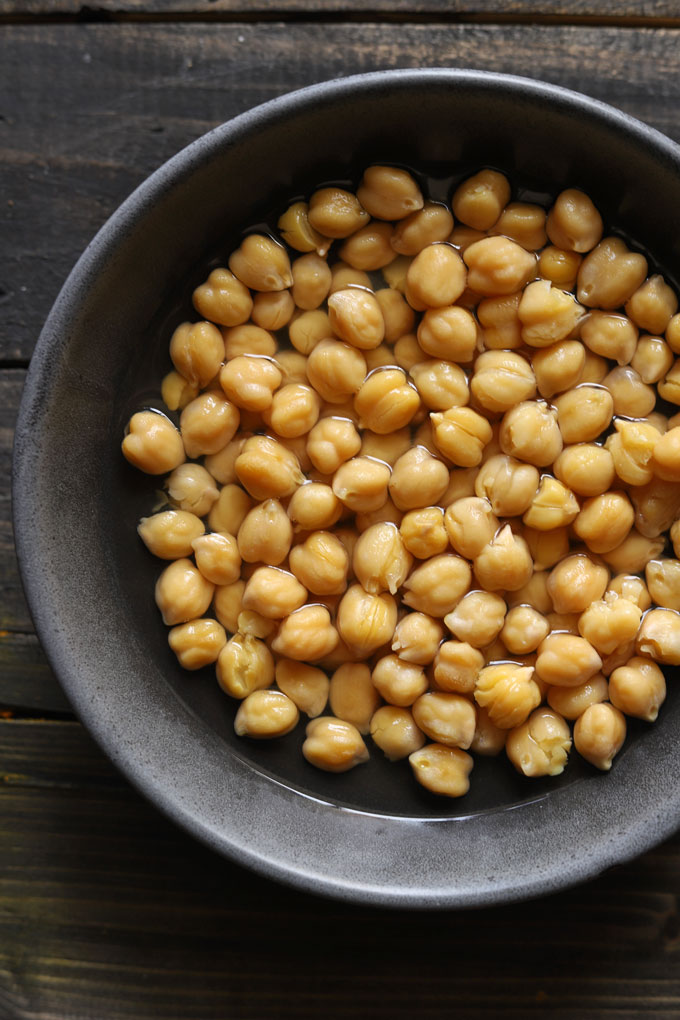
- Chickpeas : Dried chickpeas (white chana) are the key ingredient for making falafel. DO NOT use canned or pre-cooked chickpeas.
- Onion : Yellow onion, white or red onion; feel free to add either of these.
- Garlic : Fresh garlic pods give flavour to the falafel. Adjust quantity as per taste preference.
- Fresh Herbs : From cilantro, parsley, coriander, spring onion, to dill, feel free to add either of these or a combination of herbs to the falafel mixture.
- Seasoning & Spices : Cumin Powder, Coriander Powder, Green Chilli, Red Chili Powder, and Salt are the main ingredients for seasoning falafel.
- Sesame Seeds: An authentic falafel recipe is incomplete without white sesame seeds.
- Baking Powder: It gives a fluffy texture to the falafel and makes them easy to bake.
- Flour : Either use gluten-free chickpea flour (besan) or all-purpose flour to bind the falafel.
- Oil: For frying falafel, use flavourless vegetable oil.
How To Cook Falafel – 3 Method
Frying: This is a pan-fried falafel recipe. But you can shape falafel into round balls and deep-fry as well. Make sure to fry the falafel in small batches in hot oil till crisp and golden.
Baking: Grease a baking sheet with oil. Arrange falafel in the sheet. Spray/brush them with cooking oil. Bake falafel at 190 degrees Celsius for 15 – 20 minutes on each side.
Baked falafel is less crispy, soft, and pale brown. But the taste is the same as fried ones.
Air-Fry : You can air-fry falafel at 190 degrees Celcius for 20 – 25 minutes till crisp and golden. Don’t forget to turn them halfway through cooking time.
Lately, I have started using my Instant Pot Crispy Lid for cooking falafel. The result is crisp but slightly dry falafel. The colour of the falafel is also pale brown. Set Crispy Lid at 180 degrees Celcius. Cook each side for 15 minutes.
My Tried & True Tips
Soaking Chickpeas: The essential step of this falafel recipe is soaking the dried chickpeas in water for 5 – 6 hours. DO NOT use cooked, boiled, or canned chickpeas for making falafel. It does not work.
Keep in Fridge: To avoid soggy or oil-soaked falafel, keep the falafel mixture for 10 – 15 minutes in the refrigerator to chill. Trust me; this trick will always give you the best crispy falafel.
Binding Agent: I firmly believe the falafel mixture needs one binding agent in all-purpose flour or chickpea flour. Otherwise, it is difficult to make them crisp and crunchy.
Frying: Ensure the oil is preheated to the right temperature before frying the falafel. Either use a thermometer to check the oil temperature or drop a tiny ball of falafel mixture in hot oil and check.
Falafel will turn out oil-soaked if the oil is cold or not heated to the right temperature. Or, if the oil is too hot, the falafel will burn from the outside and uncooked from the inside.
While frying, do not flip the falafel again and again. Once crisp and golden from one side, flip to the other side.
Watch Falafel Video
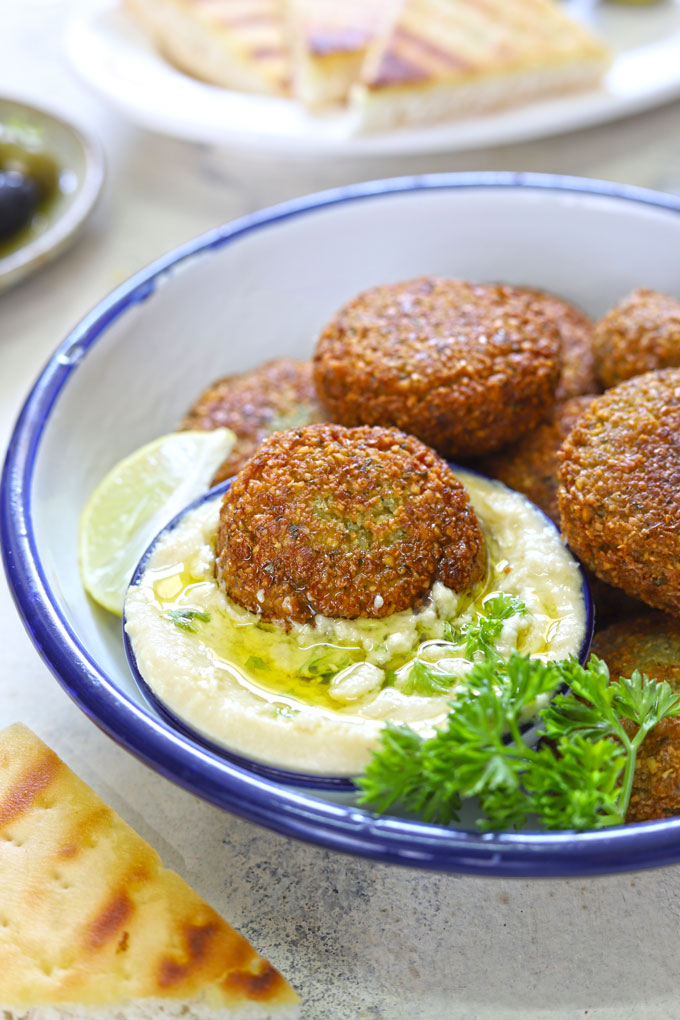
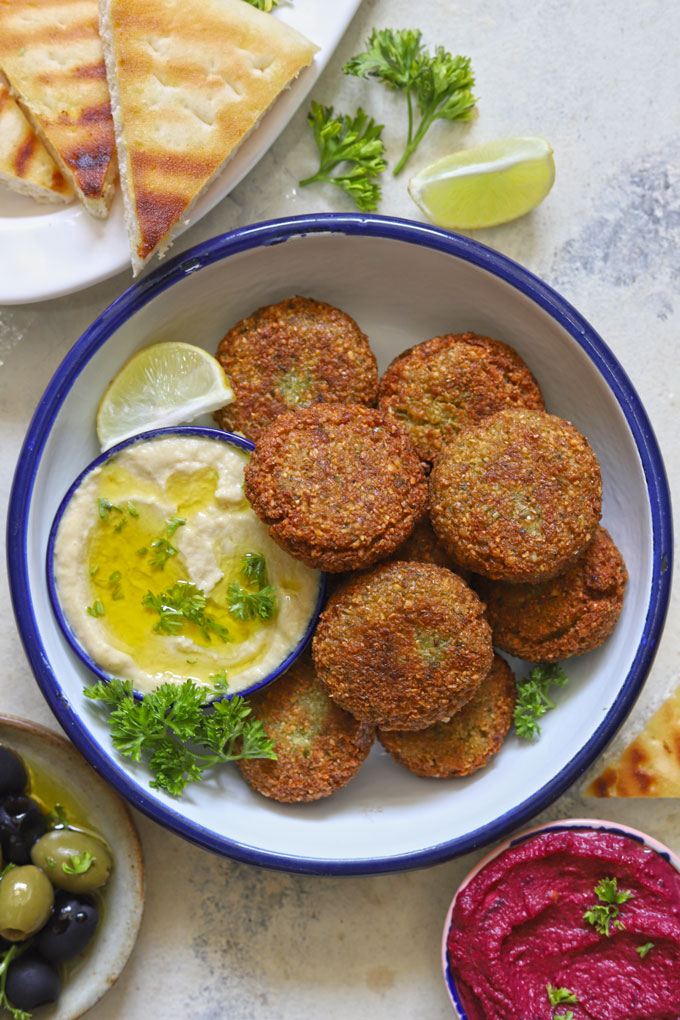
Serving Suggestion
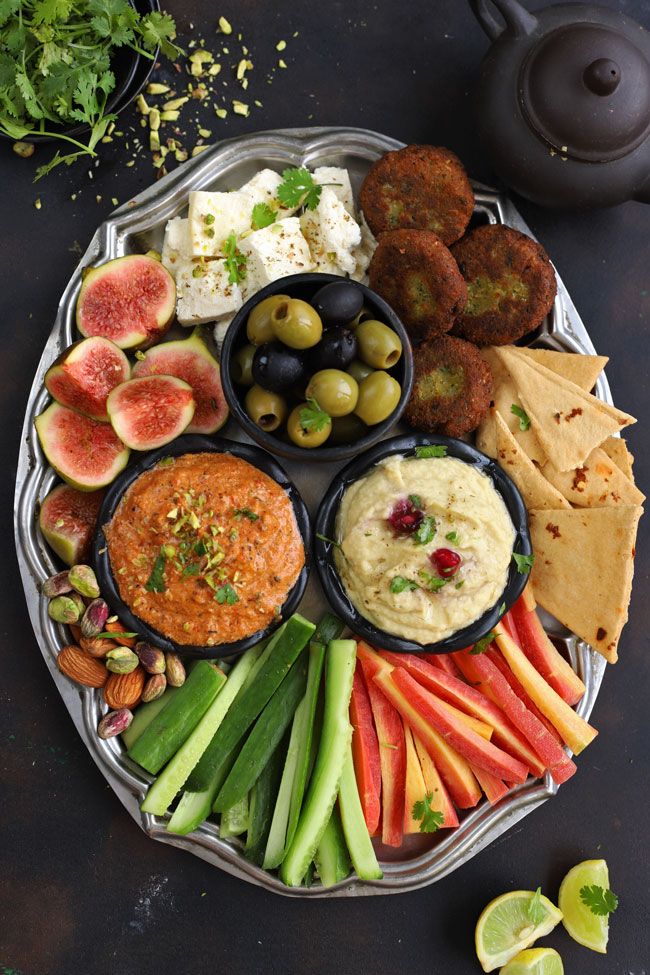
Mezze Platter: The best way to serve falafel is with other Meditteranean finger food on an appetizer platter .
Dips: Falafel is commonly served as a snack with dips like hummus , baba ganoush , avocado hummus , beetroot hummus , tzatziki, tahini sauce, or muhammara .
Salad Bowl: To make a fattoush salad more fulfilling and delicious, add baked falafel.
Storage Suggestion
Meal-Prep: You can make a falafel mixture in advance and store it in the refrigerator for 2 – 3 days. Bake or fry the falafel before serving.
You can shape the falafel and keep them in the refrigerator until ready to cook.
It is best to consume cooked falafel within 2 – 3 hours, or it will become soggy. I would not recommend storing them.
More Snack Recipes
- Paneer Tikka
- Air Fryer Malai Broccoli
- Potato Cheese Balls
- Corn Paneer Cutlet
- Tandoori Gobi Tikka
If you try this recipe and love it, please leave a comment and a rating. This helps us grow and reach other food lovers like you.
Ingredients
- ▢ 2 Cup dried chickpeas (white chana/chole)
- ▢ ½ Cup onion, roughly chopped
- ▢ 5 – 6 garlic cloves or to taste
- ▢ 1 – 2 green chili
- ▢ ¼ Cup spring onion (greens), roughly chopped
- ▢ ½ Cup fresh coriander or cilantro or parsley
- ▢ 2 tablespoon all purpose flour (maida)
- ▢ 1 tablespoon cumin powder (jeera powder)
- ▢ 1 tablespoon coriander powder
- ▢ 1 teaspoon baking powder
- ▢ 1 teaspoon red chili powder or red paprika
- ▢ Salt to taste
- ▢ 1 tablespoon sesame seeds (white til)
- ▢ 2 Cup vegetable oil, for pan or shallow frying
Instructions
- Start by cooking the dried chickpeas in water for 5 – 6 hours. Once chickpeas are bigger in size after soaking, drain all the water and transfer them to a colander.
- Add soaked chickpeas, onion, garlic, green chili, fresh herbs, spices, and salt in a food processor with a blade attachment. Use the PULSE function without using any water, scraping down the sides of the processor if needed to grind the ingredients but at the same time keep the texture coarse and not a smooth paste.
- Transfer the falafel mixture into a large mixing bowl. Add sesame seeds and mix nicely. Keep in the fridge for 10 – 15 minutes or until ready to use.
- Heat oil in a frying pan to shallow or pan fry the falafel.
- Meanwhile, shape the falafel into a round disc of ¼ inch thickness. Arrange the shaped falafel in a plate.
- Pan Fry the falafel in small batches until golden and crisp on both sides. Transfer to a plate lined with an oil absorbent paper.
Baking Falafel:
- Preheat oven at 190 degrees Celsius. Grease a baking sheet with oil. Arrange falafel at an equal distance on the greased baking sheet. Spray or brush them with cooking oil.
- Bake falafel for 15 – 20 minutes on each side. Flip and bake for the same time from the other side. Baking time may vary depending upon the size and setting of the oven.
- Baked falafel is less crispy, soft, and pale brown in color. But the taste is exactly the same as fried ones.
- Serve Falafel warm with pita bread and hummus .
Recipe Notes:
- Use dry white chickpeas (kabuli chana/chole) soaked 5 – 6 hours in the water for making the falafel batter.
- Use a strong and sharp blade food processor to grind the ingredients for the falafel. A slightly coarse or grainy texture of the ingredients is fine for making falafel.
- If the ingredients including chickpeas aren’t grinding well add 1 tablespoon or so of water. Otherwise, there is no need to add any water to the falafel mixture.
- If the falafel is not holding shape while deep-frying, add more flour to the mixture, mix nicely, and then try.
Nutrition
We follow a strict NO SPAM Policy
