One of the most popular Navratri dishes is Kuttu Ki Puri. This puri recipe makes it possible to make perfectly crispy, puffed-up puris every time.
Estimated reading time: 6 minutes

- What is Kuttu?
- Ingredients You’ll Need
- How To Make Kuttu Puri
- My Tried and True Tips
- Kuttu Ki Puri Recipe
During Hindu festivals and fasts like Navratri, Janmashtami, or Mahashivratri, people often observe a “falahari” diet , which consists of simple, sattvic foods that are permitted during these periods. Kutti Ki Puri is one of the staple falahari puri recipes that everyone loves.
While the idea of making puris from a gluten-free flour might sound intimidating, the secret lies in using boiled potatoes to bind the dough, which gives the puris a soft interior and a delightful crunch on the outside.
What is Kuttu?
Kuttu is the Hindi name for buckwheat flour. Despite its name, buckwheat is not related to wheat and is actually not a grain. Kuttu flour has a nutty, earthy flavour that pairs wonderfully with a variety of Navratri curries and side dishes.
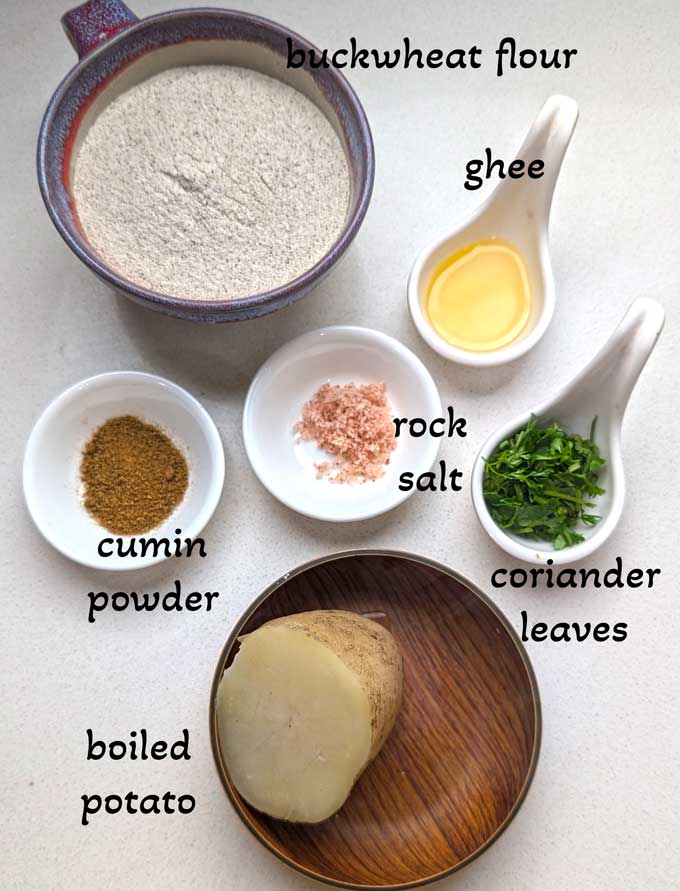
IngredientsYou’ll Need
- Buckwheat Flour (kuttu atta) finely milled. Make sure its not rancid or stale otherwise puri will taste bitter.
- Boiled Potato , peeled and grated to give a crisp texture and binding to the puri.
- Cumin Powder and seeds (jeera) for flavour.
- Ghee for binding the dough and deep frying the puri.
- Rock salt (Sendha Namak) to taste and chopped coriander leaves.
How To Make Kuttu Puri
1. Prepare the Dough:
- In a large mixing bowl, combine the Kuttu flour, grated boiled potato, cumin powder, seeds, coriander leaves, and rock salt.
- Use your hands to mix. The grated potato will moisten the flour. Add only a teaspoon of water at a time. Too much water will make the dough sticky and difficult to work with.
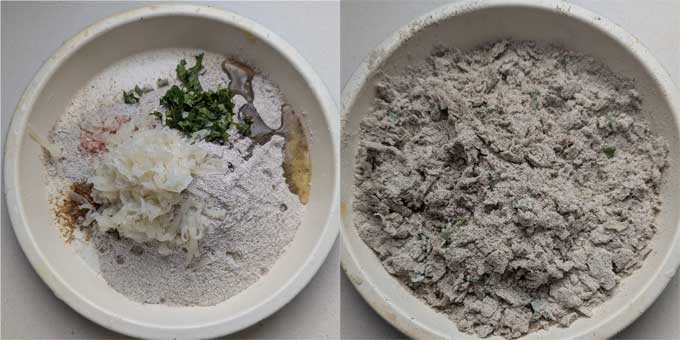
- Knead the ingredients into a smooth, firm dough. The dough should not be too soft or too hard.
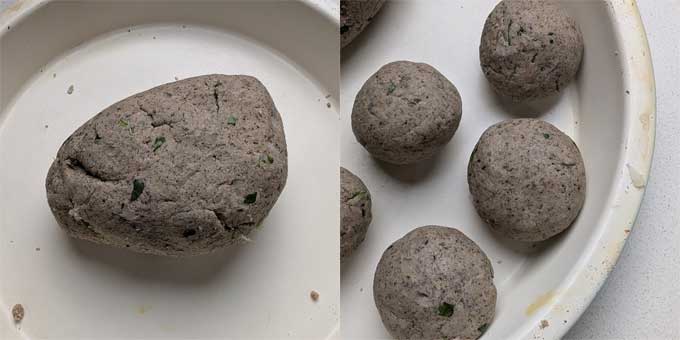
2. Rest the Dough:
- Once the dough is ready, cover it with a damp cloth and let it rest for about 15 minutes. This step is crucial as it allows the flour to hydrate and the dough to become more pliable, which prevents the puris from breaking while rolling.
3. Roll the Puris:
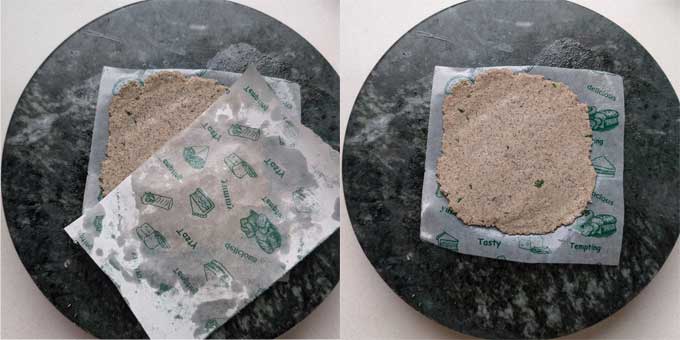
- Heat the oil or ghee for deep frying pan over medium-high heat.
- Divide the dough into small, equal-sized balls.
- Grease your palms with a little oil. Place a dough ball between two small pieces of plastic wrap/sheets. Gently flatten it with your palm and then carefully roll it into a small, thick disc of about 3-4 inches in diameter. The puris should not be too thin.
4. Fry Kuttu Puris:
- Carefully slide one rolled puri into the hot oil. The oil should be hot enough to sizzle the moment the puri is dropped in.
- Using a slotted spoon or spatula, gently press the puri down in the center. This will encourage it to puff up.
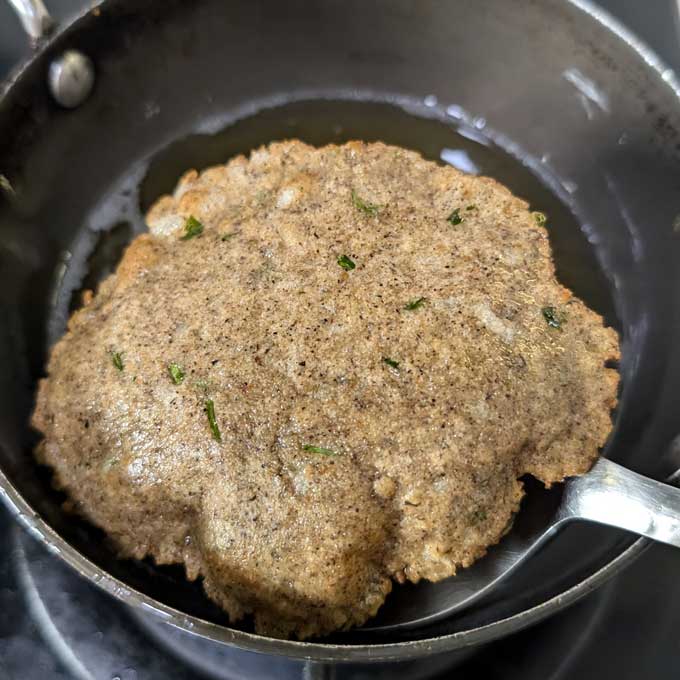
- Once the puri puffs up, flip it over and fry the other side until it turns golden brown and crispy. This should only take a few seconds on each side.
- Remove the puri from the oil and place it on a paper towel to drain excess oil.
- Continue the process with the remaining dough balls.
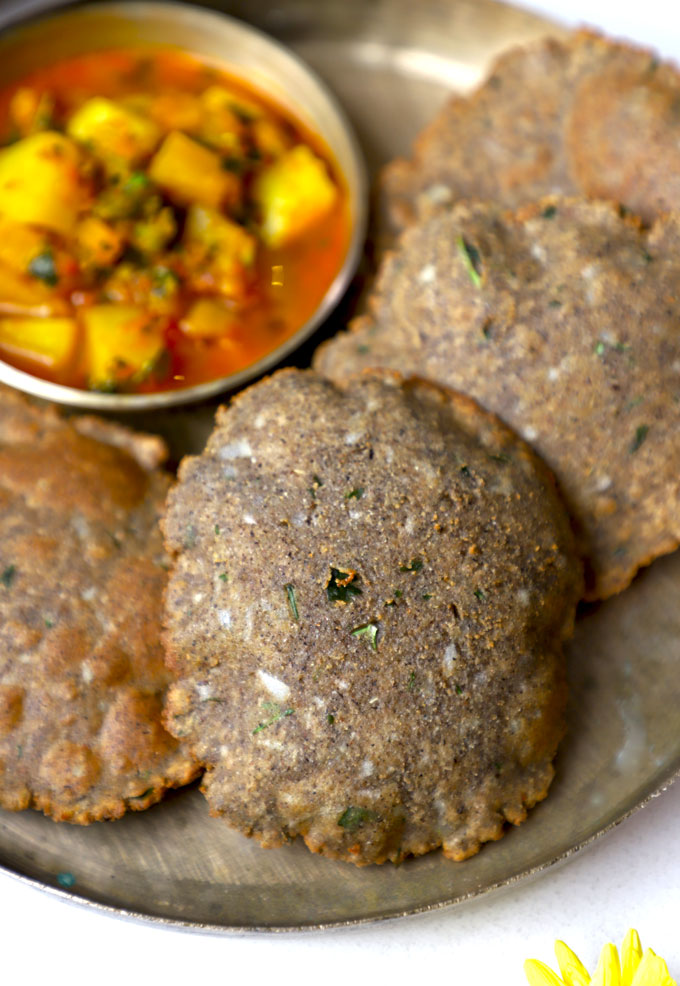
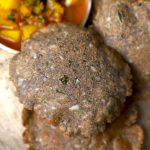
Serve the Kuttu Ki Puri with your choice of falahari sabzi and raita. Kuttu Ki Puri is best enjoyed hot and fresh.
It is traditionally served with:
- Aloo Ki Sabzi – a spicy, delicious North India Style potato curry.
- Kaju Makhana Sabzi without onion or garlic for fasting feast.
- Dahi Potato Curry is another favourite of my family with kuttu puri.
- Arbi Ki Sabzi made with colocasia (taro) root .
- Boondi Raita – provides a cool contrast to the hot puris.
- Dahi with a spoonful of sugar.
My Tried and True Tips
- The Right Potato: Use a starchy potato variety that binds well. Make sure the potato is completely cool before you grate it, as a warm potato will make the dough sticky.
- The Dough is Key: The consistency of the dough is the most important factor. It should be firm but soft enough to knead without adding much water. If you’re struggling with the dough sticking, dust your rolling surface lightly with a little extra Kuttu flour.
- Hot Oil is a Must: Ensure your oil is at the right temperature. If it’s not hot enough, the puris will absorb too much oil and become soggy. If it’s too hot, they will brown too quickly without cooking through.
- Handle with Care: Kuttu dough is delicate. Be gentle while rolling and frying the puris to prevent them from tearing.
- Pro-Tip: Follow my detailed guide on how to make perfect puri each time without fail.
More Navratri Recipes for you
- Suji Ka Halwa
- Vrat Ki Kheer
- Lauki Ki Kheer
- Vrat Ki Aloo Tikki
- Sabudana Khichdi

Ingredients
- ▢ 1 Cup kuttu ka atta (buckwheat flour)
- ▢ 1 large size potato, boiled and peeled
- ▢ ½ teaspoon cumin seeds (jeera)
- ▢ ¼ teaspoon cumin powder (jeera powder)
- ▢ 1 tablespoon ghee (clarified butter) + more for deep frying
- ▢ 1 tablespoon chopped coriander leaves
Instructions
- In a large mixing bowl, combine the Kuttu flour, grated boiled potato, cumin powder, seeds, coriander leaves, and rock salt.
- Mix nicely. The grated potato will moisten the flour. Add only a teaspoon of water at a time. Too much water will make the dough sticky and difficult to work with. Knead the ingredients into a smooth, firm dough. The dough should not be too soft or too hard.
- Once the dough is ready, cover it with a damp cloth and let it rest for about 15 minutes.
- Heat the oil or ghee for deep frying pan over medium-high heat. Divide the dough into small, equal-sized balls.
- Grease your palms with a little oil. Place a dough ball between two small pieces of plastic wrap/sheets. Gently flatten it with your palm and then carefully roll it into a small, thick disc of about 3-4 inches in diameter. The puris should not be too thin.
- Carefully slide one rolled puri into the hot oil. Using a slotted spoon or spatula, gently press the puri down in the center. This will encourage it to puff up. Once the puri puffs up, flip it over and fry the other side until it turns golden brown and crispy.
- Remove the puri from the oil and place it on a paper towel to drain excess oil. Continue the process with the remaining dough balls.
- Serve the Kuttu Ki Puri with your choice of falahari sabzi and raita.
Recipe Notes:
- After binding, resting the dough allows the flour to hydrate and the dough to become more pliable, which prevents the puris from breaking while rolling.
- Make sure to grease your hands, rolling pin, and plastic sheets nicely before rolling the puri.
- Kuttu Puri are not ideal for storing. It is best to serve them hot and fresh.
Nutrition
We follow a strict NO SPAM Policy
Kuttu Ki Puri Recipe
Equipment
- Mixing Bowl
- Deep Frying Pan
Ingredients
- 1 Cup kuttu ka atta (buckwheat flour)
- 1 large size potato, boiled and peeled
- ½ teaspoon cumin seeds (jeera)
- ¼ teaspoon cumin powder (jeera powder)
- 1 tablespoon ghee (clarified butter) + more for deep frying
- 1 tablespoon chopped coriander leaves
Instructions
- In a large mixing bowl, combine the Kuttu flour, grated boiled potato, cumin powder, seeds, coriander leaves, and rock salt.
- Mix nicely. The grated potato will moisten the flour. Add only a teaspoon of water at a time. Too much water will make the dough sticky and difficult to work with. Knead the ingredients into a smooth, firm dough. The dough should not be too soft or too hard.
- Once the dough is ready, cover it with a damp cloth and let it rest for about 15 minutes.
- Heat the oil or ghee for deep frying pan over medium-high heat. Divide the dough into small, equal-sized balls.
- Grease your palms with a little oil. Place a dough ball between two small pieces of plastic wrap/sheets. Gently flatten it with your palm and then carefully roll it into a small, thick disc of about 3-4 inches in diameter. The puris should not be too thin.
- Carefully slide one rolled puri into the hot oil. Using a slotted spoon or spatula, gently press the puri down in the center. This will encourage it to puff up. Once the puri puffs up, flip it over and fry the other side until it turns golden brown and crispy.
- Remove the puri from the oil and place it on a paper towel to drain excess oil. Continue the process with the remaining dough balls.
- Serve the Kuttu Ki Puri with your choice of falahari sabzi and raita.
Notes
- After binding, resting the dough allows the flour to hydrate and the dough to become more pliable, which prevents the puris from breaking while rolling.
- Make sure to grease your hands, rolling pin, and plastic sheets nicely before rolling the puri.
- Kuttu Puri are not ideal for storing. It is best to serve them hot and fresh.
Nutrition
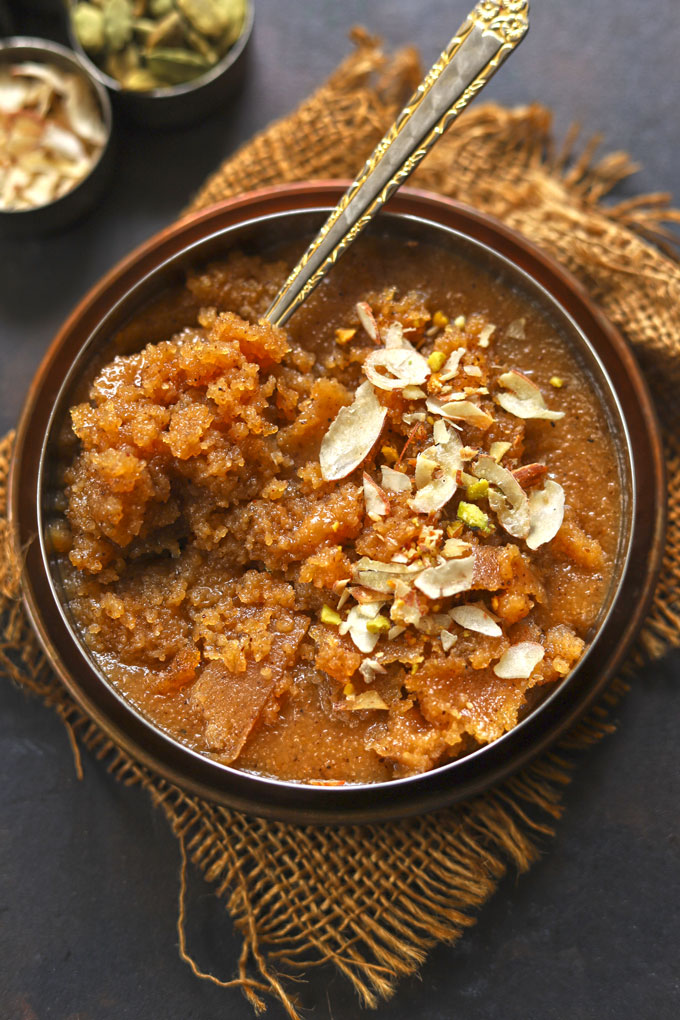
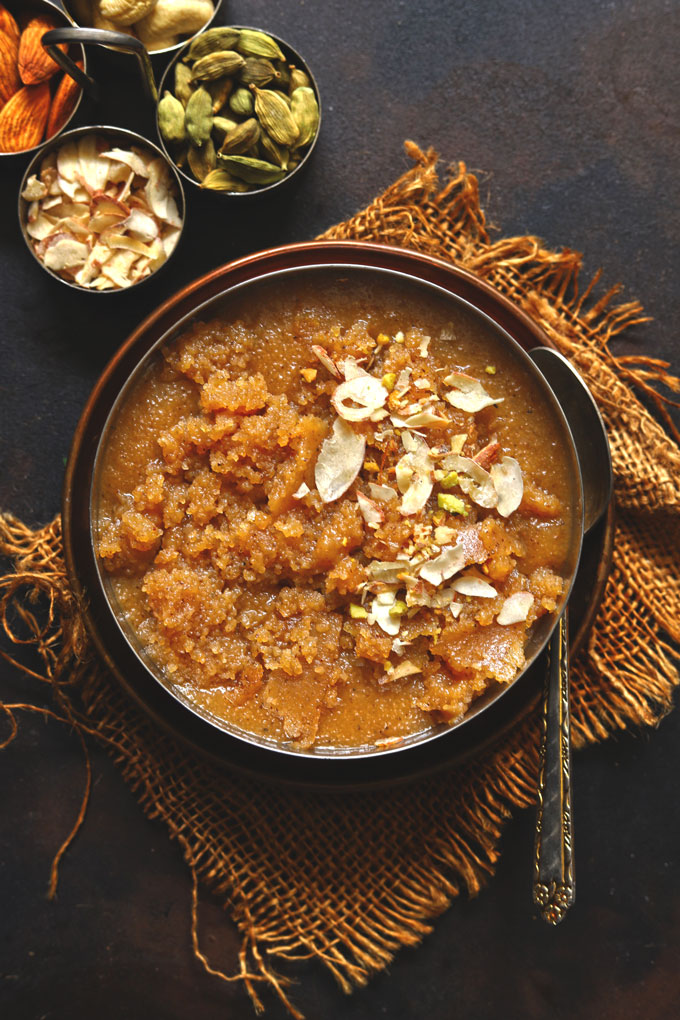
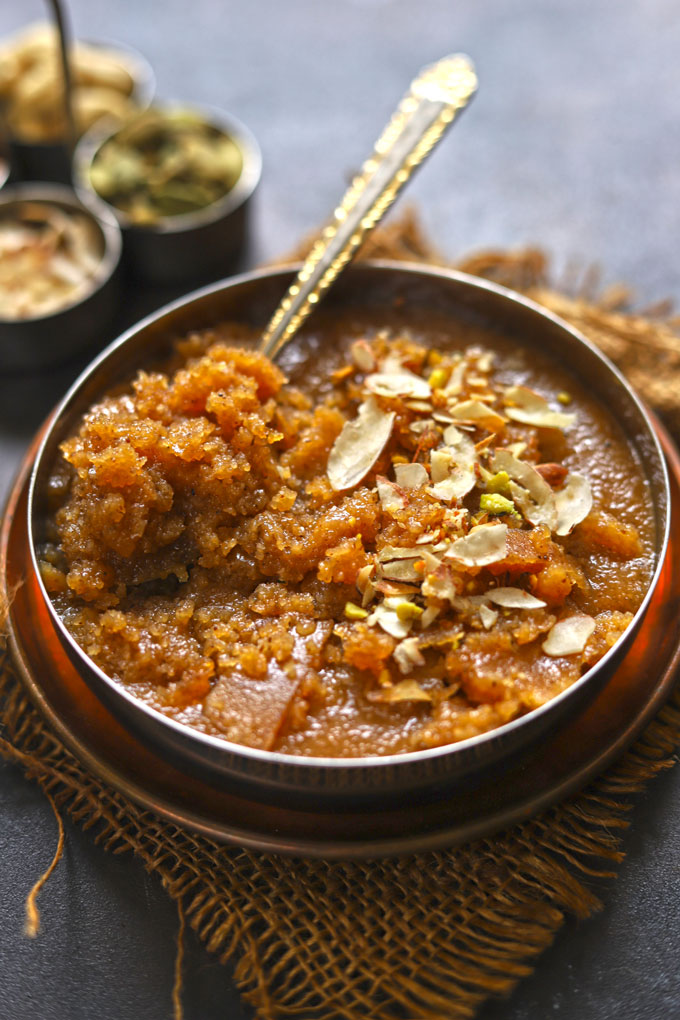
Suji Ka Halwa is one of the easiest halwa recipes and also one of the most popular Indian sweet dishes – also known as Sooji Sheera or Rava Kesari.
Estimated reading time: 5 minutes
- About Suji Ka Halwa
- The Key Ingredient – Suji (Semolina)
- Watch Suji Halwa Video
- My Tried and True Tips
- FAQS Related To Suji Halwa
- Suji Ka Halwa Recipe
About Suji Ka Halwa
Suji Ka Halwa is a traditional Indian sweet dish with semolina (suji/rava), sugar, ghee, and water. Regardless of these humble ingredients, this Indian halwa tastes simply divine.
Halwa is a common sweet dish or Indian-style sweet pudding. It is widely made across the Indian subcontinent. There are many variations of halwa – carrot halwa , atta (wheat) halwa , chikoo halwa , moong dal halwa , pineapple rava kesari , etc.
Sooji Halwa was a staple dessert during my growing up years, no festive meals, birthdays celebrations, Navratri, or cold winter days, were considered complete without a comforting bowl of suji ka halwa on the table.
The Key Ingredient – Suji (Semolina)
Semolina is known as suji/sooji or rava in India. Suji, rava, and semolina are all the same. They are called different names in different regions of our country.
Suji is mainly made with wheat. Hence, it is not a gluten-free ingredient. It is widely used in Indian kitchens to make idli , cutlet , or cake .
What kind of suji (rava) is best for making halwa?
There are different varieties of sooji available in supermarkets. For sooji halwa the fine variety of sooji is the best. In South India, it is known as chirotti rava.
Other Ingredients for Halwa:
- Ghee: It gives the suji ka halwa a rich taste and aroma.
- Sugar: The white granulated sugar is perfect for the suji halwa. You can use jaggery powder or light brown sugar as well.
- Cardamom Powder is an optional ingredient for a sweet aroma and taste.
- Water : Finally, water helps give the halwa desired consistency and cook semolina. Many sooji halwa recipes suggest using milk instead of water for a creamy taste. I always prefer my halwa cooked in water.
Watch Suji Halwa Video
My Tried and True Tips
- The only secret mantra behind the triumphant bowl of sooji halwa is the slow roasting process of the semolina . The more semolina is slowly roasted, the better the flavour and colour of the halwa.
- Always use a heavy bottom pan to roast suji and make halwa. A nonstick pan or a lightweight pan is not an ideal choice. Do not leave the semolina unattended while roasting, as it burns quickly.
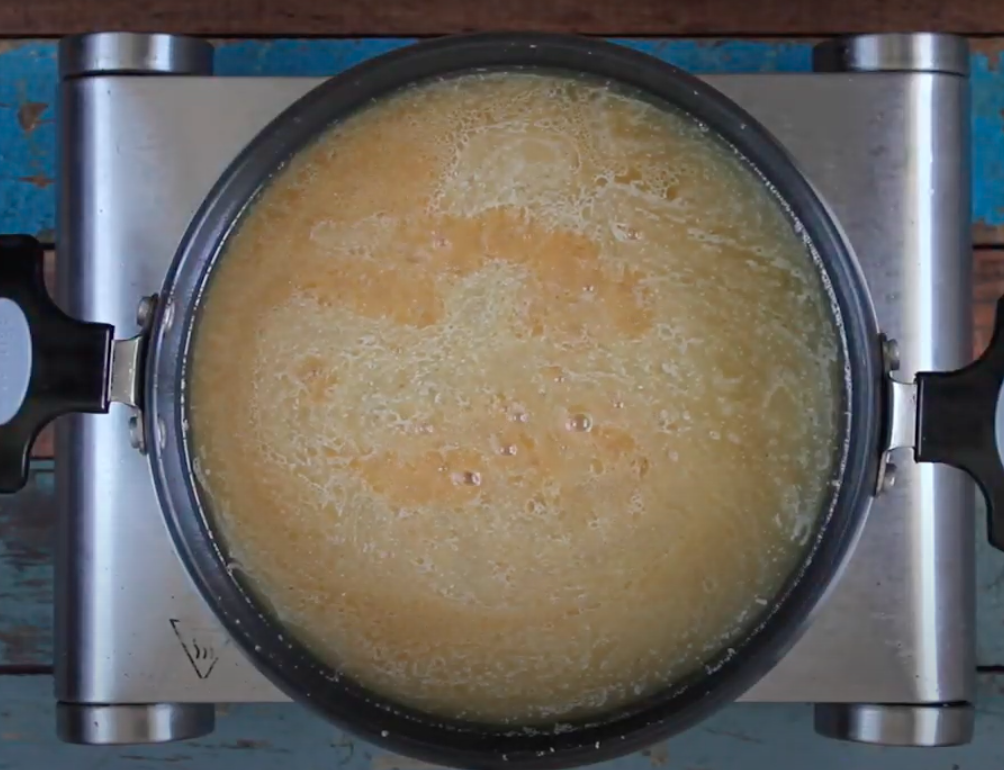
- The perfect ratio of suji:ghee:sugar is 1:1:1 . The equal portion of these three ingredients will always yield a delicious bowl of suji ka halwa. If you add 1 cup of semolina, then 4 cups of water are fine to make halwa. You can adjust the quantity of water depending on the consistency desired.
- If you like thick sooji halwa then 4 cups of water are enough. If you want to have sooji sheera-like consistency, then increase the water.
- After adding water, cover the pan with a lid as semolina bubbles and splutters around. Stay away at a safe distance from the bubbling pan of halwa.
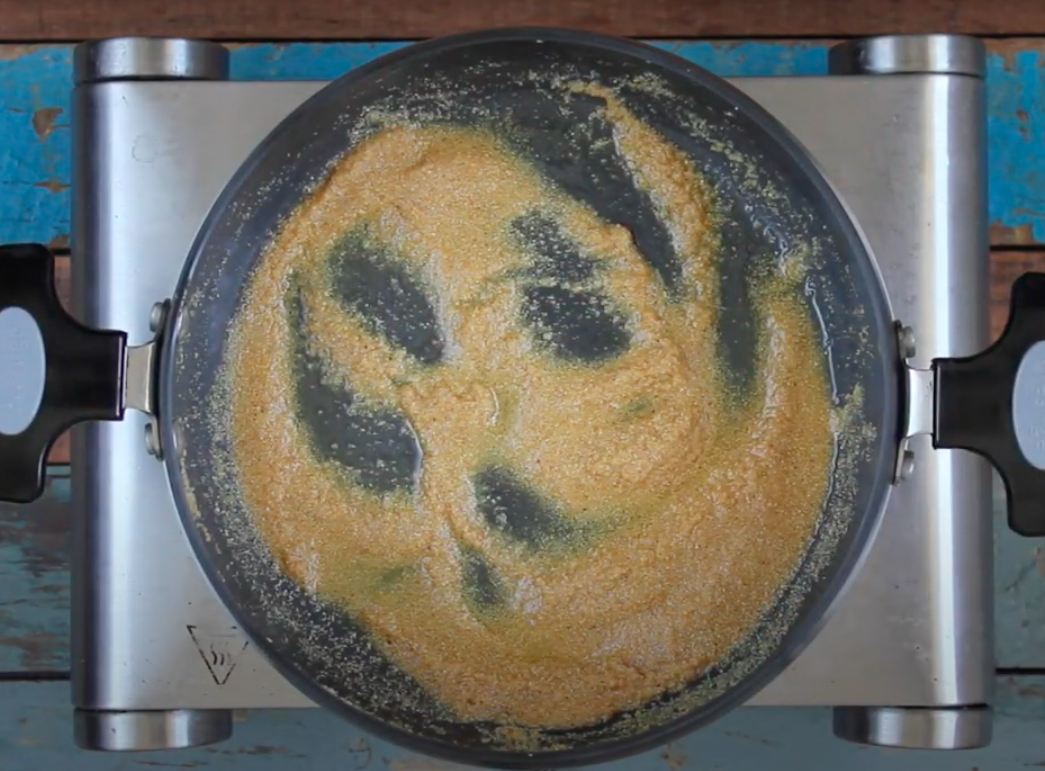
The colour of suji halwa may vary from cream or pale white to light brown or deep brown. This happens because of the roasting time of semolina. If the semolina is less roasted or roasted over a low flame, then the colour of halwa is pale white. Whereas if semolina is roasted to perfection, the colour of halwa is deep or dark brown.
Yes, you can use unsalted butter to make halwa.
The only reason for a bitter-tasting suji halwa is the burnt semolina. If the semolina is over-roasted or burnt, then the taste of halwa is bitter and not appetizing.
If your suji halwa seems too liquid, let it simmer over low heat for 5 – 10 minutes without covering. Stir at regular intervals. After a few minutes, the excess moisture evaporates. Simmer till you get the desired consistency.
More Indian Dessert Recipes for you to try
- Khoya Gulab Jamun
- Sugar Free Bhapa Doi
- Coconut Ladoo
- Mawa Barfi
- Basundi
- Jalebi
- Modak
Ingredients
- ▢ ½ Cup ghee (clarified butter)
- ▢ ½ Cup semolina (rava/sooji)
- ▢ ½ Cup sugar or to taste
- ▢ 1 teaspoon green cardamom powder (optional)
- ▢ 3 Cup water, room temperature
Ingredients For Garnish:
- ▢ 2 tablespoon sliced almonds and pistachio
Instructions
- In a heavy bottomed pan heat ghee over medium flame.
- Add semolina, reduce the heat to low and saute semolina over low heat till it turns deep brown in color, stirring continuously in between. Stirring is essential while roasting semolina so that it gets evenly roasted.
- Roasting semolina over low heat is a time taking task. For more efficiency I usually keep myself engaged with other chores in the kitchen while semolina is getting roasted.
- Once semolina is roasted add water and stay a bit far away from the pan as there is a lot of bubbling and splashing.
- Once semolina calms down a bit after adding water stir continuously to avoid lump formation.
- Add sugar and cardamom powder. Stir once again to combine. Keep the flame to low.
- Cover the pan with the lid and let halwa cook for 5 – 10 minutes over a low heat.
- Remove the lid of the pan, stir, turn off the heat. Suji Halwa is of dropping consistency, if it seems too liquid, let it simmer for few more minutes over low heat.
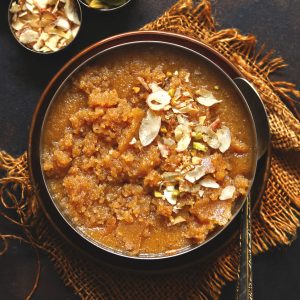
- Transfer suji halwa to serving bowls. Garnish with sliced almonds and pistachio. Serve warm.
Recipe Notes:
- The perfect ratio of suji:ghee:sugar is 1:1:1 .
- If you are adding 1 cup of semolina then 4 cups of water are fine to make halwa.
- After adding water, cover the pan with a lid as semolina bubbles and splutters around.
- Store leftover suji halwa in an airtight container in the refrigerator for a week. Reheat it in the microwave for 3 – 5 minutes before serving. The best way to store leftover rava/sooji is first lightly roast it and allow it to cool. Then transfer to an airtight container and store in the refrigerator for longer shelf life. Or you can store it at room temperature. Check from time to time for bugs and molds.
Nutrition
We follow a strict NO SPAM Policy
