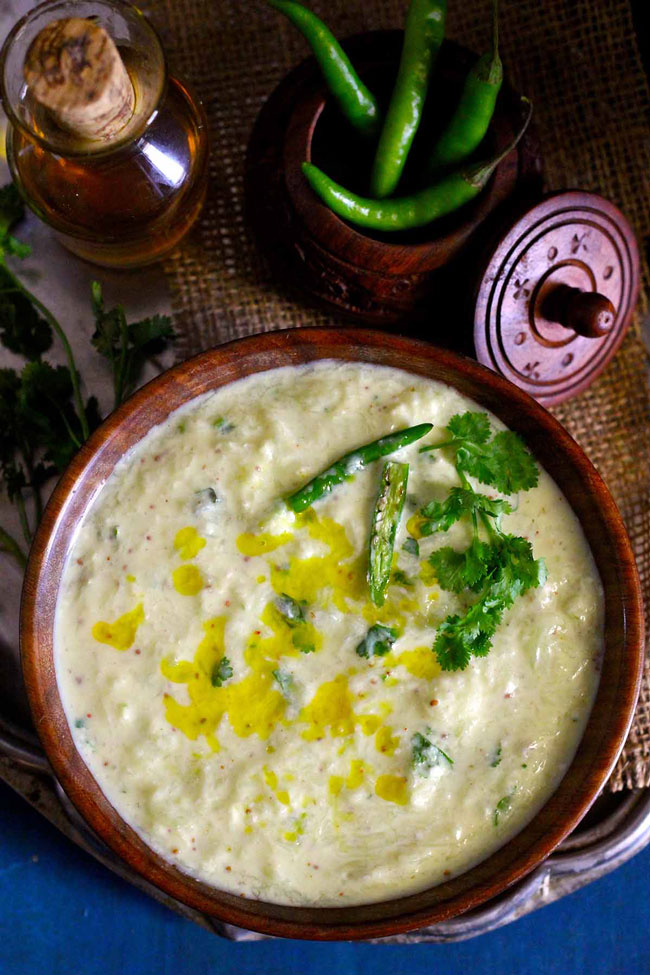
Kumaoni Raita is a delicious cucumber raita from Uttarakhand. It’s spicy, tangy, and full of flavours. It is known as Pahadi kheere ka raita.
Famous Kumaoni Raita
Kumaon Hills are nestled in the foothills of the Himalayas in Uttarakhand, India. They are bestowed with a maze of mountains, lush greenery, and breathtaking landscapes.
The region’s culture, cuisine, and rich heritage remain untold. However, many renowned food historians and novelists have captured the essence of the Kumaoni cuisine in their writings.
If you have visited Kumaon’s lush green hill stations, such as Nainital or Ranikhet , you might taste the famous Kumaoni Raita with aloo ke gutke . It is a quintessential part of Kumaoni cuisine.
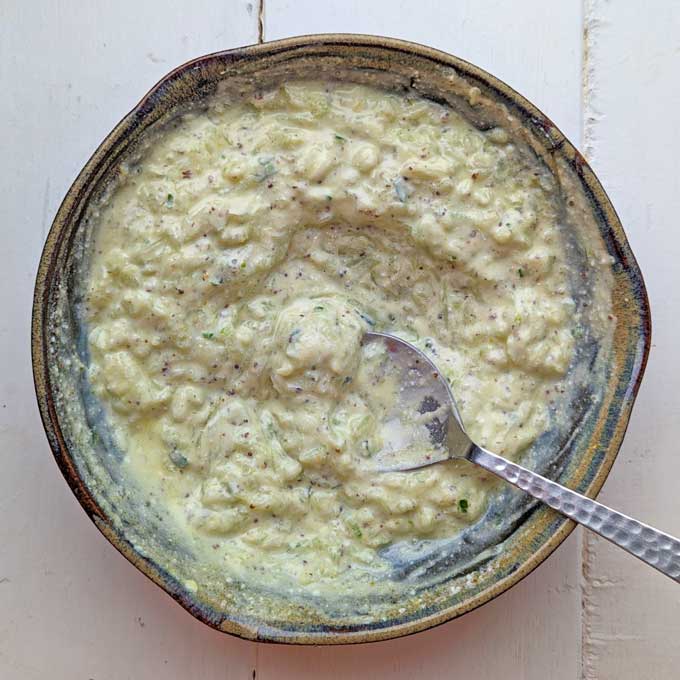
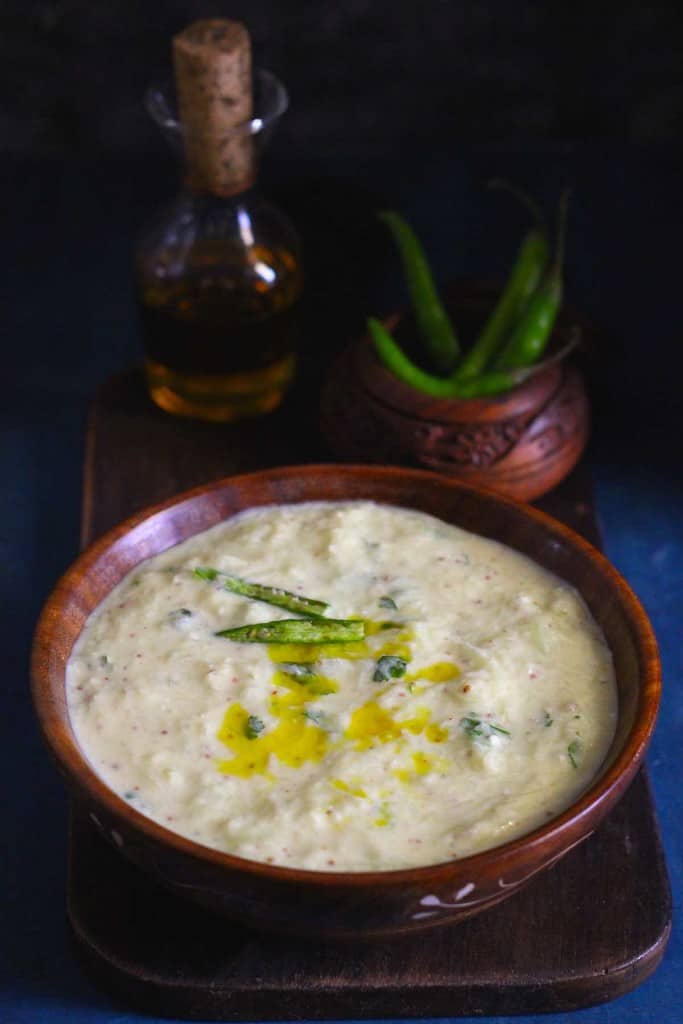
Kumaoni Raita has a very unique taste and texture. It is spicy, zingy, and has a thick, luscious texture. It is also one of the most popular street food across the Kumaon region. You can call it Pahadi raita, Kumaoni raita, kheere ka raita, or kakdi ka raita.
The first taste impression of Kumaoni Raita is like a hit of the strong taste, and not subtle at all. And it might be possible due to the robust flavour of mustard, and it might not be a love-at-first-bite kind of dish. Eventually, your palate starts developing a kind of affection with this rare sapor.
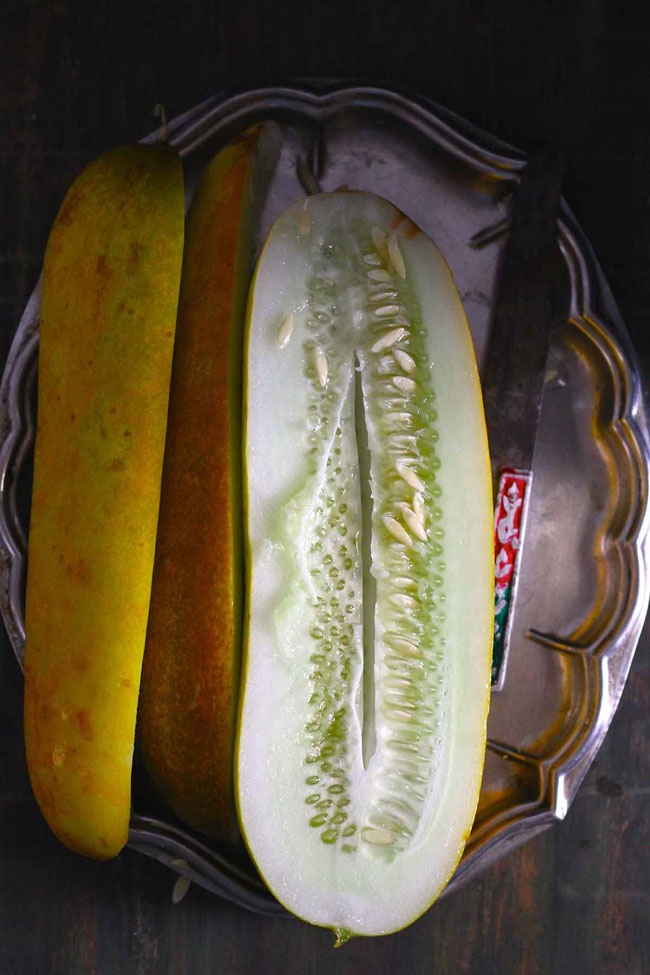
About Pahadi Cucumber
To make the Kumaoni raita, on e needs the giant yellowish skin tone local cucumber variety . It is also known as Pahadi kheera.
You can use the regular big-size Indian cucumber for making Kumaoni raita.
The other predominant flavour in the pahadi raita is tiny pale yellow local mustard seeds known as bachha rai or lai . These mustard seeds are combined with mustard oil and green chilli to escalate the flavours of raita to a new high.
While travelling across the region, you can buy this local cucumber and mustard from the markets.
Other Ingredients
- Curd
- Green Chilli and Coriander
- Salt, Turmeric, Mustard Oil
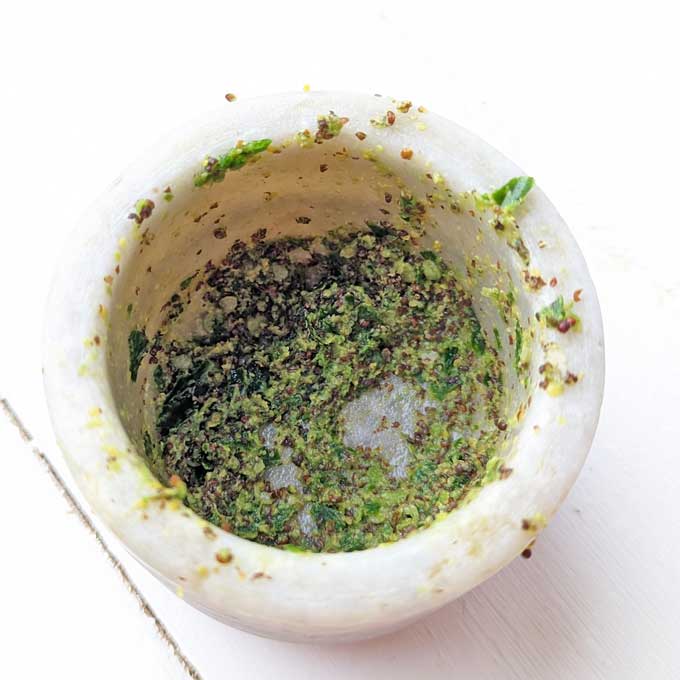
How To Make
Step 1) Add mustard seeds, green chilli, and salt in a stone mortar and pestle. Grind to a coarse paste. Or you can use a tiny blender as well for the purpose. Transfer the paste to a bowl and set it aside.
Step 2) Peel and cut the cucumber lengthwise into half. Remove the seeds from each piece using a spoon. Grate the cucumber, and squeeze out all the liquid from the grated cucumber using a muslin cloth. Set aside in a bowl.
Step 3) Whisk curd to get a smooth consistency. Use approximately ¼ cup of water to get the desired consistency. Kumaoni Kheere ka raita is usually on the thicker side.
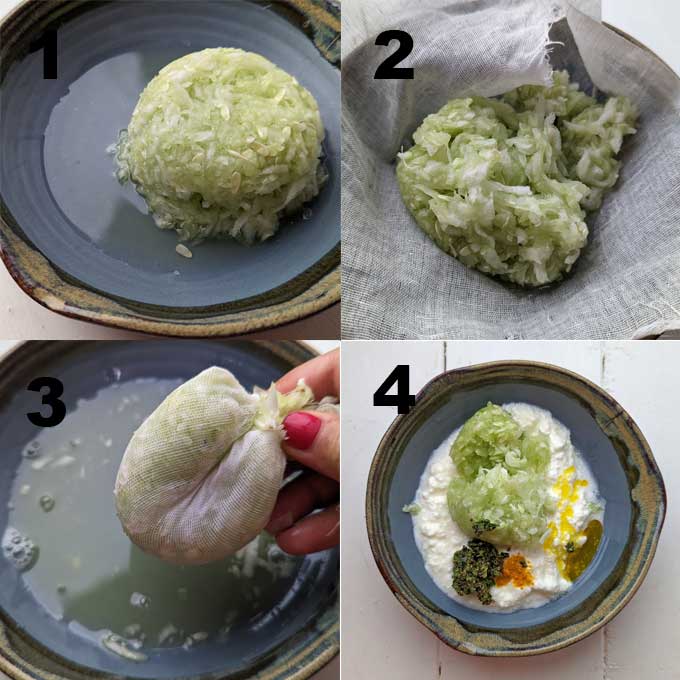
Step 4) Add the mustard paste to the whisked curd, grated cucumber, mustard oil, coriander leaves, salt, and turmeric. Mix nicely.
For the flavours to mature, let the raita sit at room temperature or in the fridge for 30 minutes before serving.
Serving Suggestion
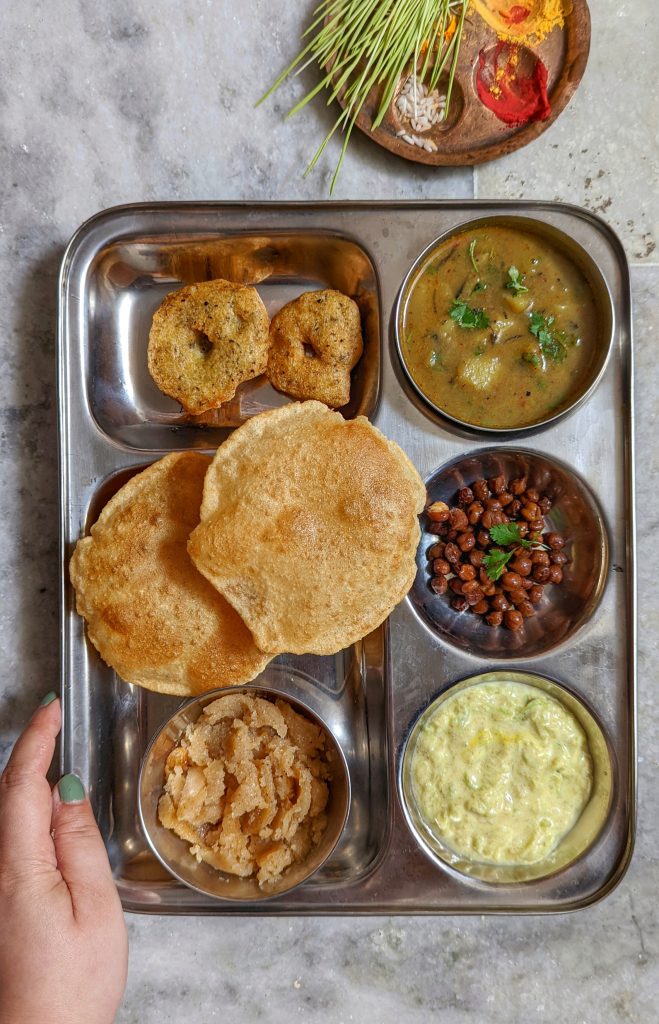
In a Kumaoni household, kheere ka raita is served with anything and everything. It is part of traditional Kumaoni thali on festive occasions, along with dishes like dal bada , poori , aloo ki sabji , and kheer .
Sometimes we enjoy it for lunch along with dal – bhaat .
And the forever popular combination is the Aloo Ke Gutke and Raita. The spicy, crispy, sweet Pahadi aloo is served with raita. It is one of my favourite teatime snacks.
My Tried and True Tips
A coarse paste of mustard seeds and green chilli is required —no need to make a fine chutney-like paste. Grinding mustard seeds and green chilli in a mortar and pestle or a stone grinder for the rustic texture is best.
Adding mustard oil to the Kumaoni raita is optional. It is added for that extra kick in the flavour.
No need to dry roast or fry the mustard seeds to make the raita. Make a coarse paste and directly combine it with the curd.
Before adding the cucumber, ensure all the liquid from the grated cucumber is squeezed out. This step will ensure a thick and luscious Pahadi Kheere Ka Raita.
Last but not least, the flavours of this cucumber raita mature after a few hours. Hence, it is always best to make it in advance and store it in the fridge.
More Kumaoni Recipes
- Aloo Paani
- Gahat Ki Dal
- Badi Ki Sabji
- Aloo Ke Gutke
- Mooli Ki Kadhi
- Kumaoni Bada (Vada)
- Pahadi Vrat Ki Panjri
If you try this recipe and love it, please leave a comment and a rating. This helps us grow and reach other food lovers like you.

Ingredients
- ▢ 400 gram curd
- ▢ 2 Cup grated cucumber
- ▢ 2 ¼ teaspoon salt or to taste
- ▢ 1 tablespoon small size mustard seeds (rai)
- ▢ 2 green chilli
- ▢ 2 tablespoon mustard oil (optional)
- ▢ ½ teaspoon turmeric powder
- ▢ 2 tablespoon chopped coriander leaves
Instructions
- Add mustard seeds, green chilli, and ¼ teaspoon salt in a stone mortar and pestle. Grind to a coarse paste. Or you can use a tiny blender as well for the purpose. Transfer the paste to a bowl and set it aside.
- Peel and cut the cucumber lengthwise into half. Remove the seeds from each piece using a spoon. Grate the cucumber, and squeeze out all the liquid from the grated cucumber using a muslin cloth. Set aside in a bowl.
- Whisk curd to get a smooth consistency. Use approximately ¼ cup of water to get the desired consistency. Kumaoni Kheere ka raita is usually on the thicker side.
- Add the mustard paste to the whisked curd, grated cucumber, mustard oil, coriander leaves, remaining salt, and turmeric. Mix nicely. Taste, and if required, add more salt or mustard oil.
- For the flavours to mature, let the raita sit at room temperature or in the refrigerator for 30 minutes before serving.
- Serve Kumaoni Raita chilled with aloo ke gutke .
Recipe Notes:
- Do not make a fine chutney like paste of mustard seeds and chilli.
- Adding mustard oil to the Kumaoni raita is optional. It is added for that extra kick in the flavour.
Nutrition
Postcard From Kumaon Hills, Uttarakhand

Summer Vaccation in Ranikhet, Uttarakhand
We follow a strict NO SPAM Policy
Kumaoni Raita Recipe
Equipment
- Mixing Bowl
- Grater
Ingredients
- 400 gram curd
- 2 Cup grated cucumber
- 2 ¼ teaspoon salt or to taste
- 1 tablespoon small size mustard seeds (rai)
- 2 green chilli
- 2 tablespoon mustard oil (optional)
- ½ teaspoon turmeric powder
- 2 tablespoon chopped coriander leaves
Instructions
- Add mustard seeds, green chilli, and ¼ teaspoon salt in a stone mortar and pestle. Grind to a coarse paste. Or you can use a tiny blender as well for the purpose. Transfer the paste to a bowl and set it aside.
- Peel and cut the cucumber lengthwise into half. Remove the seeds from each piece using a spoon. Grate the cucumber, and squeeze out all the liquid from the grated cucumber using a muslin cloth. Set aside in a bowl.
- Whisk curd to get a smooth consistency. Use approximately ¼ cup of water to get the desired consistency. Kumaoni Kheere ka raita is usually on the thicker side.
- Add the mustard paste to the whisked curd, grated cucumber, mustard oil, coriander leaves, remaining salt, and turmeric. Mix nicely. Taste, and if required, add more salt or mustard oil.
- For the flavours to mature, let the raita sit at room temperature or in the refrigerator for 30 minutes before serving.
- Serve Kumaoni Raita chilled with aloo ke gutke .
Notes
- Do not make a fine chutney like paste of mustard seeds and chilli.
- Adding mustard oil to the Kumaoni raita is optional. It is added for that extra kick in the flavour.
Nutrition
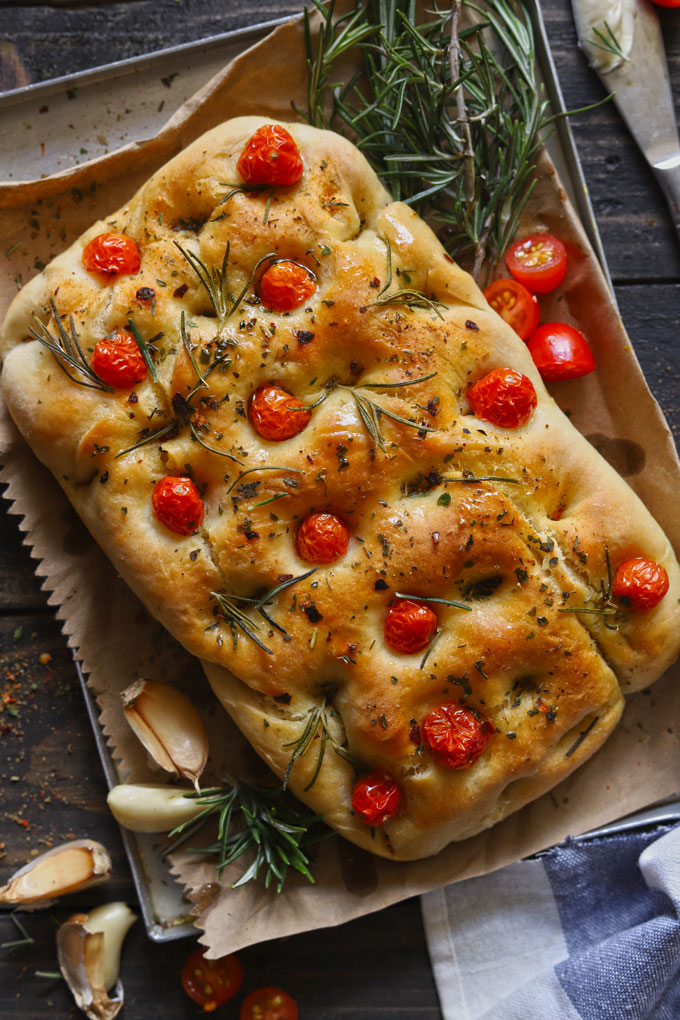
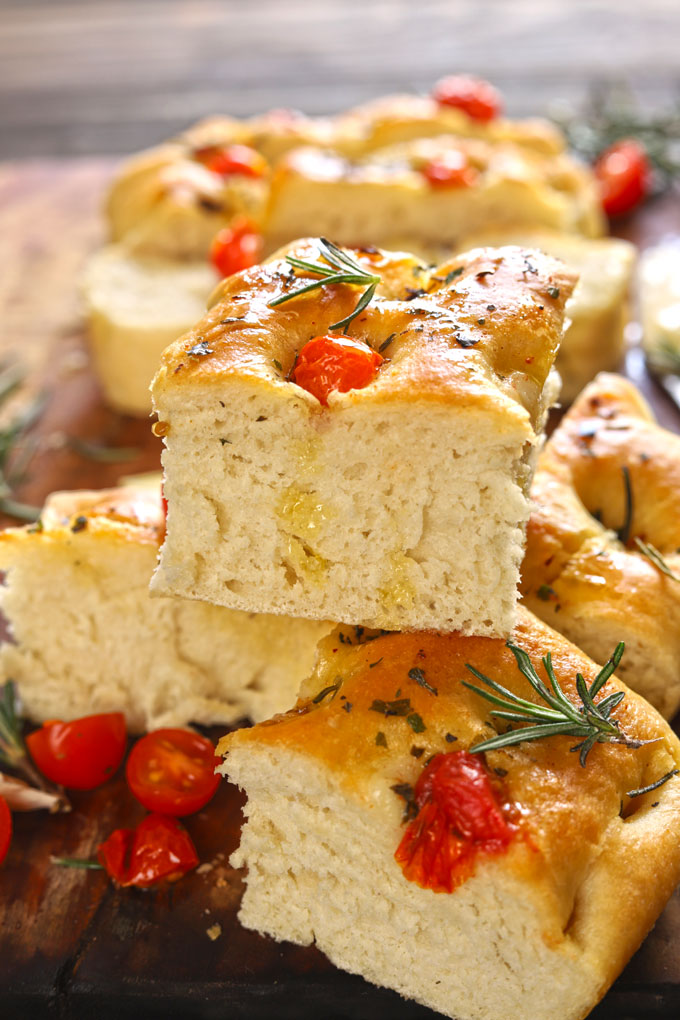
This Easy Rosemary Garlic Focaccia Recipe is perfect for beginner bakers! The hardest part is waiting for the dough to rise. The ingredients are pantry staples, and you can easily customize the toppings.
Is there anything that beats the smell of freshly baked bread at home? The answer is no . There is not.
There’s just something about fresh bread that instantly lifts the soul , and you know you’ll have a great meal.
Focaccia bread , in particular, is one of my absolute favourites . Especially this Focaccia Recipe. Why?
- It’s easy! It’s one of the more fail-proof bread recipes I’ve tried – perfect for beginners.
- You can make it your own! Add your favourite toppings – I’ll list some of mine below!
- It tastes amazing! Hands down, one of the best-tasting, easy bread recipes to make!
What exactlyisFocaccia?
Focaccia is a flat, oven-baked Italian bread, very similar to pizza . Focaccia recipes have been used as far back as Ancient Roman times and are created in many ways depending on the region.
Some are cookie-hard , like focaccia di Camogli, while others, like this focaccia recipe, are oily and soft .
Focaccia can also be sweet or savoury . In some regions, it’s more of a cake than bread; the ingredients will include sugar, raisins, honey, and other sweet ingredients.
Venetian Focaccia is even similar to panettone and is traditionally served at Easter.

Ingredients Required
- All-purpose Flour : the fountain of all bread recipes!
- Instant Yeast : Yeast is how the bread rises – the difference between flatbread and soft, fluffy bread.
- Sugar : Sugar activates the yeast . If you don’t add some sugar, you’ll have a yeasty-tasting flatbread.
- Extra Virgin Olive Oil : Olive oil adds fat and flavour and helps the dough to become less sticky .
- Salt : Salt enhances the natural bread flavours .
How to Make Focaccia
Activate the instant yeast(Don’t follow this step if you are using instant active dry yeast)
The yeast is responsible for the volume of the bread, but for it to work, we have to activate it. To do this, there are 4 easy steps :
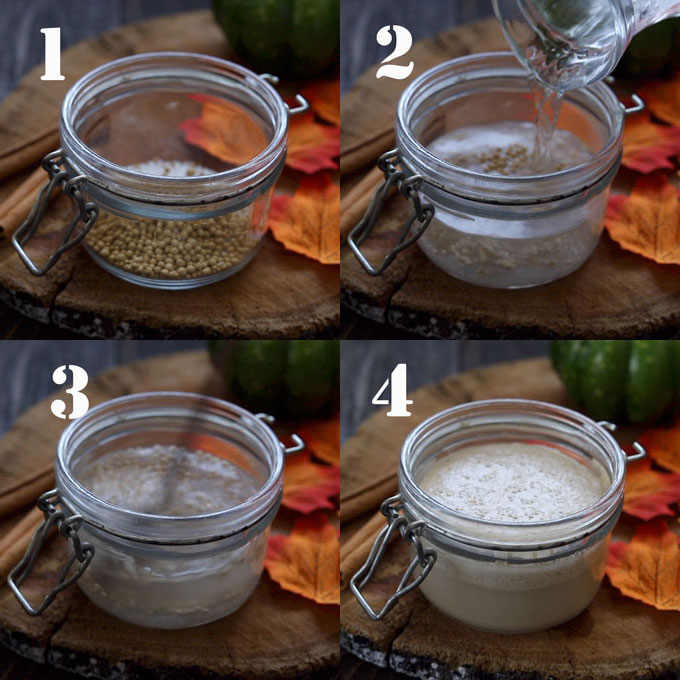
- Combine sugar and water. Bring water to boil until sugar is dissolved completely. Allow water to become lukewarm. It should not be burning hot to the touch but still warm. The temperature needs to be between 105 and 110°F .
- Add instant active dry yeast into the lukewarm water . Stir to combine.
- Let it sit for 10 minutes until a thick layer of foam forms on top.
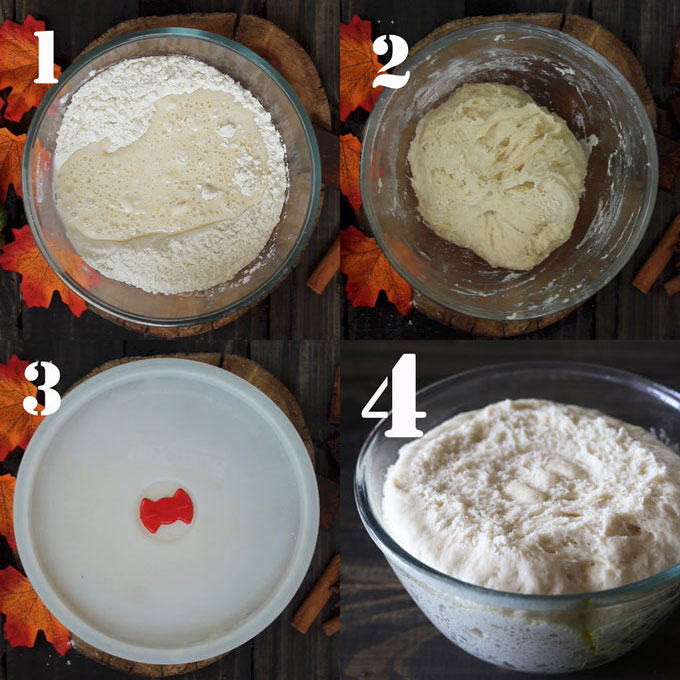
Next, we’llprepare the dough:
- Mix the dry ingredients in a bowl , then add the yeast mixture .
- Once this is combined, add in the olive oil and knead the bread for 3-5 minutes.
- Proofing : Letting the dough rise. To do this, you add the dough to a large, lightly greased mixing bowl, cover it tightly (a lid, plastic wrap or a tea towel, slightly damp with warm water and secured with a rubber band or string will work), and then let it rise for 30 minutes . It would be best to place the bowl somewhere warm with no drafts. Ovens and microwaves are great spots!
- The dough has risen – it’s time for our second proofing!
Second Proofing
This is where the dough begins to take on the shape of the finished bread.
- You will knead the dough again for 3-5 minutes and then place it in the baking tray or tin where you’ll be baking it.
- Make sure to grease the tray first before adding the dough!
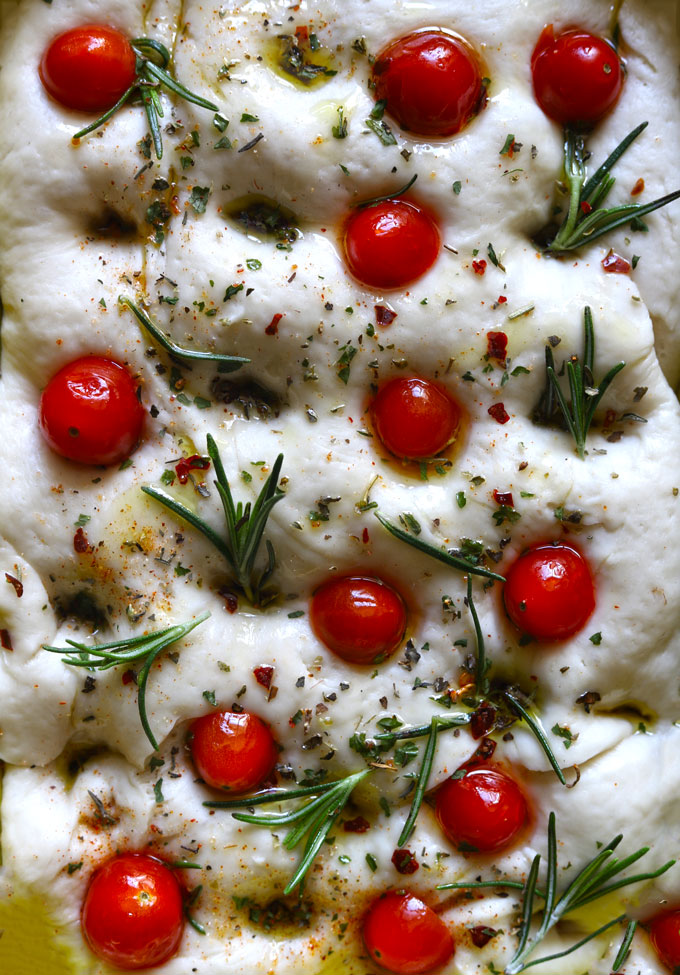
- Press your finger to make rows of dimples in the dough (about a finger distance apart), and then add one tomato and some rosemary to each dimple .
- Drizzle olive oil over it and some crushed garlic. Leave the dough in a warm place to rise again for 30 minutes .
- Bake the Focaccia Bread: The best part! Bake the dough on the middle rack in the oven for 40 minutes at 200°C/ 392°F until golden. Let it cool, add more oil if you’d like, cut it into squares and enjoy!
What other toppings can I add?
There are so many options! Here are 35+ of my favourites :
- Apple Slices
- Artichoke Hearts
- Arugula/Rocket (after baking)
- Bacon
- Basil (after baking if using fresh)
- Bell Peppers
- Cajun Seasoning
- Capers
- Chicken (roasted)
- Fresh Chilis
- Caramelized Onions
- Chives
- Chorizo
- Cilantro (after baking)
- Cheese (goat’s cheese, cheddar, mozzarella, gouda, blue cheese, ricotta)
- Everything Bagel Seasoning
- Garam Masala/ Curry Seasoning
- Ham
- Lemon (freshly squeezed or zest)
- Mushrooms
- Nuts (walnuts, pine nuts, slivered almonds)
- Olives (all kinds!)
- Oregano (after baking if using fresh)
- Pear slices
- Pepperoni
- Pesto
- Prosciutto
- Red Onion
- Red Pepper Flakes
- Salami
- Sausage (sliced links or crumbled)
- Seeds (flax, sesame, sunflower, pumpkin)
- Smoked Salmon
- Spring Onions
- Sun-Dried Tomatoes
- Za’atar Seasoning
How do I store this homemade focaccia bread?
If you’re eating this in the next couple of days, store it at room temperature, covered in plastic wrap, or a container for 2 days. Reheat in a 375-degree oven for 10 minutes.
To freeze, cut the focaccia into individual slices, and wrap each slice in plastic wrap. Freeze for up to 1 month.
More Quick Bread Recipes
Naan Recipe (Without Yeast)
Whole Wheat Pancakes
Eggless Banana Bread
Corn Cheese Muffin
Date Nut Bread
If you try this recipe and love it, please leave a comment and a rating. This helps us grow and reach other food lovers like you.

Ingredients
- ▢ 500 gram all-purpose flour (maida)
- ▢ 10 gram (1 tablespoon) instant yeast
- ▢ 10 gram (1 tablespoon) white granulated sugar
- ▢ 1 tablespoon salt
- ▢ 2 tablespoon (30 ml) extra virgin olive oil
- ▢ 350 ml (approx 1 ⅓ Cup) lukewarm water
Ingredients For Topping:
- ▢ 1 Cup sliced cherry tomato
- ▢ 1 tablespoon fresh rosemary
- ▢ 1 tablespoon crushed garlic
- ▢ 2 tablespoon extra virgin olive oil
Instructions
Activate Yeast:
- Combine sugar and water. Bring water to boil until sugar is dissolved completely. Allow water to become lukewarm. It should not be burning hot to the touch but still warm.
- Add instant dry yeast in water. Mix it nicely to dissolve in water. Set it aside for 10 minutes to foam. Once the foam is formed on top, yeast is activated.
Prepare Dough:
- Combine flour and salt in a mixing bowl or a stand mixer. Now pour the activated yeast mixture into small batches and form a smooth dough.
- The dough will be sticky. Do not add more flour. Add olive oil. Knead the dough for 3 – 5 minutes. It will become non-sticky. In a stand mixer, you can churn it at high speed for 2 – 3 minutes. Focaccia does not require too much kneading.
Proofing:
- Grease a large, spacious bowl with olive oil. Transfer the dough to a bowl. Cover it with a tight fitting lid. Keep the bowl in a warm place, such as inside the oven or microwave for 30 minutes.
- After 30 minutes, the dough will become double in volume. This means it is ready for the next stage. If the dough is not double in volume, keep it a bit longer for like 1 hour for proofing.
Second Proofing:
- Transfer the dough to a lightly greased kitchen counter. Knead the dough for 3 – 5 minutes to punch out all the air.
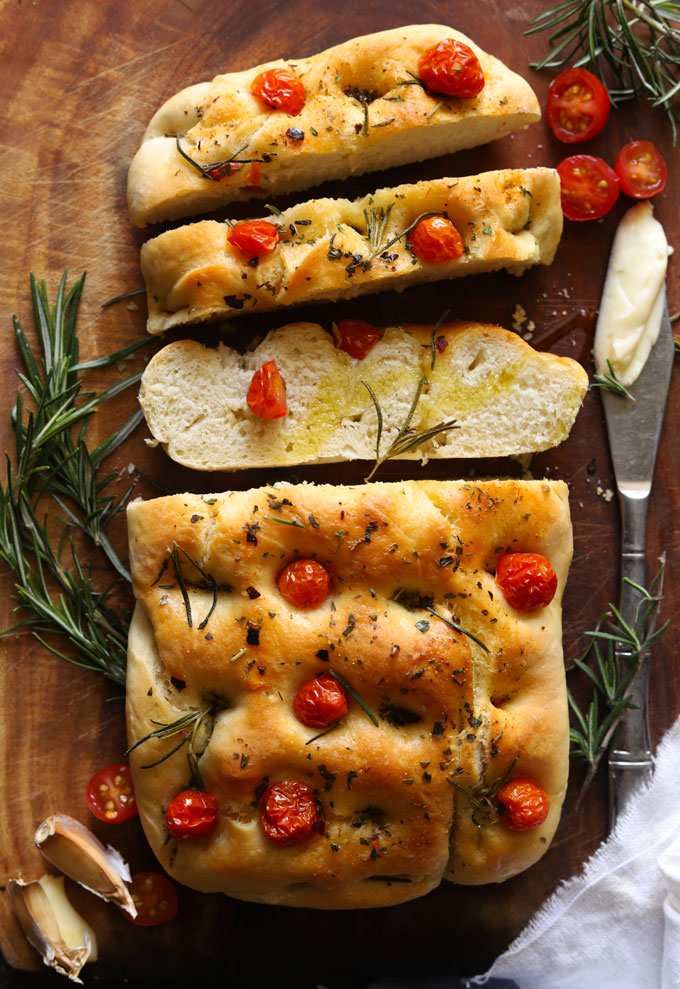
- Grease a baking tray or a square/rectangular tin with a teaspoon of olive oil. Place the dough on the tray and with greased fingers give it a flat shape. Keep the thickness of not more than half an inch as it will double in height once baked.
- Make dimples in the bread at an equal distance using your finger. Stuck cherry tomato, and rosemary in each dimple. Drizzle olive oil and sprinkle crushed garlic.
- Leave the bread to proof or rise in volume once again in a warm place for 20 – 30 minutes.
Bake Focaccia:
- Preheat oven at 200 degree celcius for 10 minutes.
- Bake the focaccia at 200 degrees Celcius for 40 minutes in the middle rack of the oven until golden on top.
- Transfer to a wire rack to cool down a bit. Brush with olive oil.
- Cut focaccia into squares and enjoy!
Recipe Notes:
Make sure sugar is dissolved in the water.
Water should be lukewarm to the touch and not boiling else. It will kill the yeast instead of activating it.
Wait until the yeast is foamy and a foam layer is formed on top. That is the signal it is fully activated.
Check the date of the yeast before using it. Old or expired yeast will not yield a satisfying texture of the bread.
There are two types of yeast – granular and fine powder. The instant granular yeast requires activation in lukewarm water. In contrast, active dry yeast with a fine powder texture can be mixed directly with flour. Read yeast packet instructions on how to use it.
Do not add more flour if the dough seems sticky. Instead, knead it and apply a little bit of olive oil. The dough for focaccia should be well-hydrated and not dry.
Always seal the dough in an airtight container and keep it in a warm, dry place for proofing, ideally inside the microwave or a preheated oven. In cold climates, proofing usually takes more time.
Sometimes due to the bigger size of the oven, you need to bake focaccia a little longer.
Nutrition
We follow a strict NO SPAM Policy
