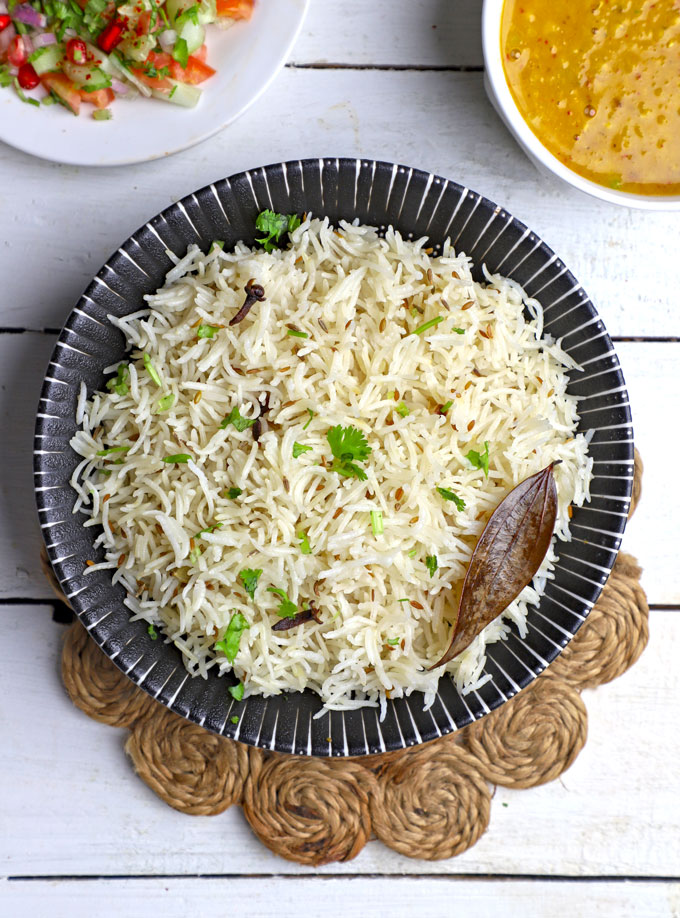
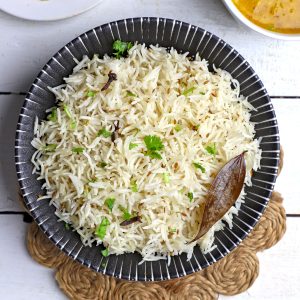
Jeera Rice is a famous Indian fried rice flavoured with cumin. It perfectly complements all Indian curries. You can make fluffy, aromatic cumin rice in under 15 minutes with an instant pot.
- What is ‘Jeera Rice’?
- Ingredients Required
- How To Make
- Serving Suggestion
- My Tried & True Tips
- More Indian Rice Recipes
- Instant Pot Jeera Rice Recipe
What is ‘Jeera Rice’?
In Hindi, the cumin seeds are called Jeera. Hence, the cumin-flavoured basmati rice is known as Jeera Rice. It is a vegetarian, one-pot, gluten-free rice dish with a subtle spices flavour and a fluffy, non-sticky texture.
You do not need fancy pulao or flatbread if you know how to make perfect jeera rice. It effortlessly fits as a side dish with every Indian main course .
Earlier, like my mother, I used to make jeera rice in a casserole over the stovetop. It is a failproof but time-consuming process. I always say that Instant Pot has been a total game-changing equipment for my Indian kitchen .
From making The 100 Best Curries for my debut cookbook to rice dishes, I cook it all on my Instant Pot.
So I am sharing a tried and tested instant pot method to make the BEST jeera rice in under 20 minutes.
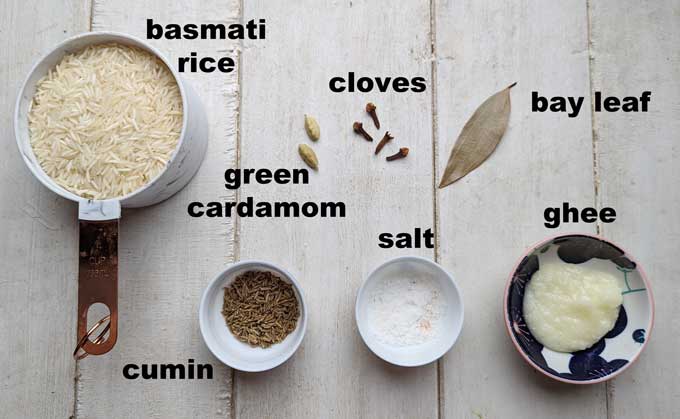
Ingredients Required
- Rice: Use long-grain, best-quality basmati rice. I would not recommend using short to medium-grain, starchy rice.
- Ghee: It gives a sweet aroma and taste to the rice. For vegan jeera rice, use flavourless vegetables or refined oil.
- Cumin: It is the star ingredient of this fried rice recipe. Use whole cumin seeds (jeera) and not the powder.
- Whole Spices: Green Cardamom, Cloves, and Bay Leaf. Use whole spices and not spice powders.
- Other Ingredients: Salt, Water
How To Make
Step 1) Rinse basmati rice with water 2 to 3 times or till water runs clear. Soak washed rice in water for 30 minutes ( images 1 & 2 ).
Step 2) To make cumin rice, set the sauté mode of the instant pot for 5 minutes.
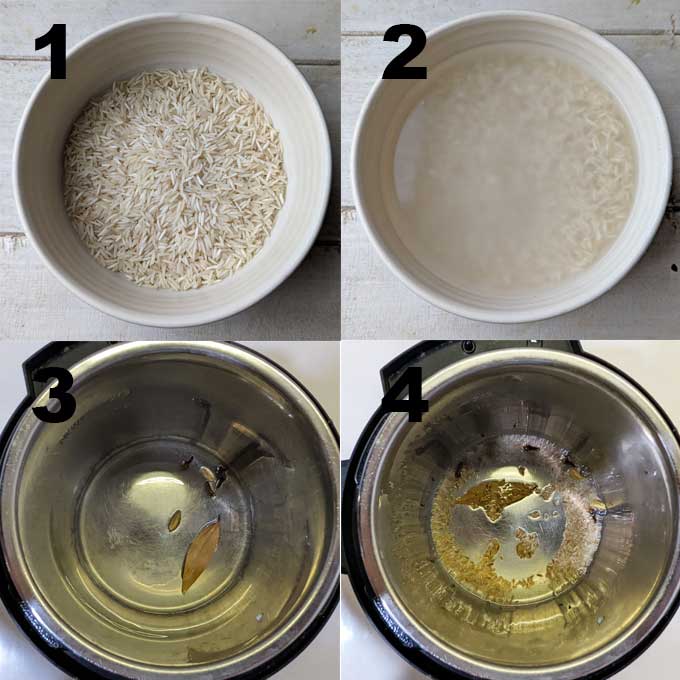
Step 3) Add ghee to the inner pot. Once the ghee is melted and hot, add bay leaf, cardamom, cloves, and cumin seeds. Fry them for 40 to 50 seconds to release the aroma of the spices ( images 3 & 4 ).
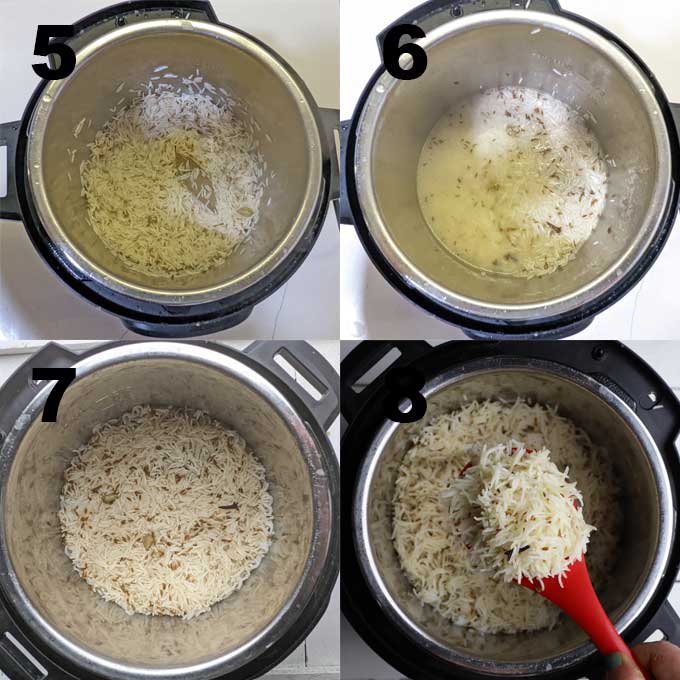
Step 4) Add soaked rice without water. Do not discard the water. Gently fry the rice for a minute to infuse the rice grain with the flavour of spices and ghee ( image 5 ).
Step 5) Add soaked rice water and an additional ¼ cup of water and salt. Stir to combine ( image 6 ). Cancel the sauté mode. Close the lid of the instant pot. Set the steam valve to the sealing position. Set the PRESSURE COOK mode for 3 minutes.
Step 6) Once the set timing is over, you can either wait for a natural steam release or do a quick release manually.
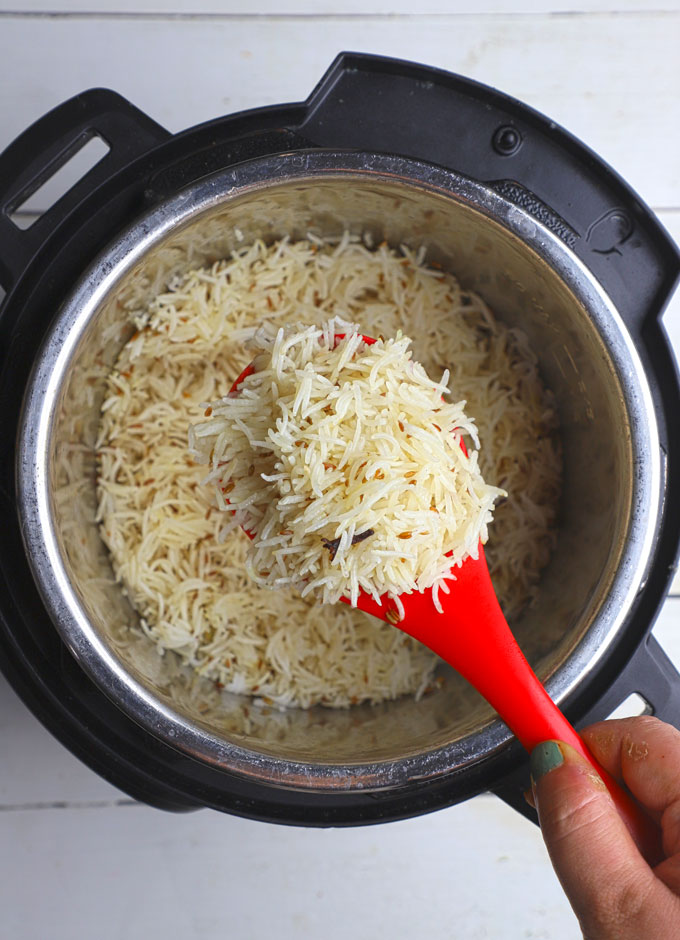
Step 7) Open the lid, fluff the rice using a fork, and sprinkle chopped coriander or cilantro leaves ( images 7 & 8 ). Allow jeera rice to sit for 1 minute.
And then serve hot with your favourite curry or dal.
Serving Suggestion
My favourite comfort food combination is jeera rice and arhar dal fry or everyday masoor dal . Apart from dal fry, I like to serve it with Rajasthani Boondi Kadhi , Paneer Curry , or a bowl of Chana Saag .
At many Indian restaurants, the popular combination is jeera rice and chicken curry or jeera rice and paneer butter masala .
It is one of those Indian side dishes that taste delicious with all types of gravies and curries.
My Tried & True Tips
- Long-Grain Rice: I think basmati rice is the best choice for making Indian jeera rice. You can substitute it with other aromatic, less starchy, medium to long-grain rice.
- Rice To Water Ratio: 1 ¼ cup of water to 1 cup of basmati rice. This ratio of rice to water always gives me fluffy, non-sticky rice in an instant pot.
- Soak & Roast: Soaking rice for 30 minutes helps each grain fluff up while cooking. Roasting the soaked rice while cooking gives a lot of flavour to the dish.
- DO NOT COOK for too long. In an instant pot , the jeera rice takes only 3 minutes. On a stovetop pressure cooker, 2 whistles over medium heat are enough. If you cook the rice too long, each grain will break apart and become mushy.
More Indian Rice Recipes
- Curd Rice
- Lemon Rice
- Chana Pulao
- Coconut Rice
- Vegetable Pulao
- Mushroom Pulao
If you try this recipe and love it, please leave a comment and a rating. This helps us grow and reach other food lovers like you.
Ingredients
- ▢ 1 Cup basmati rice
- ▢ 2 tablespoon ghee
- ▢ 1 bay leaf (tej patta)
- ▢ 2 green cardamom (elaichi)
- ▢ 4 cloves (laung)
- ▢ 1 tablespoon cumin seeds (jeera)
- ▢ 1 ¼ teaspoon salt or to taste
- ▢ 1 ¼ Cup water
- ▢ 1 tablespoon chopped fresh coriander
Instructions
- Rinse basmati rice with water 2 to 3 times or till water runs clear. Soak washed rice in 1 cup of water for 30 minutes.
- To make cumin rice, set the sauté mode of the instant pot for 5 minutes.
- Add ghee to the inner pot. Once the ghee is melted and hot, add bay leaf, cardamom, cloves, and cumin seeds. Fry them for 40 to 50 seconds to release the aroma of spices.
- Add soaked rice without water. Do not discard the water. Gently fry the rice for 1 minute to infuse the rice grain with the flavor of spices and ghee.
- Add soaked rice water and an additional ¼ cup of water and salt. Stir to combine. Cancel the sauté mode. Close the lid of the instant pot. Set the steam valve to the sealing position. Set the PRESSURE COOK mode for 3 minutes.
- Once the set timing is over, you can either wait for a natural steam release or do a quick release manually.
- Open the lid, fluff the rice using a fork, and sprinkle chopped coriander or cilantro leaves. Allow jeera rice to sit for 1 minute.
- Serve jeera rice warm with your favourite curry or dal.
Recipe Notes:
- The quantity of water and cooking time may vary depending on the variety of rice you are using. If you want, discard the bay leaf before serving the cumin rice.
- You can substitute ghee with unsalted butter or flavourless vegetable oil.
- Store leftover cumin rice in an airtight container in the fridge. Reheat it in a microwave or a pan on the stovetop.
Nutrition
We follow a strict NO SPAM Policy

Instant Pot Jeera Rice Recipe
Equipment
- Mixing Bowl
- Instant Pot
Ingredients
- 1 Cup basmati rice
- 2 tablespoon ghee
- 1 bay leaf (tej patta)
- 2 green cardamom (elaichi)
- 4 cloves (laung)
- 1 tablespoon cumin seeds (jeera)
- 1 ¼ teaspoon salt or to taste
- 1 ¼ Cup water
- 1 tablespoon chopped fresh coriander
Instructions
- Rinse basmati rice with water 2 to 3 times or till water runs clear. Soak washed rice in 1 cup of water for 30 minutes.
- To make cumin rice, set the sauté mode of the instant pot for 5 minutes.
- Add ghee to the inner pot. Once the ghee is melted and hot, add bay leaf, cardamom, cloves, and cumin seeds. Fry them for 40 to 50 seconds to release the aroma of spices.
- Add soaked rice without water. Do not discard the water. Gently fry the rice for 1 minute to infuse the rice grain with the flavor of spices and ghee.
- Add soaked rice water and an additional ¼ cup of water and salt. Stir to combine. Cancel the sauté mode. Close the lid of the instant pot. Set the steam valve to the sealing position. Set the PRESSURE COOK mode for 3 minutes.
- Once the set timing is over, you can either wait for a natural steam release or do a quick release manually.
- Open the lid, fluff the rice using a fork, and sprinkle chopped coriander or cilantro leaves. Allow jeera rice to sit for 1 minute.
- Serve jeera rice warm with your favourite curry or dal.
Notes
- The quantity of water and cooking time may vary depending on the variety of rice you are using. If you want, discard the bay leaf before serving the cumin rice.
- You can substitute ghee with unsalted butter or flavourless vegetable oil.
- Store leftover cumin rice in an airtight container in the fridge. Reheat it in a microwave or a pan on the stovetop.
Nutrition
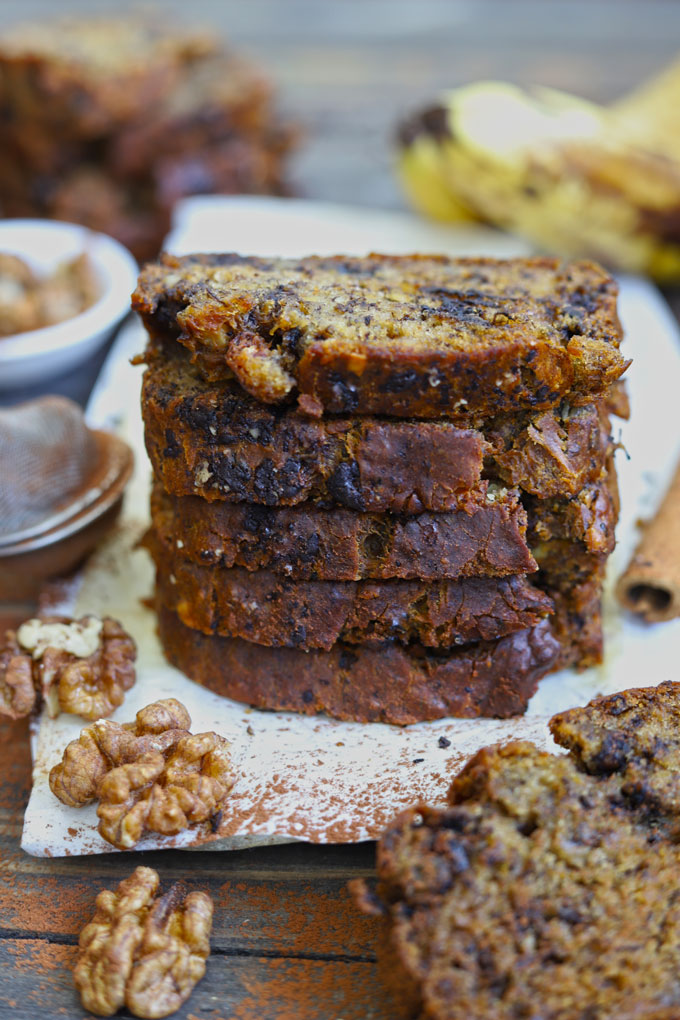
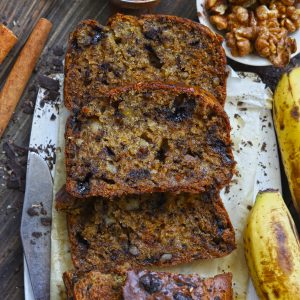
This is an eggless, soft, moist classic banana bread recipe. The USP of this banana bread recipe is it has zero butter. Be sure to watch the video!
Estimated reading time: 4 minutes

- Moist Banana Bread Without Eggs
- Popular Banana Bread Variations
- My Tried and True Tips
- Watch Banana Bread Video
- Eggless Banana Bread Recipe
During the lockdown of 2020, amid the pandemic, we all baked banana bread at home. It was one of the most loved and baked desserts during the period.
Somehow, there was something comforting about the home-baked banana bread when everything shortly seemed uncertain.
It is one of my favourite quick-bread recipes that I often make for the family.
I LOVE Banana Bread because:
- super easy to make
- kid-friendly
- has zero butter
- does not require eggs
- no-knead bread recipe
Moist Banana Bread Without Eggs
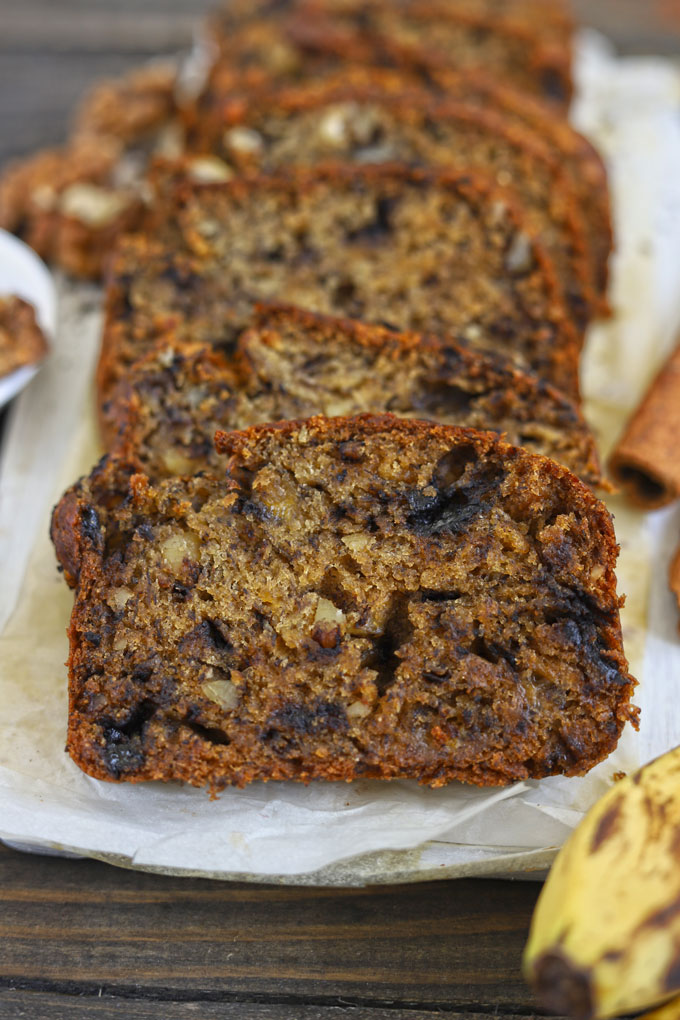
It is possible to make super moist and soft banana bread without eggs. I have baked it often, and the result is truly gratifying.
Egg Substitutes: In any baking recipe eggs help to provide moisture and texture. In this eggless banana bread recipe, we have replaced eggs with yoghurt . The thick, creamy, plain Greek yoghurt or curd is best for replacing eggs. I usually follow the thumb rule of 1 Egg = ¼ Cup Yogurt.
Vegan Version: This banana bread recipe can be made vegan-friendly by using dairy-free yoghurts such as soy, coconut milk, or almond milk yoghurt .
Popular Banana Bread Variations
You can try hundreds of banana bread recipe variations to make it taste more delicious. A few of my favourite ones are:
- Chocolate Banana Bread – with a lot of chocolate chunks and cocoa powder combined in the batter, this one is the most popular flavour.
- Coconut Banana Bread – Coconut and banana is a truly tropical flavour delight. Replace olive oil with virgin coconut oil and chocolate chips with desiccated toasted coconut flakes or chips.
- Banana Walnut Bread – The regular bread is packed with the nuttiness of roughly chopped walnuts in the batter and on the crust.
- Healthy Honey Banana Bread – To keep it healthy, replace sugar with honey or pure maple syrup. Also, you can use whole wheat flour instead of all-purpose flour.
- Cream Cheese Banana Bread – It tastes like cheesecake with a savoury, soft, melt-in-the-mouth texture. This version is unique and a hit among cheese lovers.
My Tried and True Tips
- Overripe, sweet-tasting, slightly mushy banana is perfect for making the bread. Avoid using firm or unripe bananas for baking.
- Ensure all the ingredients are at room temperature before starting the batter-making process, especially bananas and yoghurt.
- Do not overmix the batter . Once batter is combined, and no streaks of flour remain, STOP MIXING . It is a simple, no-fuss bread recipe for beginners. Hence, no complicated baking steps are involved.
- Grease the bread tin nicely with olive oil, and it would be great if you could line it neatly with parchment/baking paper . Later, this will help you to easily pull out the bread from the tin.
- Tap the baking tin gently once or twice on the kitchen counter after pouring the batter. This way, all the air trapped in the batter will be released.
- Always insert a toothpick and check for doneness before bringing it out of the oven. If the bread seems too moist or uncooked, bake for 10 – 15 minutes more.
- Allow the bread to cool in the tin for 10 – 15 minutes before inverting or pulling out. Next, cool it completely on a wire rack before slicing.
Watch Banana Bread Video
Storage Suggestion
If you plan to store banana bread, cover it with a plastic cling foil. Transfer it to an airtight container. Store the bread in the refrigerator for a week.
Do not store banana bread in the refrigerator without covering it. The bread will become dry, stale, and flavourless.
More Eggless Baking Recipes
- Eggless Ragi Cake
- Eggless Brownies
- Eggless Rava Cake
- Eggless Orange Cake
- Eggless Chocolate Cake
- Eggless Tutti Frutti Cake
- Eggless Nankhatai Cookies
- Eggless Vanilla Sponge Cake
Ingredients
Dry Ingredients:
- ▢ 1 Cup all-purpose flour (maida)
- ▢ ¾ Cup dark brown sugar or white sugar
- ▢ 1 teaspoon baking powder
- ▢ 1 teaspoon cinnamon powder
- ▢ ½ teaspoon baking soda
- ▢ ¼ teaspoon salt
- ▢ ¼ Cup dark chocolate chips or chopped dark chocolate
- ▢ ¼ Cup chopped walnuts
Wet Ingredients:
- ▢ 3 overripe banana
- ▢ 1 teaspoon vanilla extract
- ▢ ¼ Cup yogurt/curd
- ▢ ¼ Cup olive oil
Instructions
- Pre-heat oven at 180° C. Prepare your loaf pan by greasing it with a teaspoon of olive oil and line with parchment paper. Set aside.
Combine Dry Ingredients:
- In a mixing bowl, sift together both the flour, salt, baking powder and baking soda.
Combine Liquid Ingredients:
- In a small mixing bowl mash the bananas using a fork nicely until no lumps remain. Combine oil, yogurt, sugar, and vanilla extract with the mashed bananas.
- Whisk until just mixed to a smooth and creamy consistency, approximately for 5 minutes. You can also use a hand blender or a smoothie mixer to ease the process of mixing.
Prepare Batter:
Pour the liquid ingredients over the flour mix. Gently folding the batter with a spatula, till all the flour is incorporated into the cake batter and no streaks of flour remain.
Add chocolate chips and chopped walnuts. Fold them gently into the batter.
Pour the batter into the prepared loaf pan. Evenly spread the batter using a spatula. If you prefer, sprinkle chocolate chips and walnuts on top. Tap the tin on the kitchen counter to release the air trapped in the batter.
Bake for 40 minutes or until the bread is golden brown, well risen and a toothpick inserted in the centre comes out clean.
Allow the bread to cool in the tin for 10 – 15 minutes. Then transfer to a wire rack to cool down completely.
Slice and serve eggless banana bread with frosting or spread of your choice.
Recipe Notes:
Nutrition
We follow a strict NO SPAM Policy
