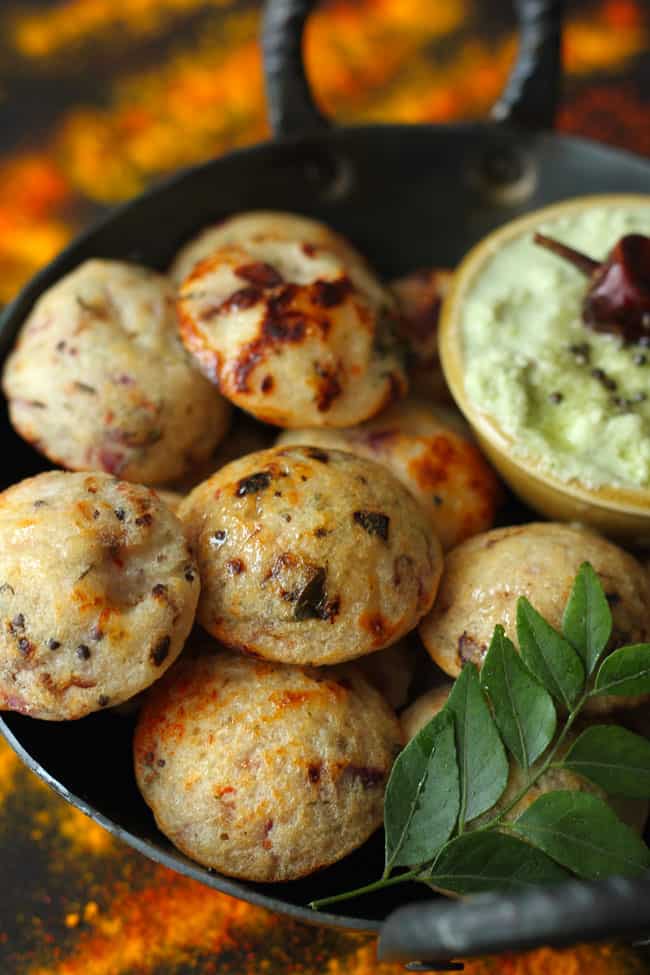
Paniyaram is a vegetarian tea-time snack from South India. Crazy crispy on the outside with a soft and pillowy interior – this instant paniyaram recipe is totally worth bookmarking. Be sure to watch the video!
What is ‘Paniyaram’?
Paniyaram is a widely popular South Indian snack. In many regions, it is also known as appe. It can be sweet or savory. You can make appe with rice flour, idli dosa batter, banana and jaggery, or using the rava (suji). Various paniyaram recipes are followed across the Southern region of India.
Instant Paniyaram Recipe
This paniyaram recipe has quick and easy written all over it. Another addition to my instant snack recipe collection. Instant paniyaram is also known as rava appe or suji ke appe.
Unlike traditional paniyaram, for instant appe we do not need to grind or ferment the batter. Instead, the batter of semolina and curd takes 10 minutes to come together, and the addition of cooking soda ferments it instantly.
Hence, this modern version of the traditional paniyaram recipe fits perfectly on the weekday breakfast or snack menu.
More Reasons To LOVE Instant Paniyaram
- vegetarian
- meal prep friendly
- easy to make and customize
- perfect for school lunchbox or snacks
Instant Paniyaram
My Tried & True Tips
Use the finest form of rava, also known as chiroti rava. DO NOT USE thick and coarse rava for this paniyaram recipe.
Before preparing the batter, ensure the paniyaram is well greased and ready to use.
After adding the fruit salt or baking soda, immediately pour the batter into the molds and set it for cooking. Do not let the batter sit for more than 5 minutes after adding cooking soda.
Do not add soda or fruit salt if you want to store the paniyaram batter . Keep it in an air-tight container in the refrigerator. Each time bring out the batter, let it come to room temperature, add cooking soda, mix, and make paniyaram.
This paniyaram recipe is highly customizable. You can add chopped onion or spinach, grated carrot, spinach, or broccoli. Season the batter with Italian herbs, chopped ginger, spices, grated coconut, or cheese.
Watch Video
Serving Suggestion
From vegetable sambar , coconut chutney to mint chutney , one can serve paniyaram with a variety of dipping sauces and chutney.
You can serve rava appe for breakfast or teatime snacks with a cup of filter coffee. In many South Indian households, appe is served with meat or fish curries as well as a side dish.
Did I tell you rava paniyaram makes a great lunchbox snack as well?

Paniyaram Recipe
More Indian Snack Recipes
- Aloo Pakora
- Maddur Vada
- Peanut Chaat
- Instant Dhokla
- Aloo Tikki Chaat
- Vegetable Cutlet
- Murmura Namkeen
- Cheese Rava Cutlet
If you try this recipe and love it, please leave a comment and a rating. This helps us grow and reach other food lovers like you.

Ingredients
Ingredients For Paniyaram Batter:
- ▢ 1 Cup semolina (suji/rava) sooji/rava
- ▢ 1 ½ Cup curd (yogurt), at room temperature
- ▢ salt to taste
Additional Ingredients:
- ▢ 2 tablespoon ghee or cooking oil
- ▢ 1 teaspoon black mustard seeds (rai)
- ▢ 1 teaspoon white urad dal (dhuli urad)
- ▢ 6 – 8 curry leaves
- ▢ ½ Cup finely chopped onion
- ▢ ¼ Cup grated cheese (any variety)
- ▢ ½ teaspoon red chili powder
- ▢ 2 tablespoon finely chopped coriander
- ▢ Salt to taste
- ▢ 1 teaspoon cooking soda or baking soda
Instructions
Prepare Batter:
- Combine semolina and curd in a bowl. Mix nicely to form a lump-free batter. Set aside for 5 – 10 minutes.
Prepare Tempering:
- Heat oil/ghee in a frying pan or kadhai. Add mustard seeds, urad dal, and curry leaves. Fry for a minute or until seeds starts spluttering.
- Next, add chopped onion and fry till the onion turn light golden in color.
Final Mixing:
- Pour this tempering over the semolina batter along with grated cheese, coriander, and red chili powder. Combine nicely.
- If the batter seems too thick, add one or two tablespoons of water to get the idli-dosa batter-like consistency.
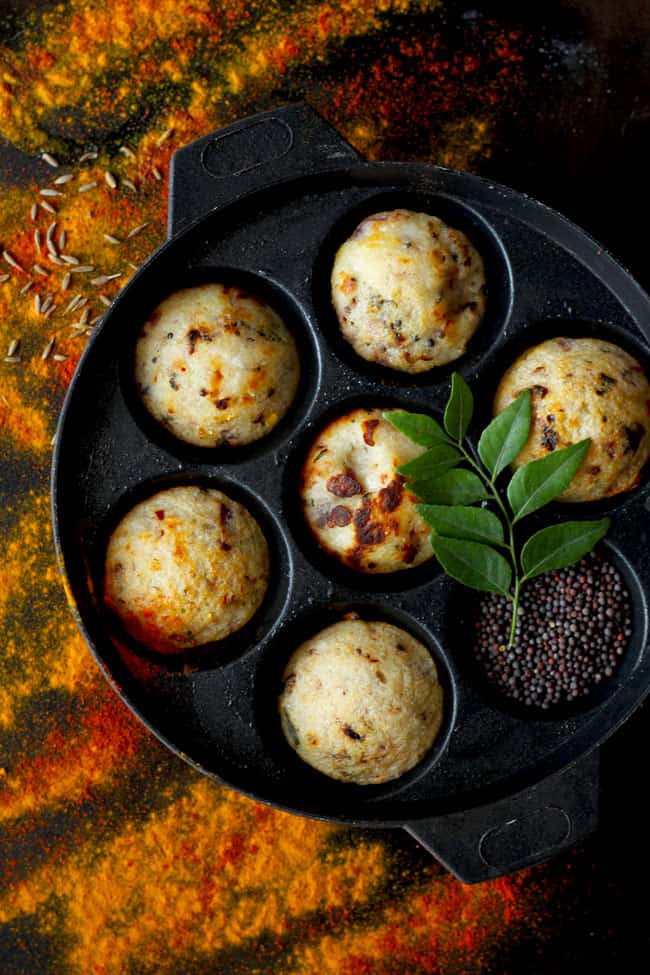
Prepare Paniyaram:
- Heat a non-stick paniyaram/appe pan with one drop of oil in each mold or you can brush each cavity with oil.
- Meanwhile, add cooking soda in the batter and whisk the mixture in one direction until the batter starts frothing.
- Now spoon one tablespoon of batter in each mold of the paniyaram pan.
- Cover and cook for 2 – 3 minutes. Check for doneness and flip using a fork/skewer/spoon to the other side. Cook from the other side for 2 – 3 minutes. Transfer to a plate. Similarly, prepare the rest of the paniyaram.
- Serve Instant Rava Paniyaram with coconut chutney ( see recipe ).
Recipe Notes:
- Try to use a non-stick paniyaram pan. It requires less oil and is easy to clean as well.
- Similarly, you can prepare paniyaram with the idli-dosa batter as well. Just skip adding cooking soda.
- In case your measuring cups and spoons are not in reach, don’t worry. As long the consistency of the batter is similar to idli-dosa batter, be assured you will savor delish paniyaram.
- If the batter seems too thick, add one or two tablespoons of water to get the dropping consistency.
- The batter can be stored in the fridge for 2 – 3 days without adding soda. Every time before using bring it to room temperature.
Nutrition
We follow a strict NO SPAM Policy
Instant Paniyaram Recipe
Equipment
- Mixing Bowl
- Paniyaram Pan
Ingredients
Ingredients For Paniyaram Batter:
- 1 Cup semolina (suji/rava) sooji/rava
- 1 ½ Cup curd (yogurt), at room temperature
- salt to taste
Additional Ingredients:
- 2 tablespoon ghee or cooking oil
- 1 teaspoon black mustard seeds (rai)
- 1 teaspoon white urad dal (dhuli urad)
- 6 - 8 curry leaves
- ½ Cup finely chopped onion
- ¼ Cup grated cheese (any variety)
- ½ teaspoon red chili powder
- 2 tablespoon finely chopped coriander
- Salt to taste
- 1 teaspoon cooking soda or baking soda
Instructions
Prepare Batter:
- Combine semolina and curd in a bowl. Mix nicely to form a lump-free batter. Set aside for 5 - 10 minutes.
Prepare Tempering:
- Heat oil/ghee in a frying pan or kadhai. Add mustard seeds, urad dal, and curry leaves. Fry for a minute or until seeds starts spluttering.
- Next, add chopped onion and fry till the onion turn light golden in color.
Final Mixing:
- Pour this tempering over the semolina batter along with grated cheese, coriander, and red chili powder. Combine nicely.
- If the batter seems too thick, add one or two tablespoons of water to get the idli-dosa batter-like consistency.
Prepare Paniyaram:
- Heat a non-stick paniyaram/appe pan with one drop of oil in each mold or you can brush each cavity with oil.
- Meanwhile, add cooking soda in the batter and whisk the mixture in one direction until the batter starts frothing.
- Now spoon one tablespoon of batter in each mold of the paniyaram pan.
- Cover and cook for 2 - 3 minutes. Check for doneness and flip using a fork/skewer/spoon to the other side. Cook from the other side for 2 - 3 minutes. Transfer to a plate. Similarly, prepare the rest of the paniyaram.
- Serve Instant Rava Paniyaram with coconut chutney ( see recipe ).
Video
Notes
- Try to use a non-stick paniyaram pan. It requires less oil and is easy to clean as well.
- Similarly, you can prepare paniyaram with the idli-dosa batter as well. Just skip adding cooking soda.
- In case your measuring cups and spoons are not in reach, don’t worry. As long the consistency of the batter is similar to idli-dosa batter, be assured you will savor delish paniyaram.
- If the batter seems too thick, add one or two tablespoons of water to get the dropping consistency.
- The batter can be stored in the fridge for 2 - 3 days without adding soda. Every time before using bring it to room temperature.
Nutrition
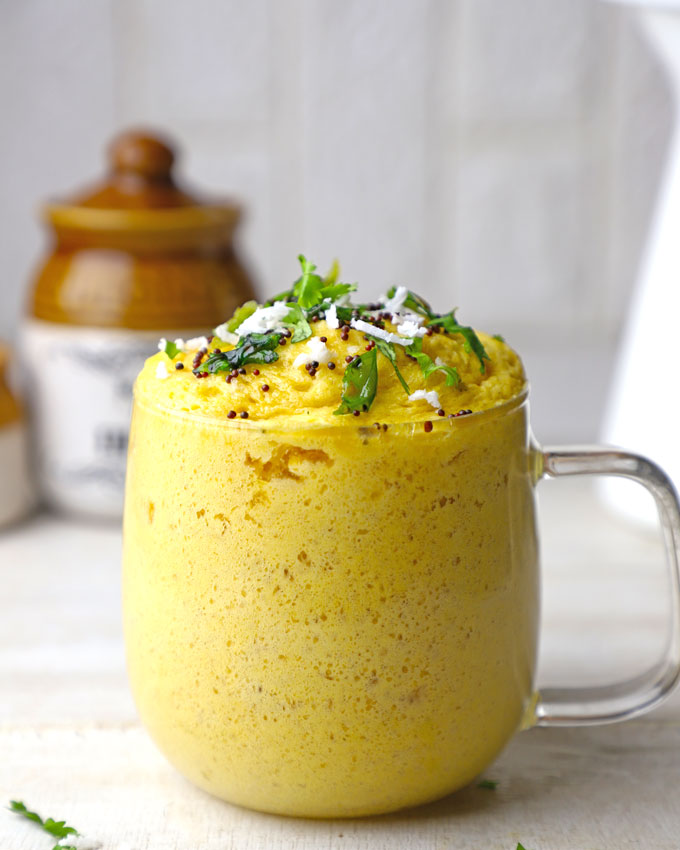
This is the easiest instant dhokla recipe that gets ready in 10 minutes in a microwave. It is one of the most trending mug recipes on Instagram.
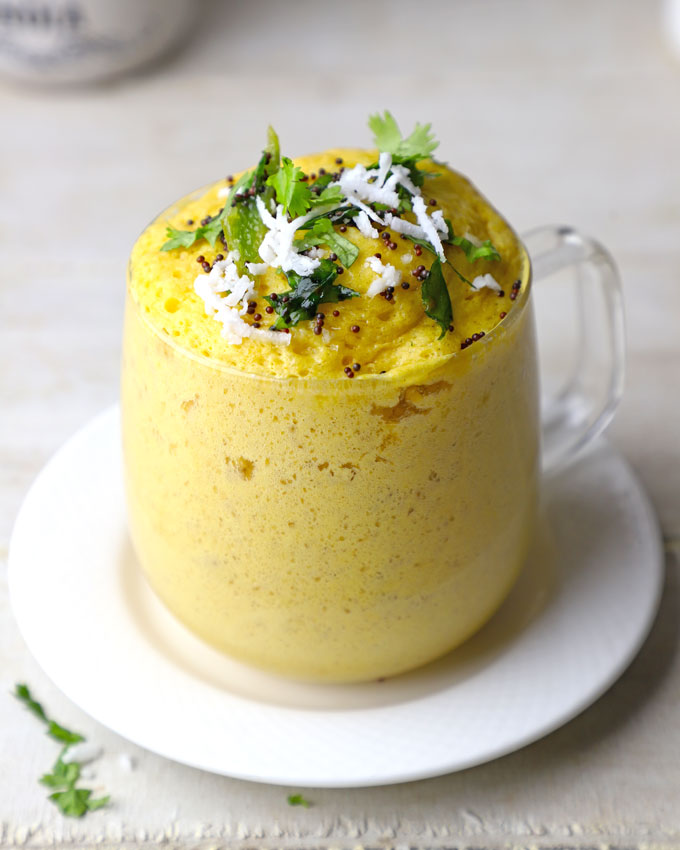
Trending Mug Dhokla
The idea of a dhokla in a mug has intrigued me since I saw this trend on Instagram . I have to try it; that was my first reaction.
Being a devoted dhokla lover, it is one of my favorite Indian snacks. But at times, I find myself too lazy to make a big batch from scratch. Hence, this easy-peasy mug dhokla recipe works best for a small family of two.
To be honest, this mug dhokla recipe is more like an instant khaman . Nowhere close to an authentic Gujarati-style dhokla. But when it comes to taste, it is so damn delicious.
Here is WHY YOU SHOULD TRY IT
- oddly satisfying
- fun teatime snack
- perfectly serves two
- quick and easy to make
- requires less than 15 minutes
- minimal effort, maximum flavor
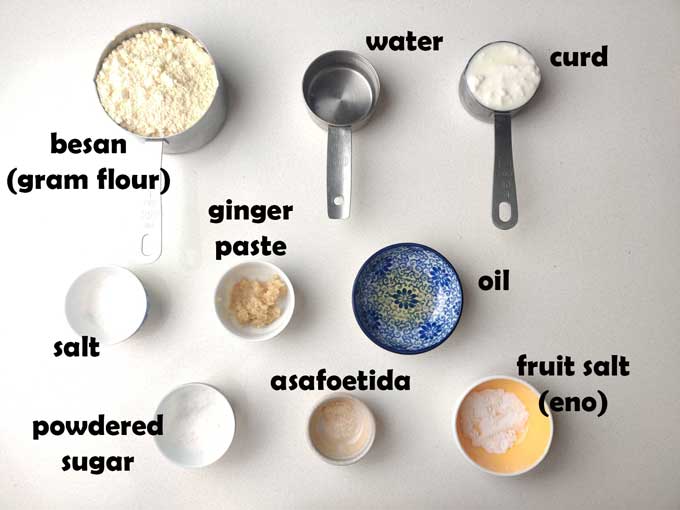
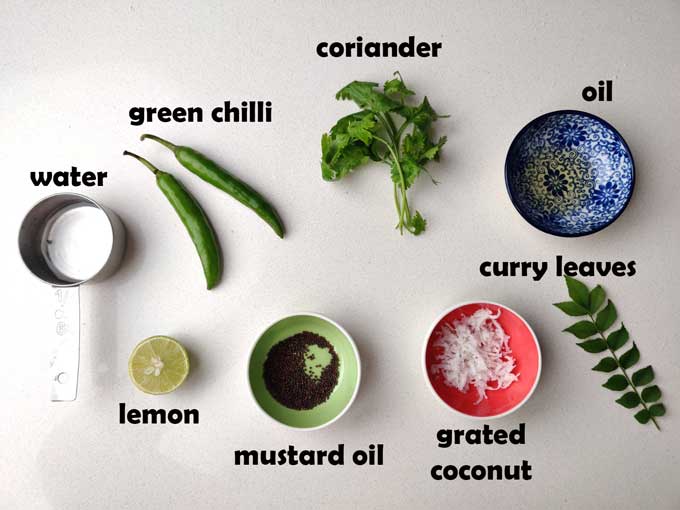
Ingredients Required For Batter
- Gram Flour: Use fine quality gram flour (besan) for this mug dhokla recipe.
- Curd: Do not use cold or straight out of the fridge curd.
- Water: Use room temperature water.
- Fruit Salt: Use plain, non-flavored fruit salt. I use Eno, which comes in a blue color sachet or bottle. You can use cooking soda as well.
- Sugar: Use only powdered sugar because it mixes well with flour.
- Ginger Paste: You can use green chili and ginger paste as well.
- Oil: Use neutral flavored refined oil.
- Other Ingredients: Salt, Asafoetida (hing), lemon juice ( I missed including it in the picture above )
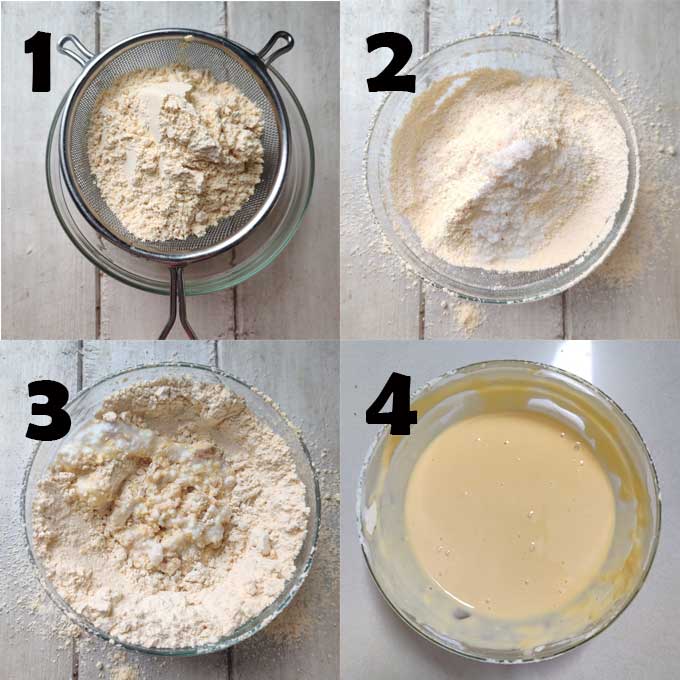
How To Make
Step 1) Sift gram flour in a bowl ( image 1 ). Add powdered sugar, salt, asafoetida, and mix them ( image 2 ).
Step 2) Add curd, water, ginger paste, and lemon juice. Whisk gently to make a smooth, lump-free, spoon-dropping consistency batter. Usually, it takes 2 minutes ( image 4 ).
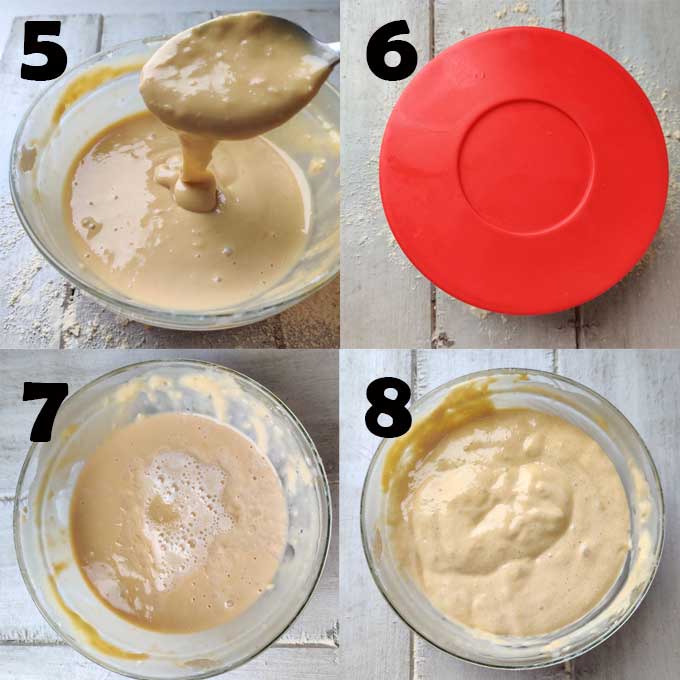
Step 3) Cover and let the batter sit for 2 – 3 minutes ( images 5 & 6 ).
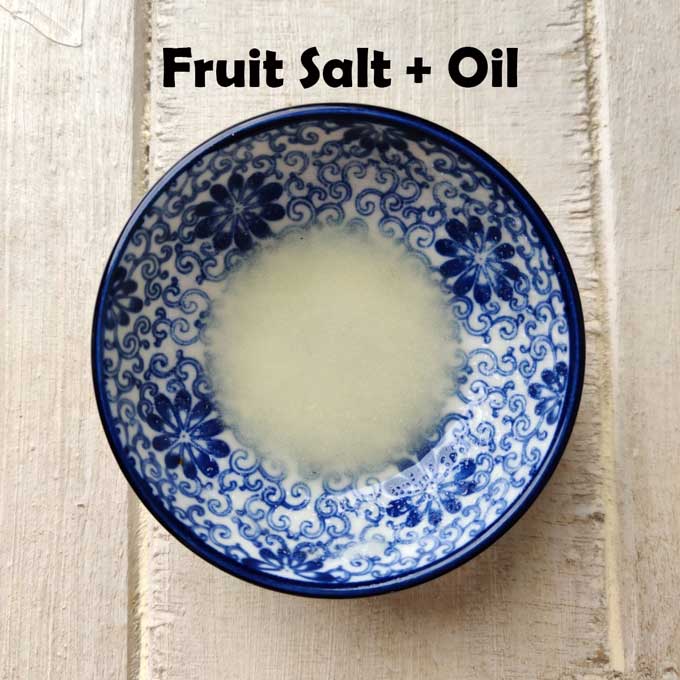
Step 4) Combine fruit salt with oil. Mix.
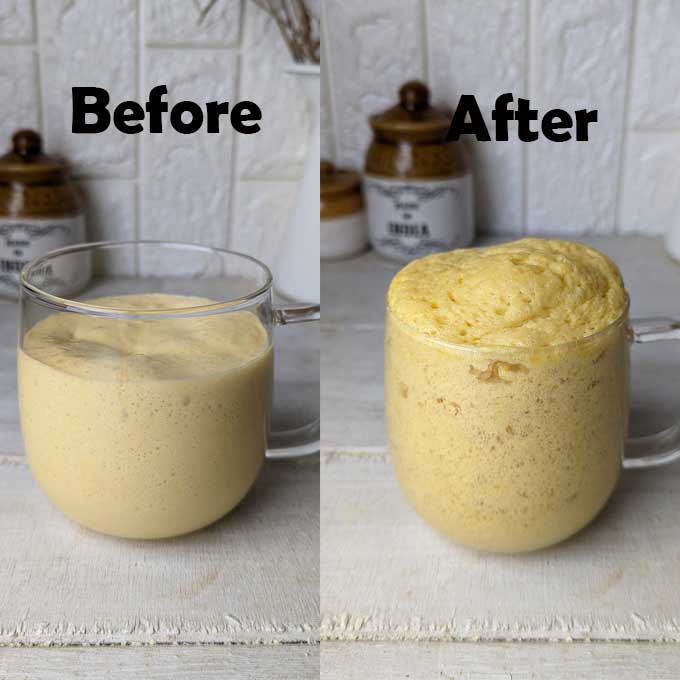
Step 5) Add the fruit salt and oil mix to the batter. Gently cut and fold the batter. The dhokla batter will become light, airy, and double in volume ( images 7 & 8 ).
Step 6) Pour the dhokla batter into mugs. Tap gently to remove the air.
Step 7) Microwave mug dhokla for 2 – 3 minutes. And it’s ready!
Ingredients For Tempering (Tadka)
- Oil: Use flavorless refined or vegetable oil for making tadka.
- Green Chili: Discard the white seeds and the pith.
- Lemon Juice: It gives a subtle sourness to the dhokla.
- Other Ingredients: Black Mustard Seeds (rai), Curry Leaves, Water
- Garnish: Fresh Coriander Leaves, Grated Coconut
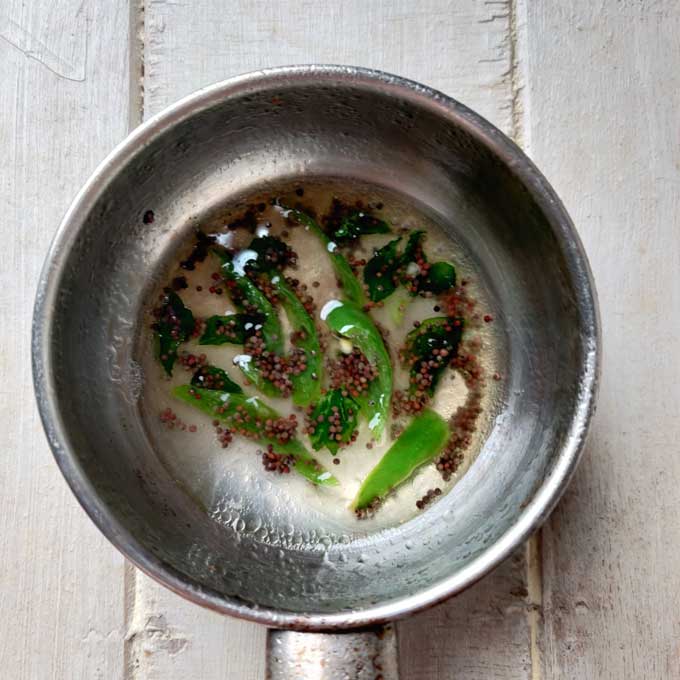
Heat oil in a small pan. Once it’s hot, add mustard seeds, curry leaves, and green chili.
Cook for less than 1 minute. Turn off the heat.
Add lemon juice and water. Stir to combine.
Pour this tadka over the mug dhokla.
My Tried & True Tips
Sifting gram flour would always give you a smooth, lump-free batter.
DO NOT ADD too much water or curd. Instead, follow the standard cup measurement method suggested in my dhokla recipe.
A dhokla batter should be smooth, lump-free, and of spoon-dropping consistency like an idli or pancake batter.
DO NOT WHISK the batter too vigorously or for too long. You will end up aerating it too much, and while cooking, it might deflate.
Let the batter rest for 2 – 3 minutes. This step will always give you a soft and fluffy dhokla.
Combining fruit salt and oil is a trick I learned from Chef Ranbir Brar, and it works like magic for the dhokla recipe.
After adding fruit salt, DO NOT WHISK OR MIX batter for too long or vigorously. Instead, follow only the cut and fold method.
DO NOT OVERFILL the mug because the dhokla needs space for inflating and rising to the top.
Before adding tadka water, allow the mug dhokla to cool down for 2 minutes.
You can poke tiny holes using a toothpick and then pour the tadka over the mug dhokla. This way, the underneath layers would also get flavored.
Serving Suggestion
The green mint chutney adds a layer of extra flavor to the mug dhokla. Of course, you can also serve mug dhokla with sweet tamarind (imli) chutney. Or a traditional Gujarati style khatti chutney works too.
I would not recommend storing mug dhokla as it tastes best when served fresh and hot. Also, after storing in the refrigerator, the texture becomes dry and a bit hard.
You can steam it in an instant pot steam mode . Fill the inner pot with 2 cups of water, place a trivet, and put your mug on the rivet. Close the lid. Set the steam valve to the venting position. Steam dhokla for 10 minutes.
Here are my two tips: Do not incorporate too much air while whisking the batter. Whisk it gently and for 1 – 2 minutes only. Do not overfill the mug. The batter needs space for expansion and to rise to the top.
We are using lemon juice in the dhokla recipe. It is as good as citric acid plus way safer for health.
Substitute one teaspoon of fruit salt with a baking soda or cooking soda . Both act as a great instant fermenting agent. But if fruit salt or baking soda is added in too much quantity, your dhokla might get a soapy taste. So be careful!
Turmeric powder reacts with baking soda or fruit salt to give orange or red colored patches in khaman dhokla. In this dhokla recipe, we are not adding turmeric. If you want, add only a pinch or ¼ teaspoon.
More Indian Snack Recipes
Chilli Bajji
Corn Chaat
Aloo Pakora
Peanut Chaat
Maddur Vada
Vegetable Cutlet
If you try this recipe and love it, please leave a comment and a rating. This helps us grow and reach other food lovers like you.
Ingredients
Ingredients For Batter
- ▢ 1 Cup gram flour (besan)
- ▢ 1 tablespoon powdered white sugar
- ▢ 1 ¼ teaspoon salt or to taste
- ▢ ¼ teaspoon hing (asafoetida)
- ▢ ¼ Cup curd
- ▢ ¼ Cup water
- ▢ 1 teaspoon ginger paste
- ▢ 1 tablespoon lemon juice
- ▢ 1 tablespoon refined oil
- ▢ ½ teaspoon Eno fruit salt
Ingredients For Tadka
- ▢ 2 tablespoon refined oil
- ▢ 1 teaspoon mustard seeds (rai)
- ▢ 1 tablespoon curry leaves
- ▢ 2 green chilies, sliced (discard seeds and pith)
- ▢ 1 tablespoon lemon juice
- ▢ 4 tablespoon water
Ingredients For Garnish
- ▢ 1 tablespoon chopped fresh coriander
- ▢ 1 tablespoon grated coconut
Instructions
Prepare Dhokla Batter
- Sift gram flour in a bowl. Add powdered sugar, salt, asafoetida, and mix them together.
- Add curd, water, ginger paste, and lemon juice. Whisk gently to make a smooth, lump-free, spoon-dropping consistency batter. Usually, it takes 2 minutes
- Cover and let the batter sit at room temperature for 2 – 3 minutes.
- Once resting time is over, get your mugs ready for pouring dhokla batter. Combine fruit salt with oil in a bowl. Mix nicley.
- Add the fruit salt and oil to the dhokla batter. Gently cut and fold the batter. The dhokla batter will become light, airy, and double in volume.
- Immediately pour the dhokla batter into mugs. Tap the mugs gently on the kitchen counter to remove the trapped air.
- Microwave mug dhokla for 2 – 3 minutes. Bring it out and insert a toothpick. If it comes out clean, the dhokla is ready. Place it on the counter to cool down.
Prepare Tadka
- Heat oil in a small pan. Once it’s hot, add mustard seeds, curry leaves, and green chili.
- Cook for less than 1 minute. Turn off the heat.
- Add lemon juice and water. Stir to combine. Be careful there will lot of sizzling and splashing.
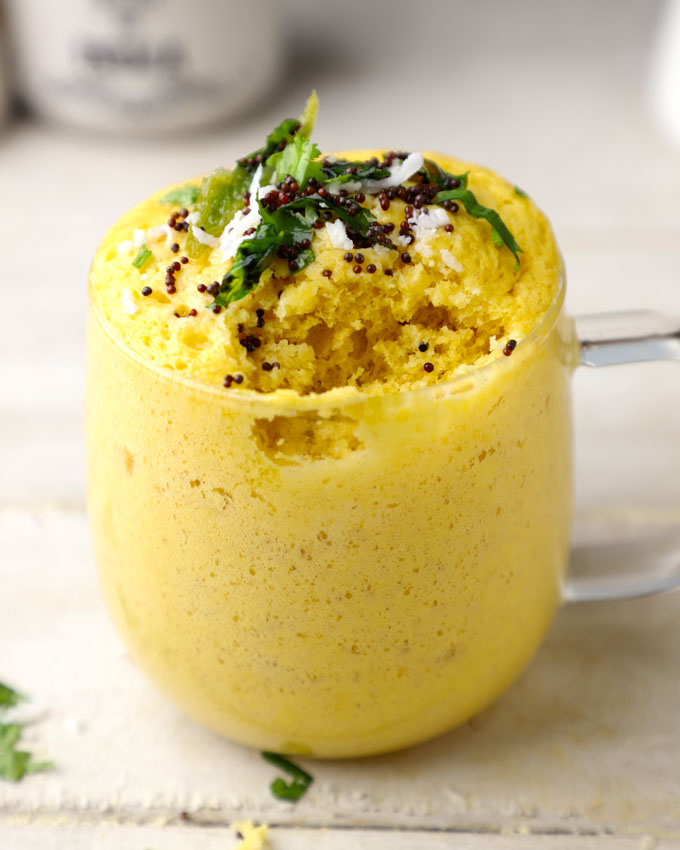
- Poke tiny holes using a toothpick in the mug dhokla. Pour this tadka over the mug dhokla.
- Serve it with green chutney and enjoy!
Recipe Notes:
- The cooking time of mug dhokla may vary depending upon the size of the mugs. If you are using small teacups, then it takes only 2 minutes. Whereas for a bigger mug like mine it takes 2 ½ – 3 minutes.
- I do not add turmeric in the dhokla batter as it reacts with fruit salt and creates orange/reddish patches in a dhokla.
- Follow the standard cup measurement method for this dhokla recipe.
- Make sure the fruit salt or baking soda are of good quality otherwise batter will not inflate.
Nutrition
We follow a strict NO SPAM Policy
