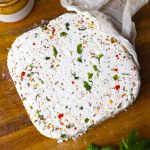
If you’re a fan of paneer, you’re in for a treat. Here is a detailed guide on how to make soft masala paneer that’s perfect for grilling, salads, or even snacking on its own.
Estimated reading time: 6 minutes

- About Masala Paneer
- Ingredients You’ll Need
- How To Make Masala Paneer
- Tips for Making Soft Paneer
- Homemade Masala Paneer Recipe
About Masala Paneer
Paneer, a fresh and versatile soft cheese, is a staple ingredient in Indian Cuisine. Adding spices and herbs while making the paneer transforms it from a simple, plain cheese into a flavorful ingredient that can elevate any dish.
Why you should make Masala Paneer:
Making paneer at home may seem daunting at first, but here’s why you should make it:
- it is fresh and free from preservatives
- a good vegetarian, high-protein snack
- you can make it a small/large quantity
- it is completely gluten and nut-free
- meal prep friendly and inexpensive
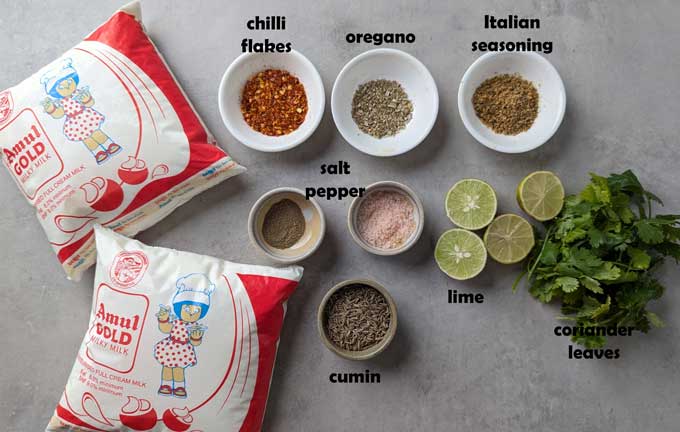
Ingredients You’ll Need
- Full-fat milk with more than 5% fat. In India, I prefer Amul Gold for making curd or paneer at home.
- Acidic Agents like lime juice or white vinegar to transform milk into paneer.
- Seasoning: Chilli Flakes, Cumin, Oregano or Pizza Seasoning Mix, Salt, Crushed Black Pepper, Fresh Coriander
- Ice Cold Water
Equipment:
- Paneer Box
- Colander or sieve
- Large, heavy-bottomed pot
- Muslin cloth or cheesecloth
- Heavy Weight (a pot filled with water or mortar, for example)
How To Make Masala Paneer
1. Boiling the milk
- Pour a tiny bit of water into the saucepan. This prevents milk from sticking to the pot and burning.
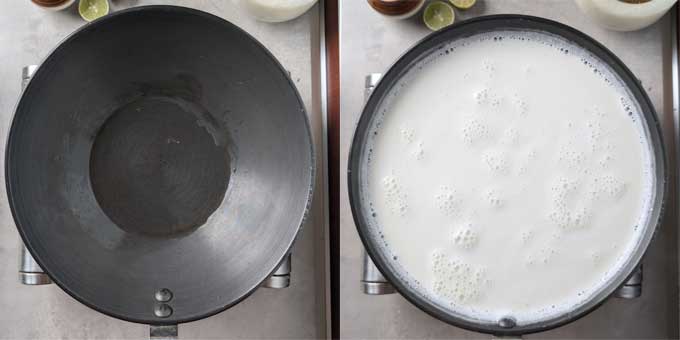
- Start by pouring full-fat milk into a large, heavy-bottomed pot.
- Place the pot over high heat and bring the milk to a boil, stirring occasionally to prevent it from scorching at the bottom.
2. Seasoning the milk
- Once the milk reaches a rolling boil, reduce the heat to the lowest setting.
- Add all the seasoning and salt. Gently stir to combine.
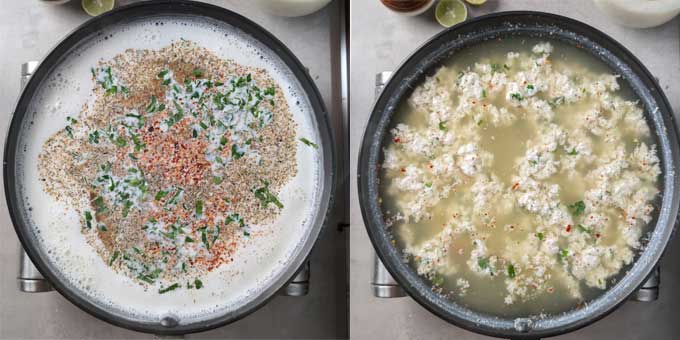
3. Adding the Acidic Agent
- Slowly add lemon juice or white vinegar while stirring the milk gently.
- You’ll notice that the milk begins to curdle, and the cheese (solid parts) starts separating from the whey (liquid). Continue stirring until the whey becomes a pale greenish colour. At this stage, turn off the heat. Remove the saucepan from the heat.
- If the milk doesn’t curdle completely, add more lemon juice or vinegar.
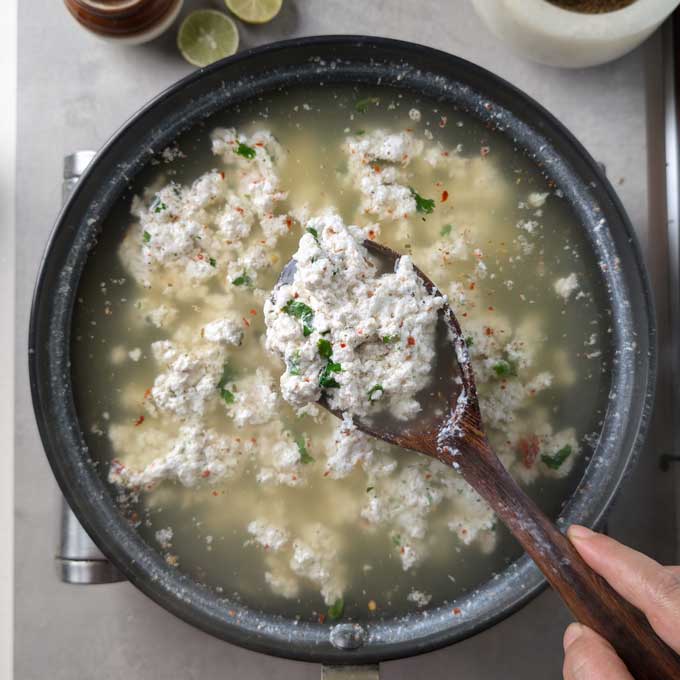
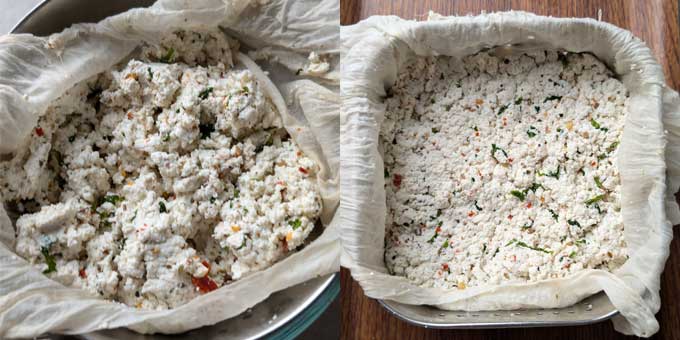
4. Straining the paneer
- Line a colander with cheese or muslin cloth.
- Immediately pour the cheese into a colander lined with cloth. Do not waste the whey water, use it for binding paratha dough or making kadhi .
- Pour 2 cups of ice-cold water over the paneer to stop cooking and wash away any residual acidic taste.
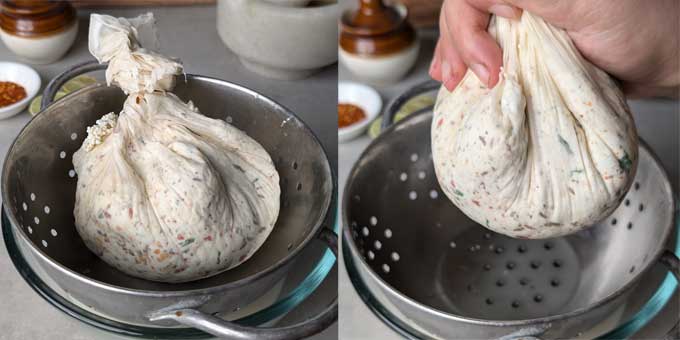
- Gather the cloth’s edges and twist them to form a bundle, allowing excess whey to drain out.
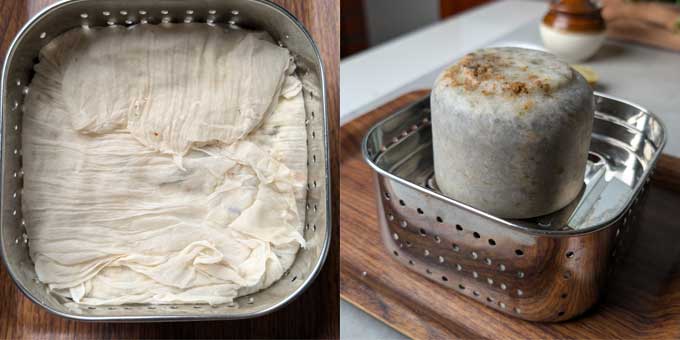
5. Draining and pressing the paneer
- For soft and spongy paneer, it’s important not to press it too hard.
- Place the muslin cloth-wrapped cheese on a flat surface and place a lightweight on top (such as a plate with a pot of water). Let it sit for 30 minutes to an hour.
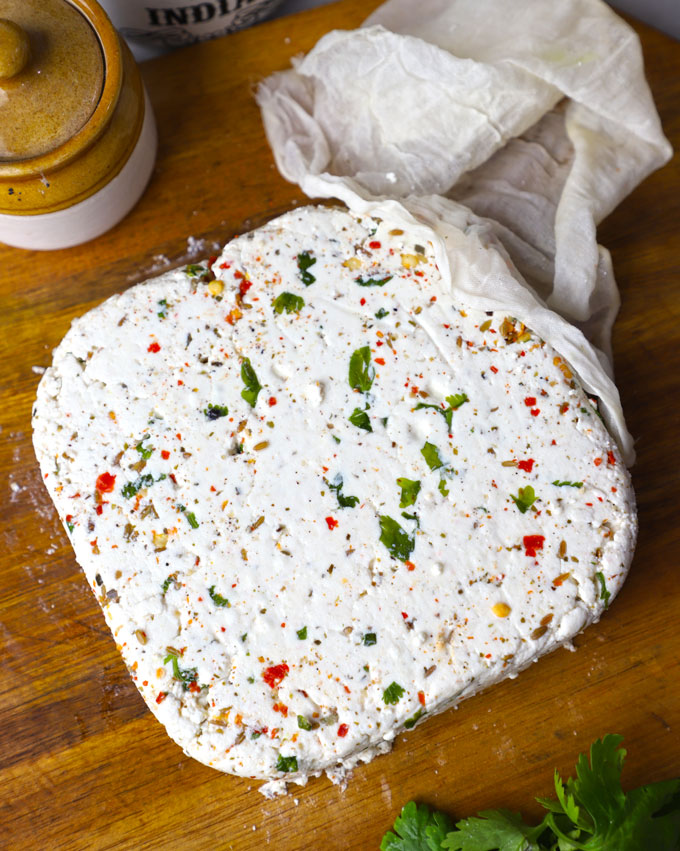
6. Cutting and storing the masala paneer
- After the pressing time, unwrap the paneer from the cloth. You’ll have a smooth block of paneer ready to be cut into cubes or slices.
- If you’re not using it immediately, store it in a container filled with water in the refrigerator. This keeps the paneer soft and prevents it from drying out.
Tips for Making Soft Paneer
- Use fat-rich milk as it curdles well and gives you better paneer.
- Temperature matters: Don’t add the acidic agent while the milk is still on high heat. Turn off the heat and then add an acidic agent.
- Pressing time: For a softer paneer, reduce the pressing time and use a lighter weight. If you want a firmer paneer for grilling or frying, press it longer with a heavier weight.
- Gentle pressing: If you prefer your paneer to be extra soft, reduce the pressing time and use a lighter weight. The longer you press, the firmer your paneer will be.
How to Use Masala Paneer
Masala Paneer is incredibly versatile and can be used in a variety of dishes:
- Curries: Add to Indian gravies like kadai paneer , paneer jalfrezi , pulao , or palak paneer
- Snacks: Marinate and grill , make paneer tikka or pan-fry the masala paneer for a spicy, flavorful snack.
- Salads: Toss it with fresh veggies for a protein-rich salad.
- Desserts: Use it to make sweets like Rasgulla or Sandesh .
- Wraps and sandwiches: Add to wraps, or sandwiches for flavoursome, protein-packed stuffing.

Ingredients
- ▢ 2 litre full-cream milk (full fat milk)
- ▢ ¼ Cup lime juice or white vinegar
- ▢ 1 teaspoon red chilli flakes
- ▢ 1 teaspoon Italian Seasoning Mix
- ▢ 1 teaspoon crushed black pepper or to taste
- ▢ 2 teaspoon salt or to taste
- ▢ 1 tablespoon cumin seeds (jeera) roughly crushed
- ▢ 2 tablespoon chopped fresh coriander
Instructions
- Pour a tiny bit of water into the saucepan. This prevents milk from sticking to the pot and burning.
- Start by pouring full-fat milk into a large, heavy-bottomed pot.
- Place the pot over high heat and bring the milk to a boil, stirring occasionally to prevent it from scorching at the bottom.
- Once the milk reaches a rolling boil, reduce the heat to the lowest setting. Add all the seasoning and salt. Gently stir to combine.
- Slowly add lemon juice or white vinegar while stirring the milk gently.
- You’ll notice that the milk begins to curdle, and the cheese (solid parts) starts separating from the whey (liquid). Continue stirring until the whey becomes a pale greenish colour. At this stage, turn off the heat. Remove the saucepan from the heat.
- Line a colander with cheese or muslin cloth. Immediately pour the cheese into a colander lined with cloth. Do not waste the whey water, use it for binding dough or making kadhi.
- Pour 2 cups of ice-cold water over the paneer to stop cooking and wash away any residual acidic taste.
- Gather the cloth’s edges and twist them to form a bundle, allowing excess whey to drain out.
- Place the muslin cloth-wrapped cheese on a flat surface and place a lightweight on top (such as a plate with a pot of water). Let it sit for 30 minutes to an hour.
- After the pressing time, unwrap the paneer from the cloth. You’ll have a smooth block of paneer ready to be cut into cubes or slices.
Recipe Notes:
- If the milk doesn’t curdle completely , add more lemon juice or vinegar. Balance the spices: Adjust the amount of spices based on your preference. For a milder flavour, reduce the chilli flakes or pepper. Use fresh herbs: Fresh coriander and mint enhance the paneer’s flavour. You can also experiment with other herbs like dill or fenugreek. Do not waste the whey water, use it for binding dough or making kadhi. For soft and spongy paneer, it’s important not to press it too hard. If you’re not using it immediately, store it in a container filled with water in the refrigerator. This keeps the paneer soft and prevents it from drying out.
Nutrition
We follow a strict NO SPAM Policy
Homemade Masala Paneer Recipe
Equipment
- Colander
- Heavy Bottom Kadhai
- Muslin or Cheesecloth
Ingredients
- 2 litre full-cream milk (full fat milk)
- ¼ Cup lime juice or white vinegar
- 1 teaspoon red chilli flakes
- 1 teaspoon Italian Seasoning Mix
- 1 teaspoon crushed black pepper or to taste
- 2 teaspoon salt or to taste
- 1 tablespoon cumin seeds (jeera) roughly crushed
- 2 tablespoon chopped fresh coriander
Instructions
- Pour a tiny bit of water into the saucepan. This prevents milk from sticking to the pot and burning.
- Start by pouring full-fat milk into a large, heavy-bottomed pot.
- Place the pot over high heat and bring the milk to a boil, stirring occasionally to prevent it from scorching at the bottom.
- Once the milk reaches a rolling boil, reduce the heat to the lowest setting. Add all the seasoning and salt. Gently stir to combine.
- Slowly add lemon juice or white vinegar while stirring the milk gently.
- You’ll notice that the milk begins to curdle, and the cheese (solid parts) starts separating from the whey (liquid). Continue stirring until the whey becomes a pale greenish colour. At this stage, turn off the heat. Remove the saucepan from the heat.
- Line a colander with cheese or muslin cloth. Immediately pour the cheese into a colander lined with cloth. Do not waste the whey water, use it for binding dough or making kadhi.
- Pour 2 cups of ice-cold water over the paneer to stop cooking and wash away any residual acidic taste.
- Gather the cloth’s edges and twist them to form a bundle, allowing excess whey to drain out.
- Place the muslin cloth-wrapped cheese on a flat surface and place a lightweight on top (such as a plate with a pot of water). Let it sit for 30 minutes to an hour.
- After the pressing time, unwrap the paneer from the cloth. You’ll have a smooth block of paneer ready to be cut into cubes or slices.
Video
Notes
- If the milk doesn’t curdle completely , add more lemon juice or vinegar. Balance the spices: Adjust the amount of spices based on your preference. For a milder flavour, reduce the chilli flakes or pepper. Use fresh herbs: Fresh coriander and mint enhance the paneer’s flavour. You can also experiment with other herbs like dill or fenugreek. Do not waste the whey water, use it for binding dough or making kadhi. For soft and spongy paneer, it’s important not to press it too hard. If you’re not using it immediately, store it in a container filled with water in the refrigerator. This keeps the paneer soft and prevents it from drying out.
Nutrition
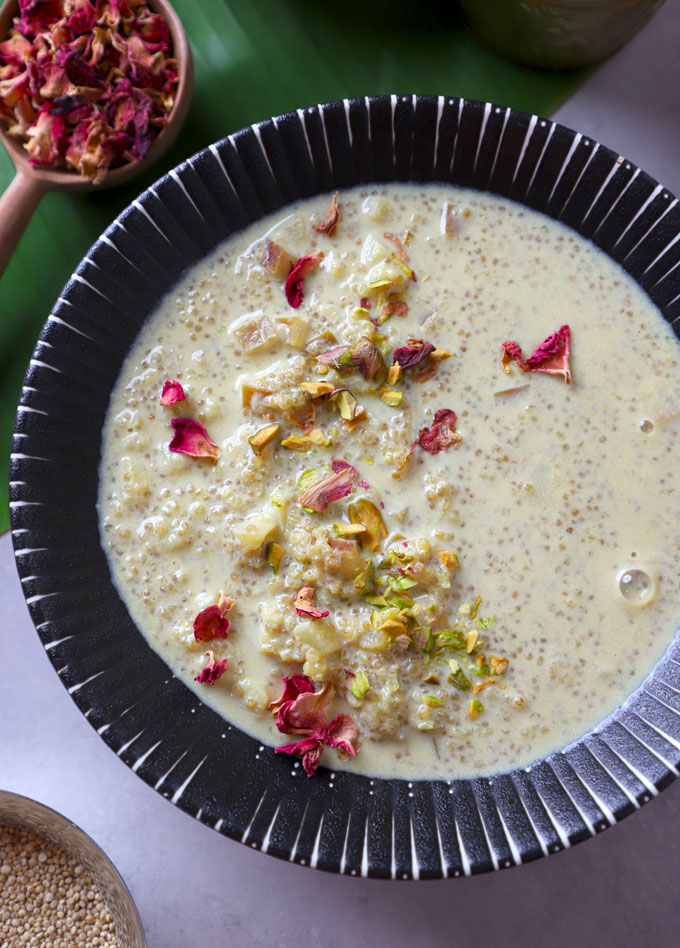
Vegan Quinoa Kheer is a delicious Indian dessert of nutritious quinoa, sweet apples and, dairy-free milk. This kheer recipe keeps all the essence of the classic dessert with a healthy twist.
Estimated reading time: 5 minutes
- Ingredients You’ll Need
- How To Make Quinoa Kheer
- My Tried and True Tips
- Apple Quinoa Kheer Recipe
When you think of Indian desserts, the first thing that comes to mind might be the creamy, luscious kheer —a traditional rice pudding. However, for those who follow a vegan diet or are simply looking to explore healthier desserts this apple quinoa kheer is a delicious alternative.
I love the idea of fresh fruits in Indian desserts. A few of my favourites are – chikoo ka halwa , pineapple rava kesari , and apple kheer. The natural sweetness of fruits blends perfectly with the richness of Indian desserts .
Why You’ll Love This Recipe
- easy, one-pot recipe
- it’s vegan and gluten-free
- low-calorie festive dessert
- wholesome, guilt-free dessert
- instant pot or pressure cooker-friendly
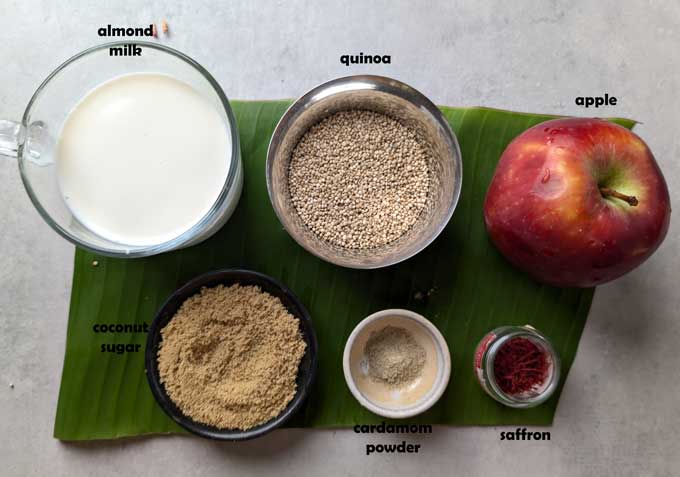
Ingredients You’ll Need
To make this healthy vegan quinoa kheer, you will need:
- White Quinoa is a versatile superfood that is naturally gluten-free, packed with protein, and rich in essential amino acids.
- Almond milk or other plant-based milk like coconut, cashew, or soy milk.
- Apples that are crisp, ripe, and sweet like Golden Delicious.
- Brown Sugar, jaggery or coconut sugar (adjust according to taste)
- Cardamom powder and Saffron for sweet aroma, flavour and colour.
- Chopped nuts like almonds, pistachios, or cashews.
How To Make Quinoa Kheer
Prep Work for Kheer:
- Rinse the quinoa thoroughly under cold water to remove any bitterness.
- Soak it in water for 30 minutes.
- Wash and finally chop the apples with the skin.
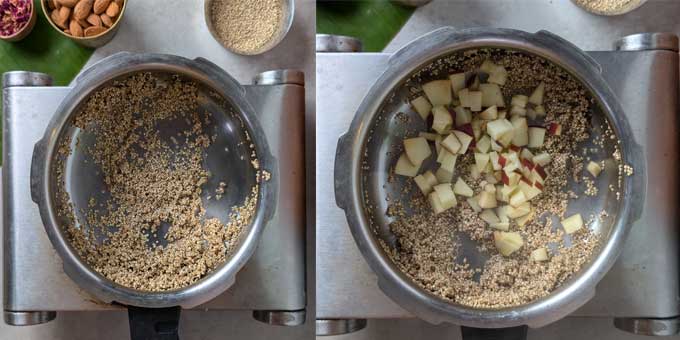
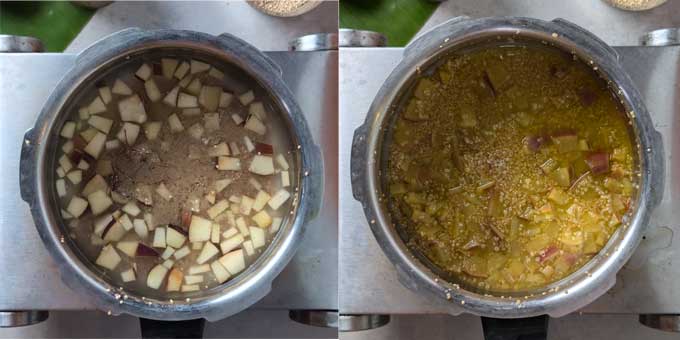
Cook the Quinoa:
- Discard water from soaked quinoa
- In a pressure cooker, dry roast the soaked quinoa for 2 – 3 minutes.
- Add chopped apples, cardamom, and saffron.
- Add water, and pressure cook over low heat for 3 whistles.
- Allow the steam to release naturally from the pressure cooker.
Add Almond Milk:
- After pressure cooking quinoa and apples are soft. Turn on the heat.
- Add almond milk and stir to combine.
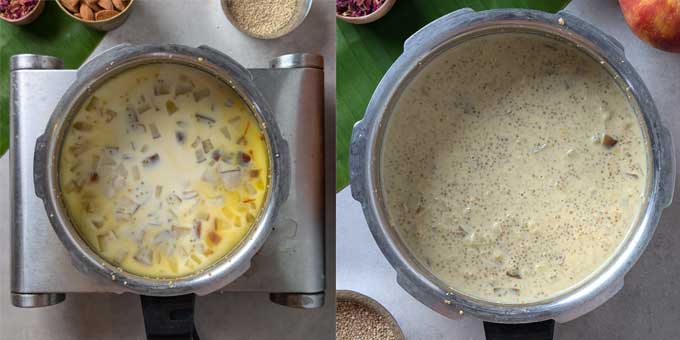
- Let it simmer over low heat for 5 – 6 minutes.
- Allow the kheer to become thick and creamy.
- Stir in the jaggery or coconut sugar until it dissolves completely.
- Let the kheer cool slightly. It will thicken further as it cools.
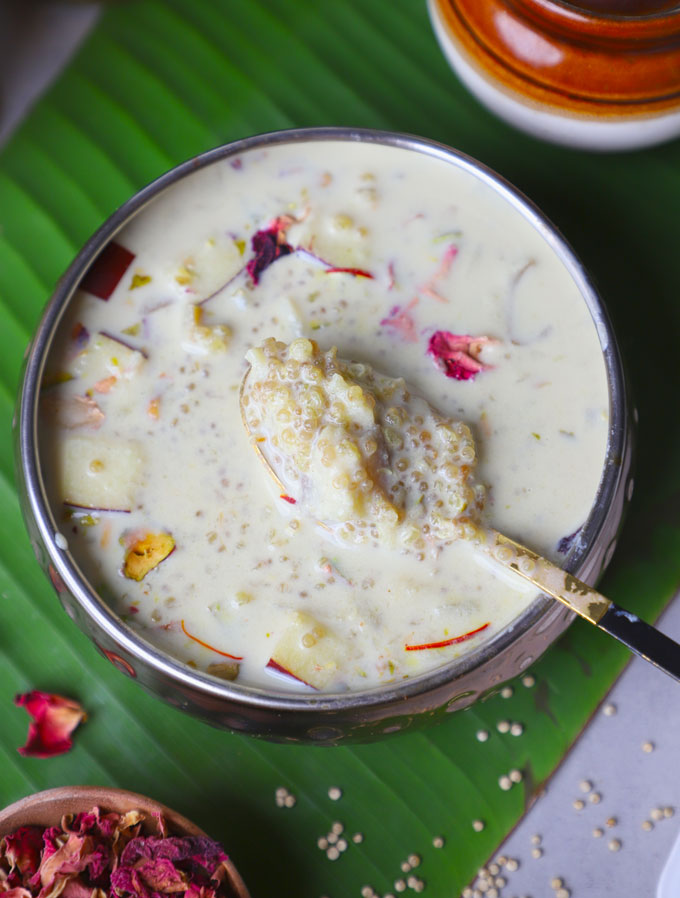
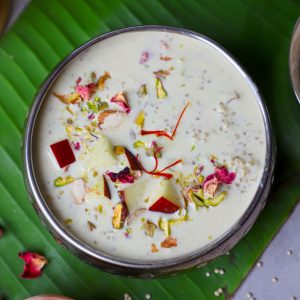
You can serve this vegan quinoa kheer warm or chilled. Garnish with more chopped nuts, edible rose petals, or saffron strands.
My Tried and True Tips
- Choosing the Right Milk: Almond milk provides a subtle flavour that pairs well with the nuttiness of quinoa. Coconut milk adds a richer, creamier texture. Feel free to experiment with different plant-based milk options depending on your taste preference.
- Apples are full of acids, which might curdle the milk. So cook the apples before combining them with the milk.
- Any sweet and ripe variety of apples is perfect for this kheer recipe . Do not use apples with tartness and sourness such as Granny Smith.
- Apple kheer has a thick and luscious consistency, hence allow the milk to thicken before adding the sweetener.
- Customization: For added flavour, you can infuse the kheer with vanilla extract, cinnamon, or nutmeg. Fresh or dried fruits like chopped dates, figs, or dried apricots can also be added.
- Adding sweetener is completely optional in this kheer recipe. Jaggery and coconut sugar add a lovely depth of flavour to the kheer. You can also use maple syrup or agave for a different flavour profile.
More Indian Kheer Recipes
- Rice Kheer
- Badam Kheer
- Seviyan Kheer
- Makhana Kheer
- Gujarati Doodh Pak
- Carrot Sabudana Kheer
more Indian kheer recipes for all festive celebrations.
Ingredients
- ▢ 1 medium size apple, finely chopped
- ▢ ¼ Cup uncooked quinoa peeled and grated
- ▢ 1 Cup water
- ▢ 2 Cup almond milk
- ▢ ⅛ Cup coconut sugar
- ▢ 1 teaspoon cardamom powder
- ▢ ¼ teaspoon saffron
- ▢ ½ tablespoon sliced almonds and pistachio
Instructions
- Rinse the quinoa thoroughly under cold water to remove any bitterness. Soak it in water for 30 minutes. Wash and finally chop the apples with the skin.
- Discard water from soaked quinoa
- In a pressure cooker, dry roast the soaked quinoa for 2 – 3 minutes. Add chopped apples, cardamom, and saffron.
- Add water, and pressure cook over low heat for 3 whistles. Turn off the heat. Allow the steam to release naturally from the pressure cooker.
- After pressure cooking quinoa and apples are soft. Turn on the heat.
- Add almond milk and stir to combine. Let it simmer over low heat for 5 – 6 minutes. Continuously stir the kheer to avoid scorching. Allow the kheer to become thick and creamy.
- Stir in the jaggery or coconut sugar until it dissolves completely. Turn off the heat. Let the kheer cool slightly. It will thicken further as it cools.
- Serve apple kheer chilled garnished with sliced dry fruits and chopped apples.
Recipe Notes:
- Feel free to experiment with different plant-based milk options depending on your taste preference.
- Cook the apples before combining them with the milk else kheer will curdle.
- You can substitute quinoa with barnyard millet or foxtail millet.
Nutrition
We follow a strict NO SPAM Policy
