Say goodbye to boring side dishes! This Green Beans Salad is perfect for a summer barbecue, a festive holiday feast, or a light lunch. Plus, it’s easy to make and looks stunning on the table!
Estimated reading time: 5 minutes

This Green Bean Salad is a testament to how simple, fresh ingredients can create something elegant, healthy, and satisfying. It combines the crisp-tender green beans with crunch of toasted sesame seeds, and a zesty mustard dressing.
Why This Green Beans Salad Shines
- Versatile: Pairs wonderfully with grilled chicken, fish, steak, or as a substantial vegetarian side.
- Quick to Assemble: Most of the work is in the prep, making assembly a breeze, especially if you blanch the beans ahead of time.
- Diet Friendly : It has no dairy or gluten along with minimal calories. Making it a perfect choice for high fibre low calorie salad or a side.

IngredientsYou’ll Need
- Fresh Green Beans , trimmed. Look for fresh perky ones, not sad and floppy ones speckled with black dots.
- Dijon Mustard for the smooth well rounded flavour. It is not as sharp as yellow mustard.
- Extra Virgin Olive Oil to emulsify the dressing. Substitute it with light seed or avocado oil.
- Lemon Juice or red wine vinegar to brighten up the flavour.
- Chilli Flakes to introduce a subtle spiciness to the salad
- Garlic Cloves finely minced, pressed or grated.
- White Sesame Seeds for the crunch and the nuttiness
- Fresh Parsley or Cilantro for the refreshing flavour.
- Salt and Crushed Pepper
How To Make Beans Salad
1) Prepare Green Beans
- Bring a large pot of salted water to a rolling boil.
- While the water heats, prepare an ice bath (a large bowl filled with ice and water).
- Trim the green beans. Add the trimmed green beans to the boiling water and blanch for 5 minutes. You want them cooked, but still with a nice snap.

- Immediately drain the green beans and plunge them into the ice bath. This “shocks” the beans, stopping the cooking process and preserving their vibrant green colour and crisp texture.

- Once completely cooled, drain the beans thoroughly and pat them dry with a clean kitchen towel or paper towels.
2. Prepare the Vinaigrette:
- In a bowl whisk together the extra virgin olive oil, lemon juice, minced garlic, Dijon mustard, sesame seeds, chilli flakes, salt, and black pepper until emulsified. Taste and adjust seasonings as needed.
3.Assemble the Salad
- Add the blanched and cooled beans to the dressing bowl. Toss them nicely in the dressing.

- Add the chopped herbs and mix one last time.
Serve green beans salad immediately, or let it chill in the refrigerator for 15-20 minutes for the flavours to meld.

Though the obvious thought would be to serve these green beans as a salad. Try it with a simple piece of grilled chicken breast, steak, or baked fish. That would be a terrific combination!
My Tried and True Tips
- Blanching is Key: Don’t skip the ice bath! It’s essential for achieving that perfect crisp-tender texture and bright green colour.
- Other Nuts: Pine nuts, pistachios, almonds, or even walnuts can be used instead of sesame seeds for a different nutty flavour.
- Add More Veggies: Cherry tomatoes, thinly sliced bell pepper, or even onion would be lovely additions.
- Herb Power: Fresh parsley, tarragon or dill would also complement the flavours.
- Cheese Addition: Add feta or goat cheese for the creaminess and the sharp savoury flavour.
More Green Salad Recipes for you
- Avocado Salad
- Fattoush Salad
- Kale Apple Salad
- Herbed Potato Salad
- Indian Cucumber Salad
- Smashed Cucumber Salad
Get all my Salad Recipes here or you can buy my ebook with 40+ Healthy Salad Recipes .

Ingredients
- ▢ 500 gram green beans, cut into half lengthwise
- ▢ 2 tablespoon extra virgin olive oil
- ▢ 1 teaspoon Dijon Mustard
- ▢ ½ lemon, juiced
- ▢ ½ teaspoon minced garlic
- ▢ ½ teaspoon red chilli flakes
- ▢ 1 tablespoon white sesame seeds
- ▢ handful of parsley, chopped
- ▢ 1 teaspoon salt or to taste
- ▢ crushed black pepper
Instructions
- Bring a large pot of salted water to a rolling boil. While the water heats, prepare an ice bath (a large bowl filled with ice and water).
- Trim the green beans. Add the trimmed green beans to the boiling water and blanch for 5 minutes. You want them cooked, but still with a nice snap.
- Immediately drain the green beans and plunge them into the ice bath.
- Once completely cooled, drain the beans thoroughly and pat them dry.
- In a bowl whisk together the extra virgin olive oil, lemon juice, minced garlic, Dijon mustard, sesame seeds, chilli flakes, salt, and black pepper until emulsified. Taste and adjust seasonings as needed.
- Add the blanched and cooled beans to the dressing bowl. Toss them nicely in the dressing. Add the chopped herbs and mix one last time.
- Serve green beans salad immediately, or let it chill in the refrigerator for 15-20 minutes for the flavours to meld.
Recipe Notes:
Nutrition
We follow a strict NO SPAM Policy

Green Beans Salad Recipe
Equipment
- stockpot or saucepan
- Salad Mixing Bowl
Ingredients
- 500 gram green beans, cut into half lengthwise
- 2 tablespoon extra virgin olive oil
- 1 teaspoon Dijon Mustard
- ½ lemon, juiced
- ½ teaspoon minced garlic
- ½ teaspoon red chilli flakes
- 1 tablespoon white sesame seeds
- handful of parsley, chopped
- 1 teaspoon salt or to taste
- crushed black pepper
Instructions
- Bring a large pot of salted water to a rolling boil. While the water heats, prepare an ice bath (a large bowl filled with ice and water).
- Trim the green beans. Add the trimmed green beans to the boiling water and blanch for 5 minutes. You want them cooked, but still with a nice snap.
- Immediately drain the green beans and plunge them into the ice bath.
- Once completely cooled, drain the beans thoroughly and pat them dry.
- In a bowl whisk together the extra virgin olive oil, lemon juice, minced garlic, Dijon mustard, sesame seeds, chilli flakes, salt, and black pepper until emulsified. Taste and adjust seasonings as needed.
- Add the blanched and cooled beans to the dressing bowl. Toss them nicely in the dressing. Add the chopped herbs and mix one last time.
- Serve green beans salad immediately, or let it chill in the refrigerator for 15-20 minutes for the flavours to meld.
Video
Notes
Nutrition
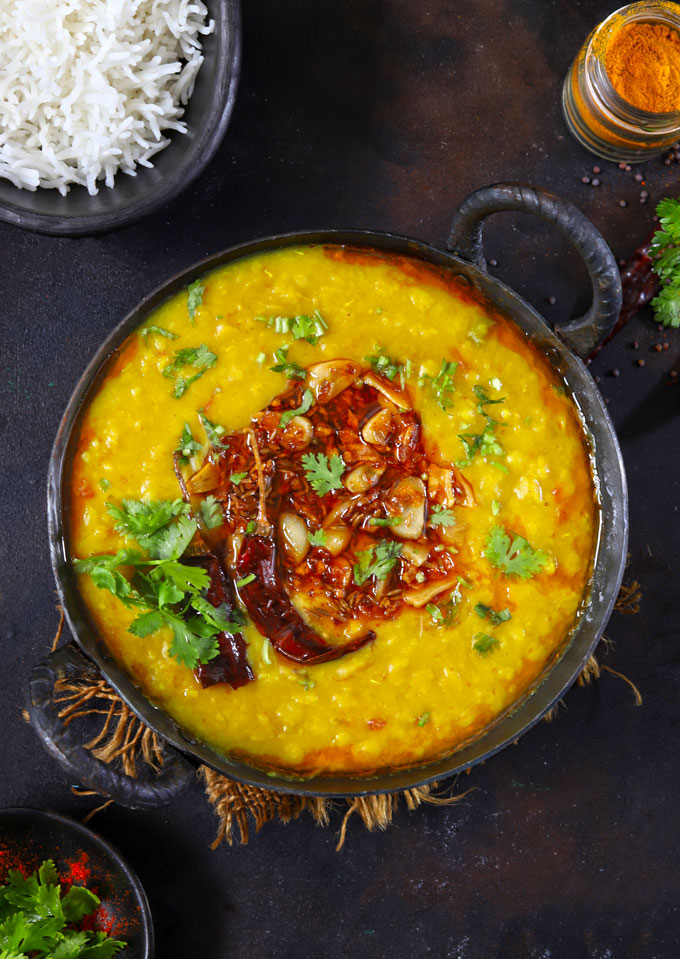
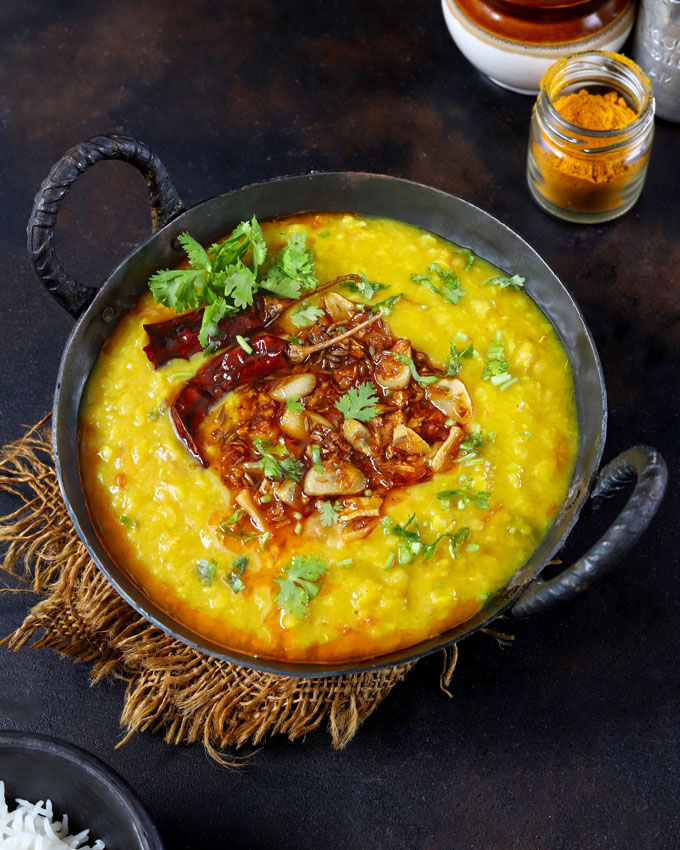
This is a simple and delicious North India-style arhar dal recipe. Also known as toor dal. Serve it with rice for a comforting meal of dal bhaat.
- What is Arhar Dal?
- My Favourite Dal Fry
- How To Make Arhar Dal Fry
- Serving Suggestion
- Arhar Dal Recipe
What is Arhar Dal?
Arhar is the Hindi term for pigeon peas. A widely popular legume from the tropical regions. In many parts of India, it is also known as toor dal. Pigeon Peas are a plant-based protein that is rich in fiber too. From making sambar to khichdi , toor dal is one of the most commonly used legumes in Indian Cuisine.
My Favourite Dal Fry
My love affair with arhar dal started at an early age.
In most Kumaoni households, the lunch menu often consists of dal-bhaat (lentil-rice), and when we say dal, we are referring to arhar ki dal. There is an unsaid, soul-satiating comfort in mopping up the piping hot arhar dal fry with steamed rice ( bhaat ).
Every home cook has their own arhar dal recipe. However, I follow my family’s signature arhar dal recipe passed on from generation to generation.
You should note that the original recipe called for heavy-duty brass cookware to cook the dal. I am switching to a pressure cooker because of two reasons. One , I don’t have the brass casserole. Second , I ain’t no patient cook. So this can be called a short version of the slow-cooked toor dal fry. Double winner!
Explore the diversity of Indian Dals!
How To Make Arhar Dal Fry
Step 1) Clean, wash, and soak toor dal in water for 15 – 20 minutes.
Step 2) Transfer soaked dal to a pressure cooker and green chili, salt, turmeric powder, ginger garlic paste, and chopped tomato. Add water. Stir to combine. Seal the pressure cooker with the lid. Cook dal for two whistles over low heat.
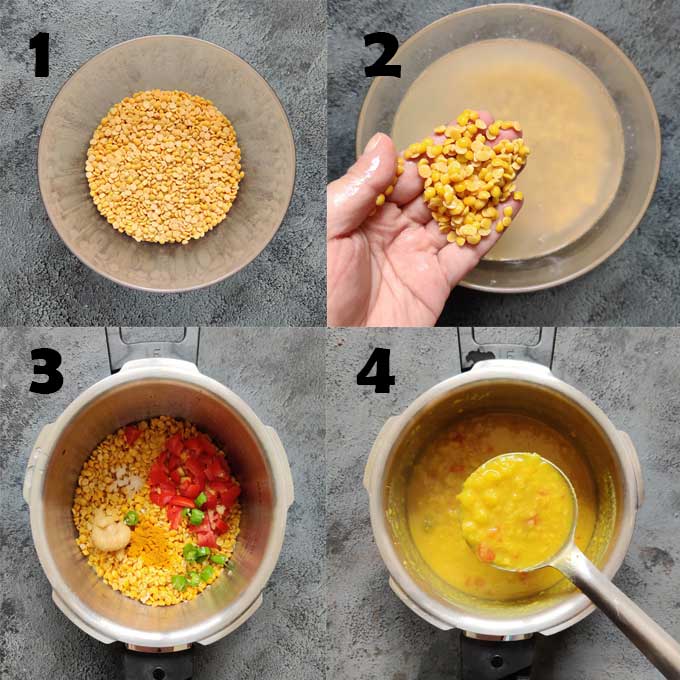
Step 3) Open the lid of the pressure cooker. Add more water if the dal is too thick to get the desired consistency.
Taste and, if required, add more salt and seasoning to the dal. Turn on the heat and simmer arhar dal over low heat while you prepare tadka.
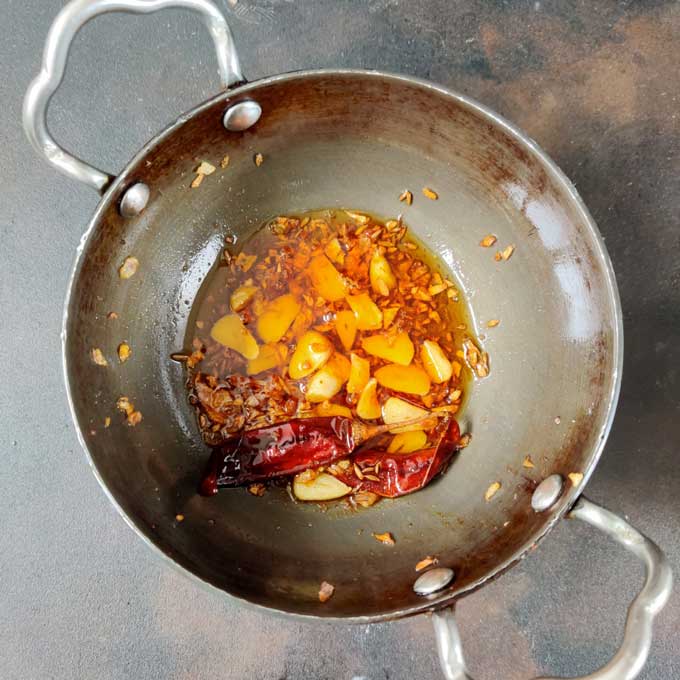
For tadka of dal, you can use a combination of garlic, cumin, dried red chilies, chopped onion, and asafoetida.
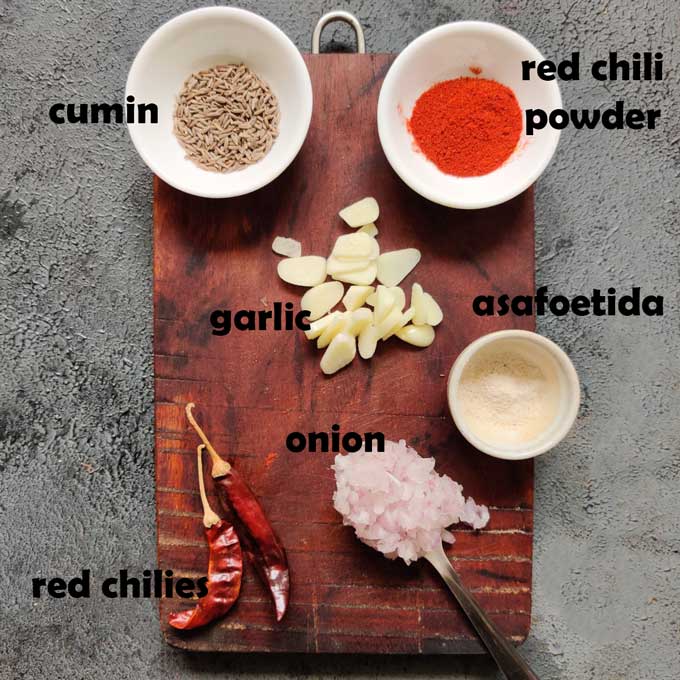
Step 4) Prepare tadka, heat ghee in a small pan. Add cumin, asafoetida, red chilies, chopped garlic, and onion. Fry till onion and garlic is light brown. At last, add red chili powder and turn off the heat.
Step 5) Pour hot tadka over the arhar dal. Stir to combine. Sprinkle chopped fresh coriander. Seal the pressure cooker with a lid for 5 minutes. This way flavor and aroma of tadka are nicely blended with the dal.
Arhar Dal Fry is ready to serve.
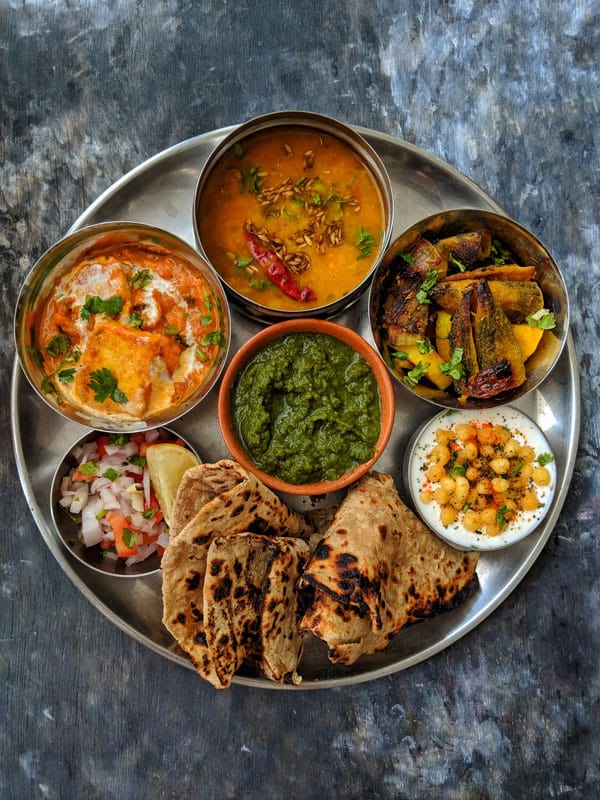
Serving Suggestion
Arhar Dal is a main course dish from Northern India. The best combination is arhar dal fry with basmati rice/ jeera rice and a simple side dish like kachumber salad , jeera aloo , or mango pickle .
Arhar Ki Dal tastes excellent with piping hot chapati or phulka also with a simple bharwa baingan , Punjabi aloo gobi sabzi, crispy bhindi fry , or masala potato .
Use leftover arhar dal to make Punjabi-style dal paratha . It is one of the best ways to recycle leftover dal.
More Indian Dal Recipes
- Dal Makhani
- Panchmel Dal
- Palak Chana Dal
- Moong Dal Chaat
- Whole Masoor Dal
- Pahadi Gahat Ki Dal
- Punjabi Sookhi Urad Dal
follow me on Youtube or Instagram for latest recipes.

Ingredients
- ▢ 1 Cup toor dal (pigeon peas)
- ▢ ½ Cup chopped tomato
- ▢ 1 green chili chopped
- ▢ 1 teaspoon turmeric powder
- ▢ ½ teaspoon red chili powder
- ▢ 1 ¼ teaspoon salt or to taste
- ▢ 1 teaspoon ginger garlic paste ( get recipe )
- ▢ 4 Cup water
- ▢ 2 tablespoon chopped fresh coriander
Ingredients for the tempering (tadka)
- ▢ 4 tablespoon ghee
- ▢ 1 teaspoon cumin seeds (jeera)
- ▢ ¼ teaspoon hing (asafoetida)
- ▢ 1 tablespoon chopped garlic
- ▢ 2 dried red chilies
- ▢ ¼ Cup finely chopped onion
- ▢ ½ teaspoon Kashmiri red chili powder
Instructions
- Clean, wash and soak toor dal in water for 15 – 20 minutes. Make sure to wash the pigeon peas nicely with water 2 – 3 times before soaking.
- Transfer soaked dal to a pressure cooker, along with green chili, salt, turmeric powder, ginger garlic paste, and chopped tomato. Add 4 cups of water. Stir to combine. Seal the pressure cooker with the lid. Cook dal for two whistles over low heat. Allow the steam to release naturally.
- Open the lid of the pressure cooker. Taste the dal and, if required, add more salt and seasoning to the dal. If the dal is too thick, add more water to get the desired consistency. Turn on the heat and allow arhar dal to simmer while you prepare the tadka.
- Prepare tadka, heat ghee in a small pan. Add cumin, asafoetida, red chilies, chopped garlic, and onion. Fry till onion and garlic is light brown. Continuously stir the tadka while frying. At last, add red chili powder and turn off the heat.
- Pour hot tadka over the arhar dal. Stir to combine. Sprinkle chopped fresh coriander. Stir to combine. Seal the pressure cooker with a lid for 5 minutes. This way flavor and aroma of tadka are nicely combined with the dal.
- Garnish with fresh chopped coriander leaves.
- Serve Arhar Ki Dal warm with rice.
Recipe Notes:
- Do not add too much water while cooking the dal. Usually, a ratio of 1:4 (dal to water) works perfectly). Please note arhar dal consistency becomes thick after a few hours of cooking. Hence, add more water if required.
- 2 – 3 whistles over low heat are perfect to cook toor dal. Cooking for too long makes dal mushy and like a thick paste.
- If you do not like spicy dal, skip adding red chilies to the tadka.
- You can customize tadka of dal as per personal preference. Use only cumin and chilies or only garlic and cumin.
- You can add a teaspoon of Garam Masala powder once the dal is cooked for warmth and a spicy taste.
Nutrition
We follow a strict NO SPAM Policy
