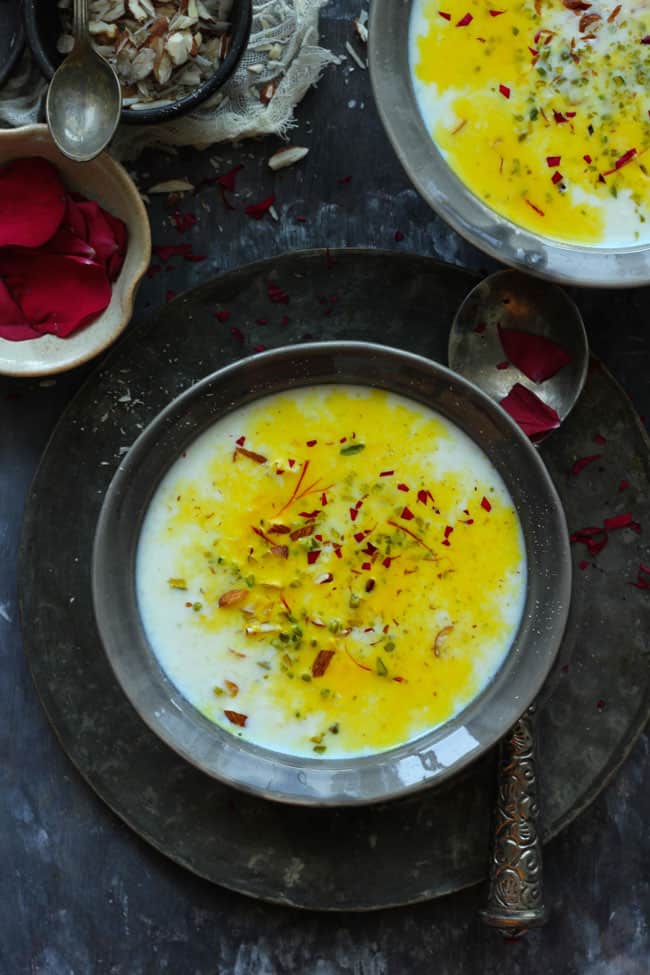
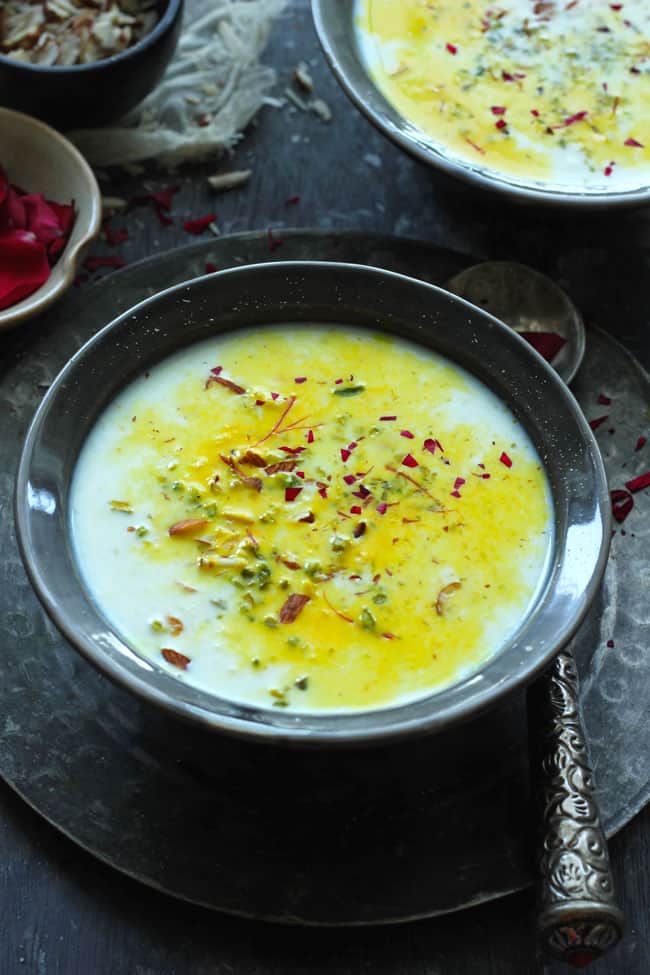
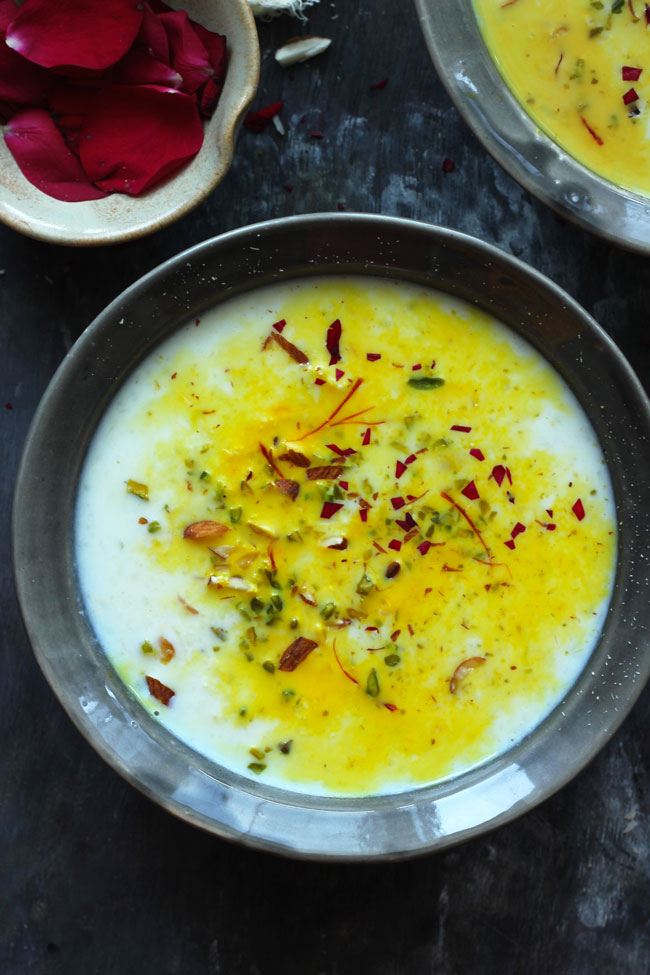
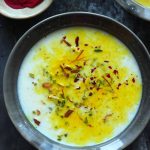
Gobi Ki Kheer is a scintillatingly festive cauliflower kheer (pudding). While cauliflowers form the base of this kheer recipe, the rest of the ingredients list is basic – milk, sugar, saffron and dry fruits. A warm, smooth and delectably creamy bowl of gobi kheer to savor at the end of a festive meal is our definition of ambrosia.
You can never run out of enough ideas for dessert. Desserts make any meal special and festive. When it comes to Indian desserts , they are often characterized as rich, indulgent, and full of aromatics.
Using fruits and vegetables in desserts isn’t uncommon in Indian cuisine. While most gourds and carrots are usual favorites, the others are worth exploring too. One such vegetable is the cauliflower.
Cauliflower is a really versatile vegetable – from sinful gobi paratha to crisp tandoori gobi or delicious cauliflower pilaf , there are tons of interesting cauliflower recipes that are my favorite.
Well, cauliflowers aren’t exactly the first thing that comes to our minds when we think Indian dessert (leave alone kheer). So I won’t blame you guys for being a little confused about this dish.
However, I urge you to try this cauliflower kheer recipe out and trust me you’ll both thank me and lick off the last bits of your dessert bowls as you finish the kheer – it is a total treat.
Pro Tips To Make Gobi Ki Kheer:
Full cream (fat) milk is the best to make any kind of kheer or Indian pudding. The full-fat milk gives a thick and luscious texture to the kheer.
The Indian desserts like kheer are never done in a short span of time. They require patience and labor of love. So until the milk reduces almost to half the original amount and thickens nicely the kheer is not ready.
Always cook kheer over low heat and in a heavy bottom deep saucepan.
Be generous while adding cardamom, saffron, and dry-fruits in kheer. The richness and aroma in the Indian desserts come from all the mentioned ingredients.
Last but not least, keep on stirring the kheer at regular intervals to collect the cream (malai) from the sides of the pan and combine it back into the milk.
More Indian Kheer Recipes You Might Like To Try:
Paneer Kheer
Lauki Kheer
Rice Kheer
Seviyan Kheer
If you try this recipe and love it, please leave a comment and a rating. This helps us grow and reach many other food lovers like you, who are looking for a perfect tried and tested recipe.

Ingredients
- ▢ 500 gram cauliflower (gobi)
- ▢ 1 litre full cream milk
- ▢ 1 teaspoon saffron (kesar)
- ▢ 2 teaspoon cardamom powder
- ▢ ½ Cup sugar or to taste
Ingredients For Garnish:
- ▢ 1 tablespoon almonds (chopped)
- ▢ ½ teaspoon unsalted pistachio (chopped)
- ▢ ½ teaspoon edible rose petals (optional)
Instructions
How To Prepare Cauliflower (Gobi):
- Take the cauliflower and wash it properly. Cut the cauliflower in big chunks.
- Heat water in a large saucepan. Add cauliflower chunks, boil for 5 minutes or till the smell of cauliflower wafts away. Drain the water and transfer the cauliflower to a strainer or colander.
- Allow cauliflower to cool down a bit. Pat dry with a kitchen towel.
- Now grate the cauliflower. Or use a food processor to get fine granules of cauliflower.
How To Make Gobi Ki Kheer:
- While preparing cauliflower, simultaneously heat milk in a heavy bottom saucepan.
- Add the cardamom powder and stir to combine.
- Let the milk come to a boil once and then reduce the heat to low. Allow the milk to simmer over low heat until it reduces to half the original amount.
- Now, add the grated cauliflower, sugar and saffron. Stir to combine.
- Simmer the kheer on a low heat until cauliflower is nicely cooked and the kheer gets a creamy consistency. Turn off the heat.
- Gobi Ki Kheer is best served chilled. So keep in the fridge for 2 – 3 hours.
- Garnish gobi ki kheer with chopped almonds, pistachio and rose petals.
Recipe Notes:
- The sliced almonds or any other dry-fruits can be roasted in a tablespoon of ghee before adding in the kheer for an extra flavor.
- If you do not have cardamom powder, use 2 – 3 whole green cardamom and crush them.
Nutrition
We follow a strict NO SPAM Policy
Gobi Ki Kheer Recipe
Ingredients
- 500 gram cauliflower (gobi)
- 1 litre full cream milk
- 1 teaspoon saffron (kesar)
- 2 teaspoon cardamom powder
- ½ Cup sugar or to taste
Ingredients For Garnish:
- 1 tablespoon almonds (chopped)
- ½ teaspoon unsalted pistachio (chopped)
- ½ teaspoon edible rose petals (optional)
Instructions
How To Prepare Cauliflower (Gobi):
- Take the cauliflower and wash it properly. Cut the cauliflower in big chunks.
- Heat water in a large saucepan. Add cauliflower chunks, boil for 5 minutes or till the smell of cauliflower wafts away. Drain the water and transfer the cauliflower to a strainer or colander.
- Allow cauliflower to cool down a bit. Pat dry with a kitchen towel.
- Now grate the cauliflower. Or use a food processor to get fine granules of cauliflower.
How To Make Gobi Ki Kheer:
- While preparing cauliflower, simultaneously heat milk in a heavy bottom saucepan.
- Add the cardamom powder and stir to combine.
- Let the milk come to a boil once and then reduce the heat to low. Allow the milk to simmer over low heat until it reduces to half the original amount.
- Now, add the grated cauliflower, sugar and saffron. Stir to combine.
- Simmer the kheer on a low heat until cauliflower is nicely cooked and the kheer gets a creamy consistency. Turn off the heat.
- Gobi Ki Kheer is best served chilled. So keep in the fridge for 2 - 3 hours.
- Garnish gobi ki kheer with chopped almonds, pistachio and rose petals.
Notes
- The sliced almonds or any other dry-fruits can be roasted in a tablespoon of ghee before adding in the kheer for an extra flavor.
- If you do not have cardamom powder, use 2 - 3 whole green cardamom and crush them.
Nutrition
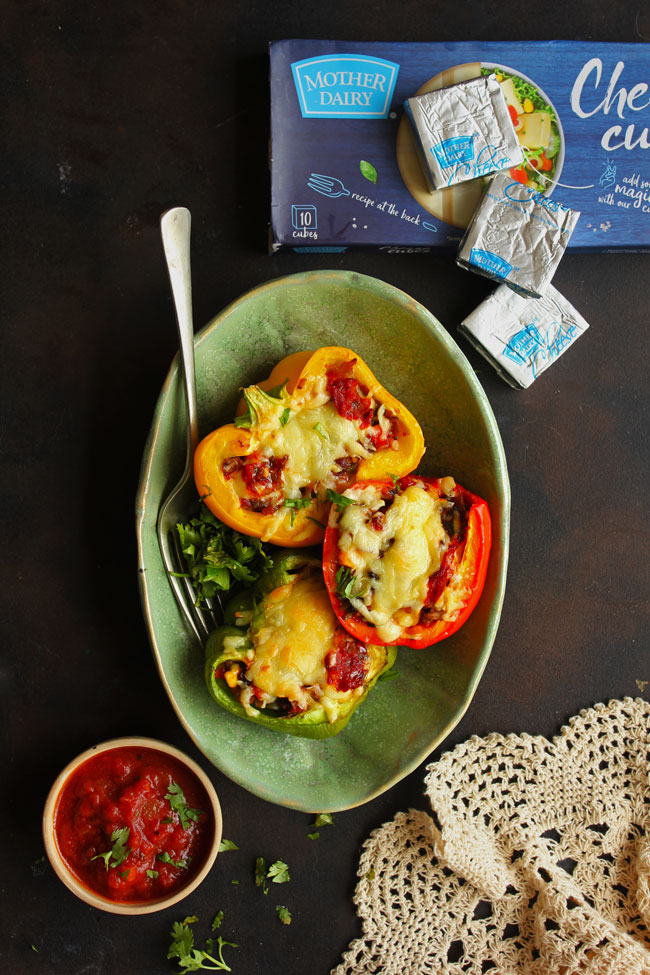
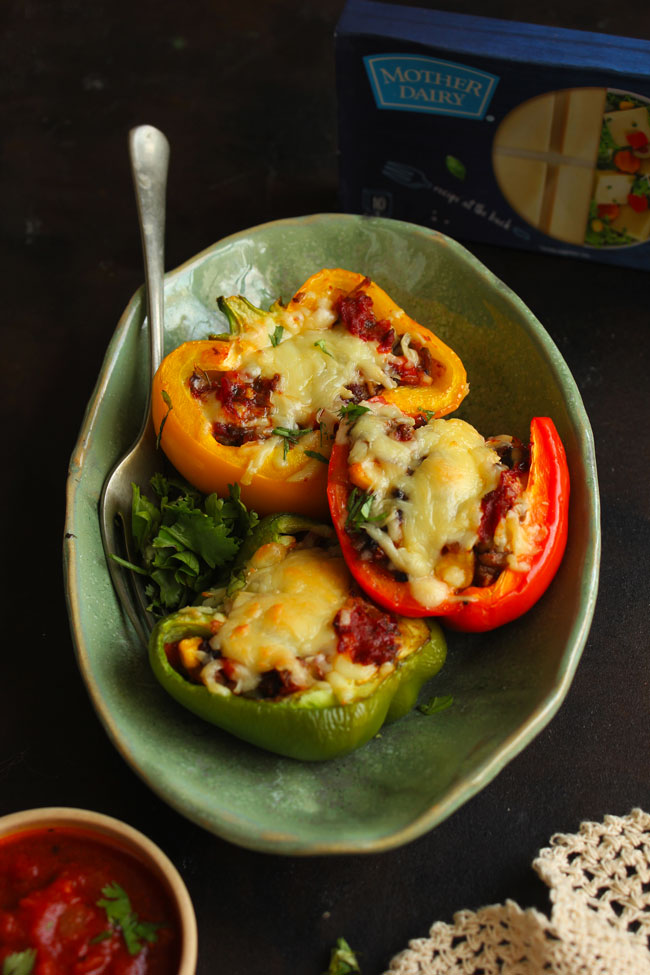
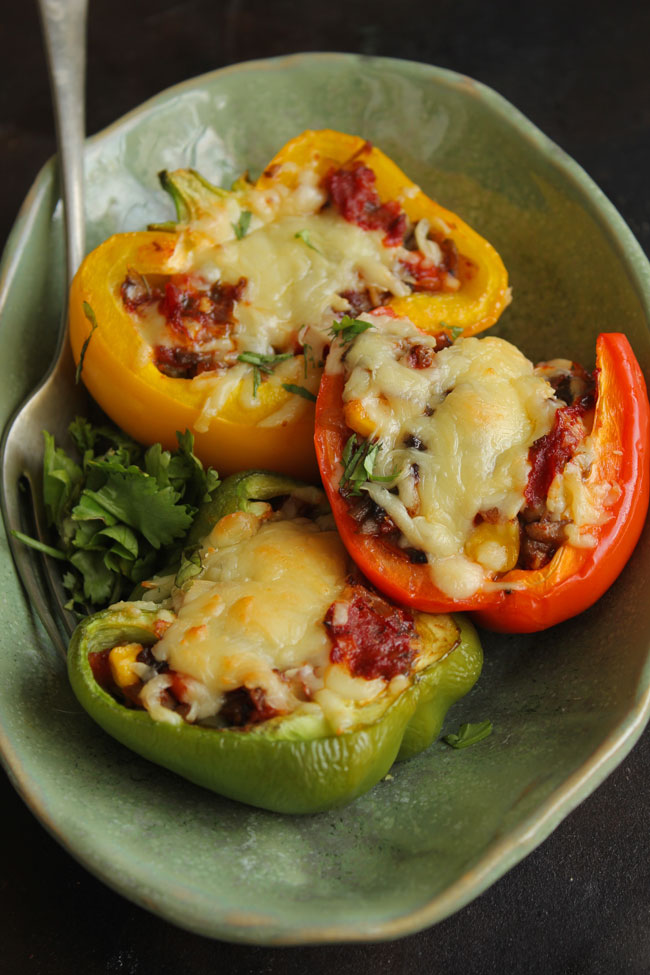
Cheese Stuffed Peppers are packed with colorful bell peppers topped with melted cheese. A cheesy treat for vegetarian lovers. Stuffed Pepper is an Italian style appetizer that can easily double as a main dish once paired with the right kind of accompaniments. Try stuffed peppers recipe this week and serve it alongside some toasted garlic bread, creamy pasta or a seasonal salad.
Italian food is always a winner on the family table. It’s not too spicy so kids won’t fuss, it has enough veggies and protein to keep us the meal planners content and then there’s cheese to keep everyone happy. This Italian style stuffed pepper recipe is an excellent family dinner cum snack for any day of the week. It is fairly versatile as well.
For the stuffing, you can use any kind of seasonal vegetables – carrot, beans, potato, mushroom, meat – beef, minced chicken, bacon, or a variety of grains like – quinoa, rice, couscous. Either way, it tastes only delicious and fulfilling.
I have used Mother Dairy Cheese to get a slightly crusty layer on top of peppers. At times I like to enjoy Mother Dairy Cheese Cube on its own. Simply cubed, seasoned with pepper and I am all sorted for the quick evening snack. You can watch the step-by-step process to make these stuffed peppers at Mother Dairy Fresh Delights Instagram Handle.
Making The Stuffed Peppers:
The peppers are the hero in this appetizer recipe so it’s very important that you choose good quality ones. They need to be firm. With smooth, relatively unblemished skins. Wash them thoroughly in salt water before use and carefully scoop out the insides (seeds and the white skin) to give a nice bowl shape for the stuffing. Like I mentioned earlier, this stuffed pepper recipe can be easily customized as per your preference.
When making stuffed peppers for a large gathering or party, prepare the stuffing and bell peppers in advance and keep in the fridge. Simply assemble and bake just before serving. Freezing the stuffed pepper is not ideal as they can get soggy and may not retain the crunch. With stuffing did beforehand stuffed pepper is one of the easy to pick together party snack. Always a crowd favorite vegetarian snack or side dish.

Ingredients
Ingredients For The Covering:
- ▢ 3 - 4 bell peppers
Ingredients For Stuffing:
- ▢ 1 medium-size onion, fine chopped
- ▢ 1 tablespoon chopped garlic
- ▢ 1 Cup Mixed Vegetables (mushroom, carrot, french beans), fine chopped
- ▢ ¼ Cup sweet corn kernels
- ▢ ¼ Cup pasta sauce, ( see recipe here )
- ▢ Salt to taste
- ▢ ½ teaspoon black pepper
- ▢ 1 teaspoon Italian Herbs Mix
- ▢ 1 Cup processed cheese, grated
- ▢ 2 tablespoon cooking olive oil
Instructions
Preheat Oven:
- Preheat oven at 180 degrees Celcius. Grease a baking tray with a teaspoon of oil. Set aside till required. Meanwhile, prepare the stuffing and peppers.
Prepare the Peppers:
- Wash and pat dry the peppers. Use a small knife to cut a wide circle around each bell pepper stem to remove the tops. Cut each pepper into equal halves. Remove the seeds and white skin from inside the peppers. Set aside.
Prepare the Stuffing:
- Heat olive oil a frying pan. Add chopped garlic and onion. Saute for 3 - 5 minutes or till translucent.
- Now, add the chopped vegetables, sweet corn kernels, salt, black pepper, Italian seasoning mix, and pasta sauce . Mix nicely, cover and cook till vegetables are nicely done. Turn off the heat.
- Add half of the grated cheese and combine.
Stuff the Peppers:
- Evenly divide the mixture among the peppers. Stuff each pepper tightly with the stuffing. Sprinkle the remaining cheese over peppers.
Bake the Peppers:
- Bake until the peppers are softened but not mushy and the cheese on top is nicely melted and golden, about 30 - 40 minutes.
- Sprinkle fresh coriander or parsley on top. Serve stuffed pepper immediately.
Recipe Notes:
Nutrition
Thanks to our friends at Mother Dairy for sponsoring this post, and making sure we always eat the best of dairy produce.
We follow a strict NO SPAM Policy
