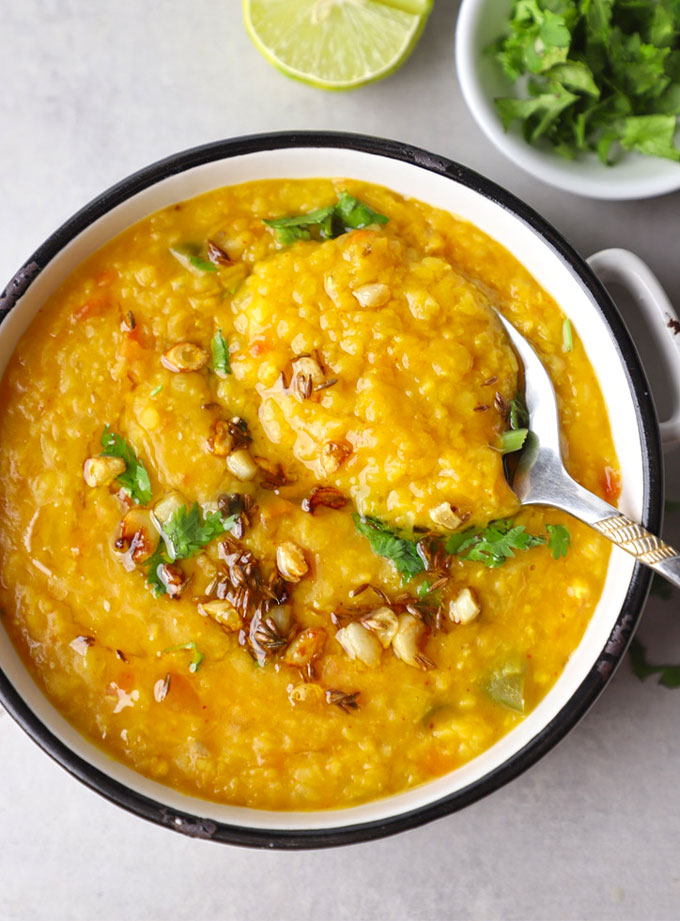
I make this quick and easy masoor dal at least twice a week for family meals. Here is a delicious masoor dal recipe – an ultimate comfort food that gets ready in less than 30 minutes in a pressure cooker.
- Everyday Comfort Food
- Masoor Dal – The Pink Lentil
- How To Cook Masoor Dal
- Serving Suggestion
- More Indian Dal Recipes
- Everyday Masoor Dal Recipe
Everyday Comfort Food
Hina says – Everyday Indian food in my home is simple, tasty, easy to cook, and comforting to the core. And a variety of dals are an integral part of my meal menu . I love lentils and beans so much that I dedicated a whole chapter (A Bag of Beans) to delicious Indian dal and bean recipes in my cookbook .
In a world filled with uncertainty, home-cooked comfort food offers a taste of home, a sense of belonging, and a reminder of the simple joys of life.
Masoor Dal – The Pink Lentil
Masoor dal, also known as red or pink lentils, originates from India and has been a part of traditional Indian cuisine for centuries. Packed with protein, fibre, and essential nutrients, masoor dal not only satisfies hunger but also nourishes the body.
It is a plant-based, vegetarian ingredient. You can use it to make stews, soups , khichdi , cutlet , tofu, dal, dosa, and so much more.
I am sharing an easy, fuss-free masoor dal recipe you can make either in a stovetop pressure cooker or instant pot with readily available ingredients.
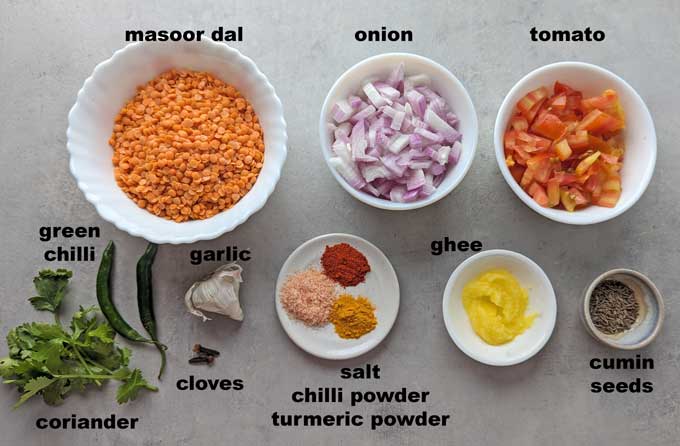
Other Ingredients
- Onion, Tomato, Green Chilli, Garlic , Coriander (cilantro)
- Seasoning: Salt, Turmeric Powder, Red Chilli Powder
- Whole Spices: Cloves (laung), Cumin, Dried Red Chilli (Optional)
- Cooking Oil: Ghee or neutral-tasting vegetable oil
How To Cook Masoor Dal
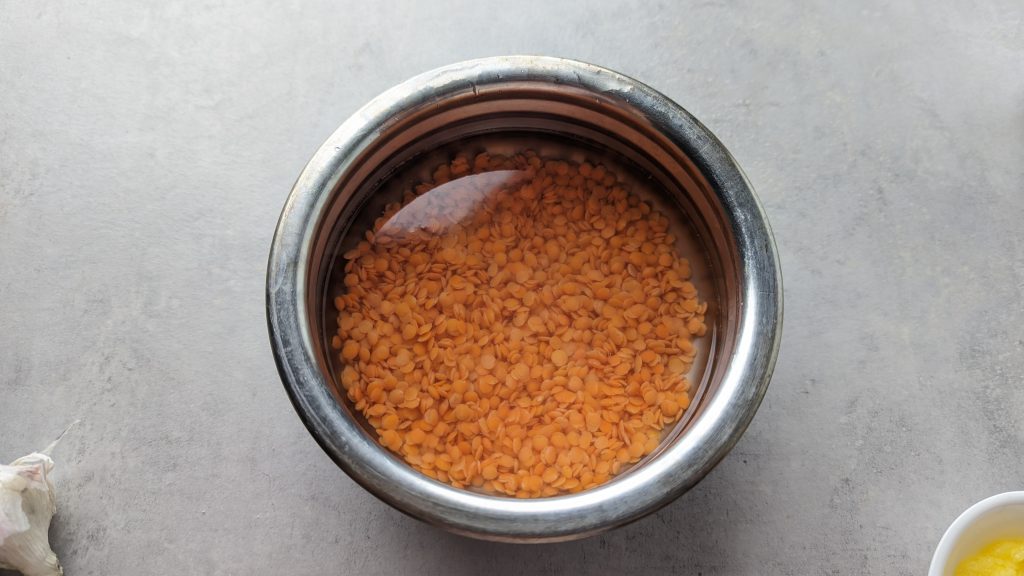
Prepare Lentil:
- Rinse and soak masoor (pink lentil) in water for 15 minutes.
- After 15 minutes, drain water from the soaked masoor.
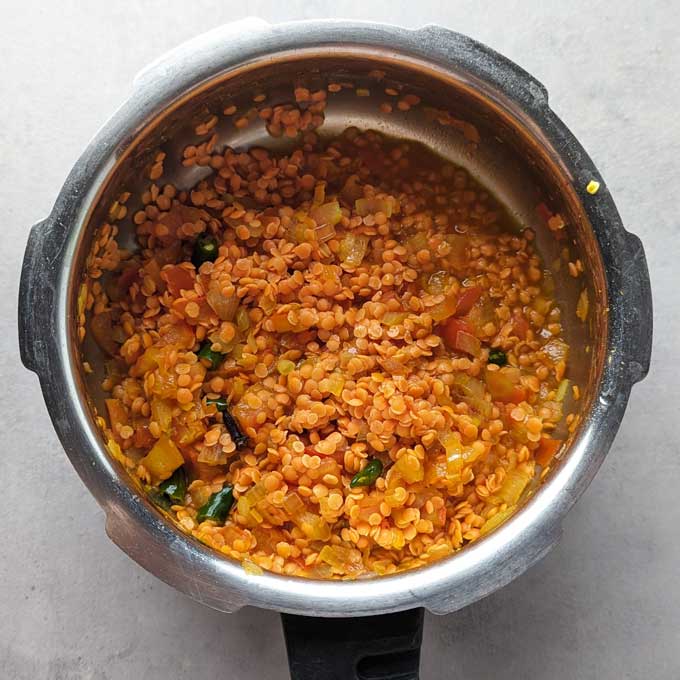
Pressure Cook :
- In a pressure cooker, add the rinsed dal, chopped tomato, green chilli, salt, turmeric, chilli powder, cloves, and water. Stir to combine.
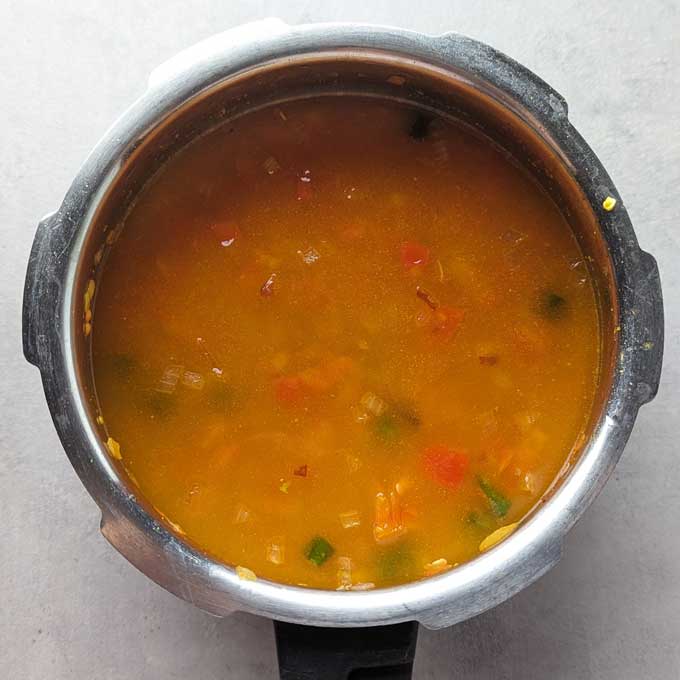
- Pressure cook over low heat for 2 whistles or 10-15 minutes until the dal is cooked.
- Allow steam to release naturally from the pressure cooker.
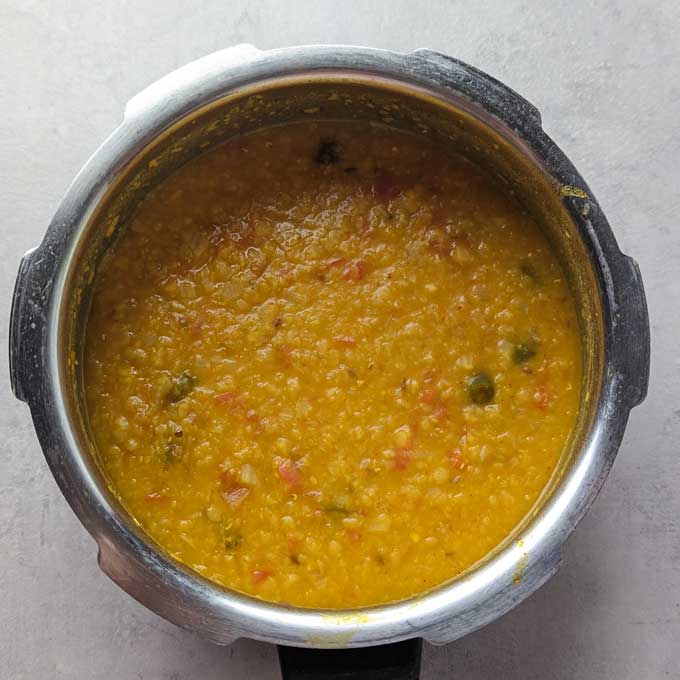
- Once cooked, mash the dal slightly with the back of a spoon. Taste, if required add more salt or spices. Set aside.
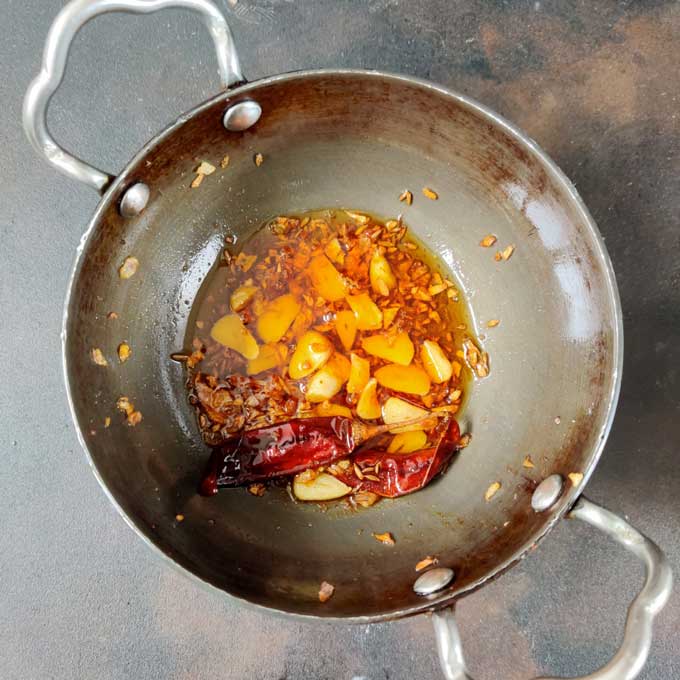
Tempering:
- Heat ghee or oil in a pan over medium heat.
- Add cumin seeds, chopped garlic, and onion. Fry them till the onion becomes light golden. Turn off the heat.
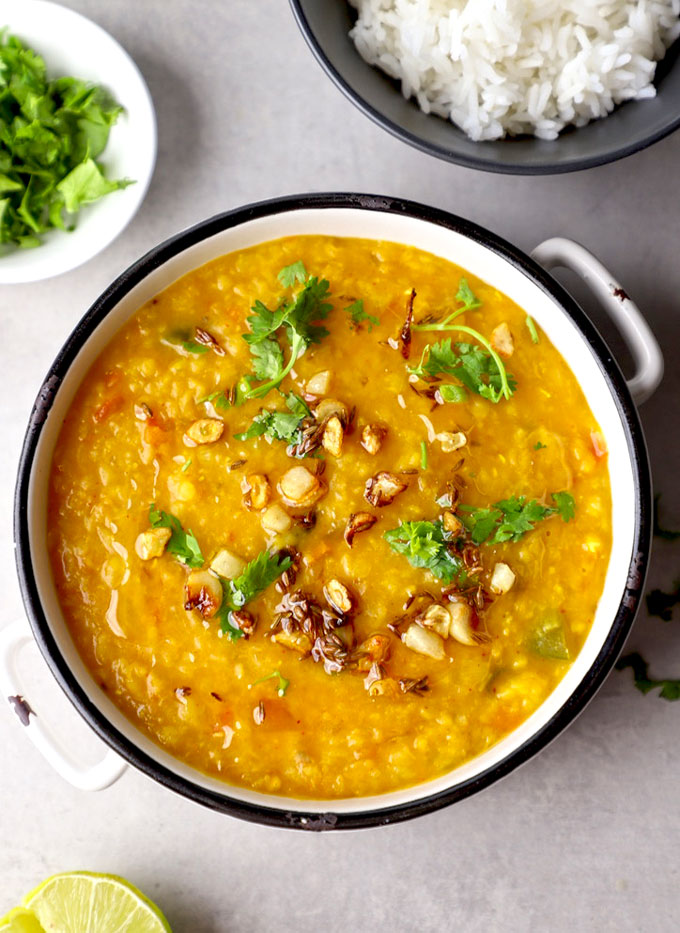
- Pour this tempering (tadka) over the hot masoor dal.
Simmering and Garnishing:
- Let the dal simmer for 5 minutes on low heat. Allowing flavours to meld together.
- Once done, turn off the heat. Garnish with chopped coriander leaves.
- Squeeze a wedge of lemon juice over the dal for a refreshing tangy taste.
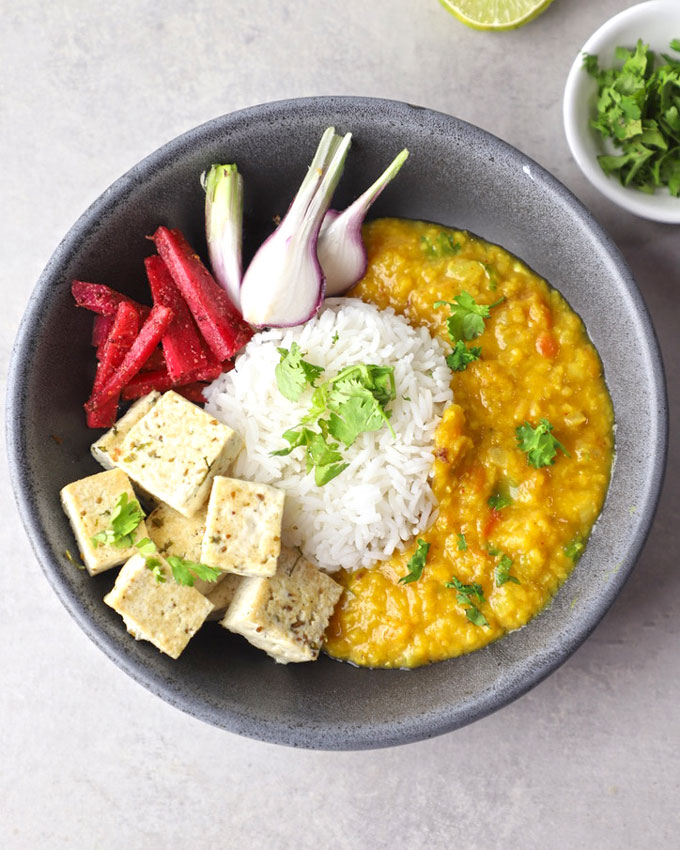
Serving Suggestion
I love to eat masoor dal with basmati rice or jeera rice . Whether I am homesick or in need of a pick-me-up after a long day, a steaming bowl of dal chawal provides me with a sense of comfort and familiarity like no other.
Masoor Dal pairs perfectly with Indian bread such as roti/phulka/chapati or naan. For a complete meal, serve it alongside curd or yoghurt , pickles, and sliced cucumbers or Indian kachumber salad .
This wholesome and nutritious dal is not only satisfying but also incredibly comforting, making it ideal for weeknight dinners.
More Indian Dal Recipes
- Arhar Dal Fry
- Dal Makhani
- Panchmel Dal
- Moradabadi Dal
- Shahi Urad Dal
- Palak Chana Dal
- Pahadi Gahat Dal
- Punjabi Sookhi Dal
If you try this recipe and love it, please leave a comment and a rating. This helps us grow and reach other food lovers like you.

Ingredients
- ▢ ½ Cup pink masoor dal
- ▢ 1 ½ Cup water
- ▢ 2 cloves (laung)
- ▢ 1 small size tomato, finely chopped
- ▢ 2 green chilli, finely chopped
- ▢ 1 teaspoon cooking salt or to taste
- ▢ ½ teaspoon turmeric powder
- ▢ ½ teaspoon red chilli powder
Ingredients for Tempering (Tadka)
- ▢ 1 tablespoon ghee
- ▢ 1 teaspoon cumin seeds (jeera)
- ▢ 1 small size onion, finely chopped
- ▢ 6 garlic cloves, finely chopped
- ▢ 2 dried red chilli, broken into halves (optional)
Ingredients For Serving
- ▢ ½ lemon, juiced (optional)
- ▢ 2 tablespoon chopped coriander leaves
Instructions
- Rinse and soak masoor (pink lentil) in water for 15 minutes. After 15 minutes, drain water from the soaked masoor.
- In a pressure cooker, add the rinsed dal, chopped tomato, green chilli, salt, turmeric, chilli powder, cloves, and water. Stir to combine.
- Pressure cook over low heat for 2 whistles or 10-15 minutes until the dal is cooked.
- Allow steam to release naturally from the pressure cooker. Once cooked, mash the dal slightly with the back of a spoon. Taste, if required add more salt or spices. Set aside.
- Heat ghee or oil in a pan over medium heat. Add cumin seeds, chopped garlic, red chilli, and onion. Fry them till the onion becomes light golden. Turn off the heat. Pour this tempering (tadka) over the hot masoor dal.
- Let the dal simmer for 5 minutes on low heat. Allowing flavours to meld together. Once done, turn off the heat. Garnish with chopped coriander leaves. Squeeze a wedge of lemon juice over the dal for a refreshing tangy taste.
- Serve Masoor Dal with jeera rice or phulka.
Recipe Notes:
- While pressure cooking the dal do not add too much water at once. I would suggest, adding lukewarm water after pressure cooking the dal to get the desired consistency.
- My mother in law adds onion while pressure cooking the dal and not in tadka. Her dal tastes equally delicious.
- I do not add coconut milk or cream to the dal. But if you like to add coconut milk, add it while simmering the dal after pressure cooking.
- Ingredients added as optional can be skipped.
- You can easily store masoor dal for 3 – 4 days. Reheat on the stovetop or microwave. It is a perfect meal prep-friendly dish.
Nutrition
We follow a strict NO SPAM Policy

Everyday Masoor Dal Recipe
Equipment
- Pressure Cooker
- Tadka Pan
Ingredients
- ½ Cup pink masoor dal
- 1 ½ Cup water
- 2 cloves (laung)
- 1 small size tomato, finely chopped
- 2 green chilli, finely chopped
- 1 teaspoon cooking salt or to taste
- ½ teaspoon turmeric powder
- ½ teaspoon red chilli powder
Ingredients for Tempering (Tadka)
- 1 tablespoon ghee
- 1 teaspoon cumin seeds (jeera)
- 1 small size onion, finely chopped
- 6 garlic cloves, finely chopped
- 2 dried red chilli, broken into halves (optional)
Ingredients For Serving
- ½ lemon, juiced (optional)
- 2 tablespoon chopped coriander leaves
Instructions
- Rinse and soak masoor (pink lentil) in water for 15 minutes. After 15 minutes, drain water from the soaked masoor.
- In a pressure cooker, add the rinsed dal, chopped tomato, green chilli, salt, turmeric, chilli powder, cloves, and water. Stir to combine.
- Pressure cook over low heat for 2 whistles or 10-15 minutes until the dal is cooked.
- Allow steam to release naturally from the pressure cooker. Once cooked, mash the dal slightly with the back of a spoon. Taste, if required add more salt or spices. Set aside.
- Heat ghee or oil in a pan over medium heat. Add cumin seeds, chopped garlic, red chilli, and onion. Fry them till the onion becomes light golden. Turn off the heat. Pour this tempering (tadka) over the hot masoor dal.
- Let the dal simmer for 5 minutes on low heat. Allowing flavours to meld together. Once done, turn off the heat. Garnish with chopped coriander leaves. Squeeze a wedge of lemon juice over the dal for a refreshing tangy taste.
- Serve Masoor Dal with jeera rice or phulka.
Notes
- While pressure cooking the dal do not add too much water at once. I would suggest, adding lukewarm water after pressure cooking the dal to get the desired consistency.
- My mother in law adds onion while pressure cooking the dal and not in tadka. Her dal tastes equally delicious.
- I do not add coconut milk or cream to the dal. But if you like to add coconut milk, add it while simmering the dal after pressure cooking.
- Ingredients added as optional can be skipped.
- You can easily store masoor dal for 3 - 4 days. Reheat on the stovetop or microwave. It is a perfect meal prep-friendly dish.
Nutrition
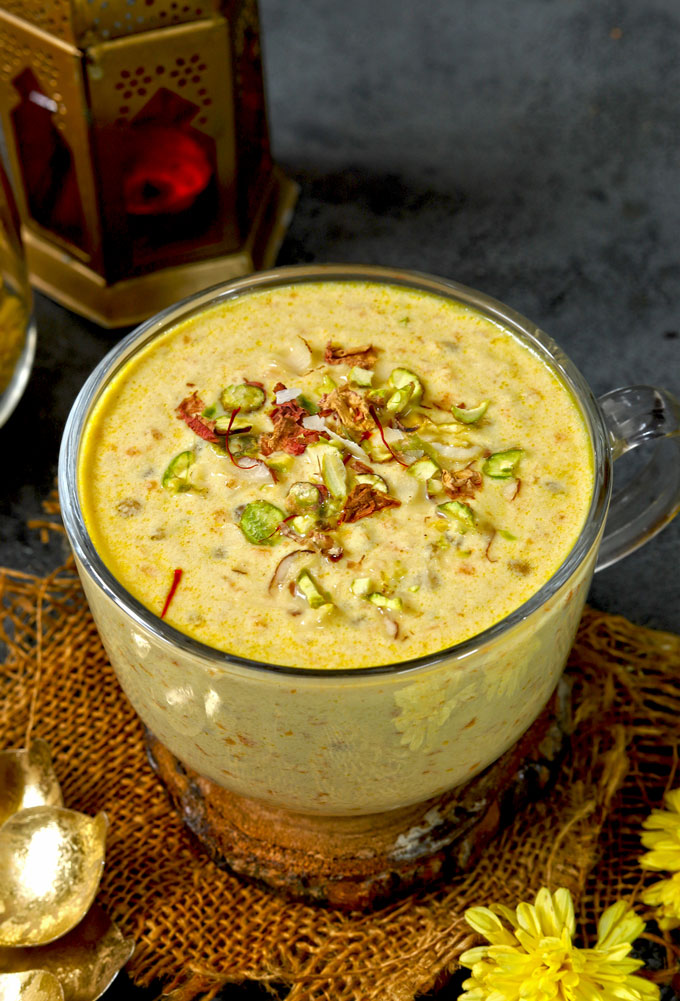
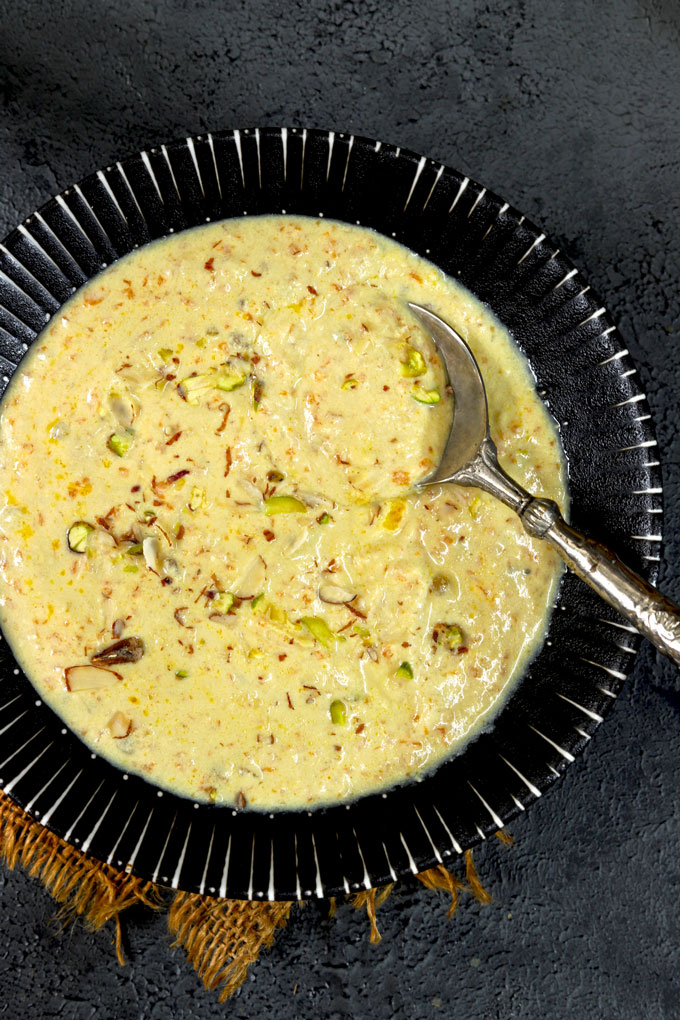
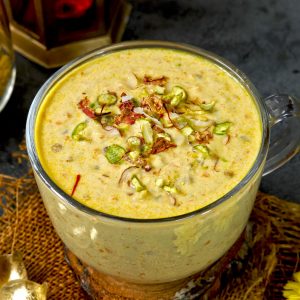
I am sharing a delicious sabudana kheer recipe with carrots and sago pearls. It is a perfect Indian dessert for festive celebrations. Be sure to watch the video!
- About Sabudana
- Story of Carrot Sabudana Kheer
- Ingredients Required
- My Tried & True Tips
- Watch Sabudana Kheer Video
- Storing Suggestion
- More Indian Kheer Recipe
- Carrot Sabudana Kheer Recipe
About Sabudana
Sabudana is a starch that’s extracted from the soft core of tapioca and other tropical palms. It is also known as sago or tapioca pearl. Sabudana is highly rich in carbohydrates. And are often consumed in tropical regions for their ability to keep one full and to provide instant energy. It is a gluten-free, plant-based vegan ingredient.
In India, sago pearls are commonly used in everyday cooking to prepare sabudana vada (cutlet) , kheer, dessert, or upma (khichdi) .
Mainly it is used to prepare various festive snacks and desserts during the Hindu festival.
Nowadays, packaged, dry sago pearls are easily available in supermarkets and grocery stores under the lentil & legume section, along with other whole grains like broken wheat, millet, or quinoa.
Story of Carrot Sabudana Kheer
A sabudana kheer is a traditional Indian dessert. It is often made on the festive occasions of Hindu festivals and puja rituals. Many like to eat sabudana kheer while observing Navratri or Janmashtami fast, it is considered a sattvic Indian dessert .
The classic version of the sabudana kheer requires only 3 ingredients – sago pearls (sabudana), milk, and sugar . My mom makes the creamiest sago pudding with these basic ingredients.
However, I do not like the taste of plain sabudana kheer. It is way too vanilla for my liking. Hence, with the addition of carrots, saffron, cardamom powder, and jaggery, I take the humble kheer up a notch.
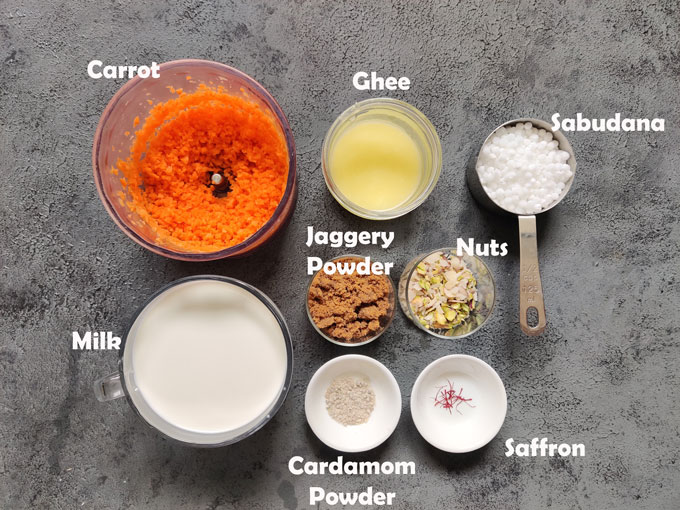
Ingredients Required
For my carrot sabudana kheer you need these ingredients:
- Sabudana: You need medium size tapioca pearls (sago). Follow my tips below on how to soak sabudana.
- Carrot: Shred the carrots using a food processor. I prefer the texture of shredded carrots in a kheer than the grated ones.
- Ghee: To fry the carrot so that all the water from the vegetable is dried up.
- Milk: Use full-fat or cream milk to make a rich and creamy kheer.
- Green Cardamom , Saffron – for the taste and aroma.
- Sugar – I prefer using jaggery powder. It gives a delicious nutty taste to the sabudana kheer. You can use granulated white sugar or brown sugar.
- Dry Fruits: Slived almond, unsalted pistachio, dried rose petals. You can roughly chop the nuts or process them in a food processor to make a coarse powder.
My Tried & True Tips
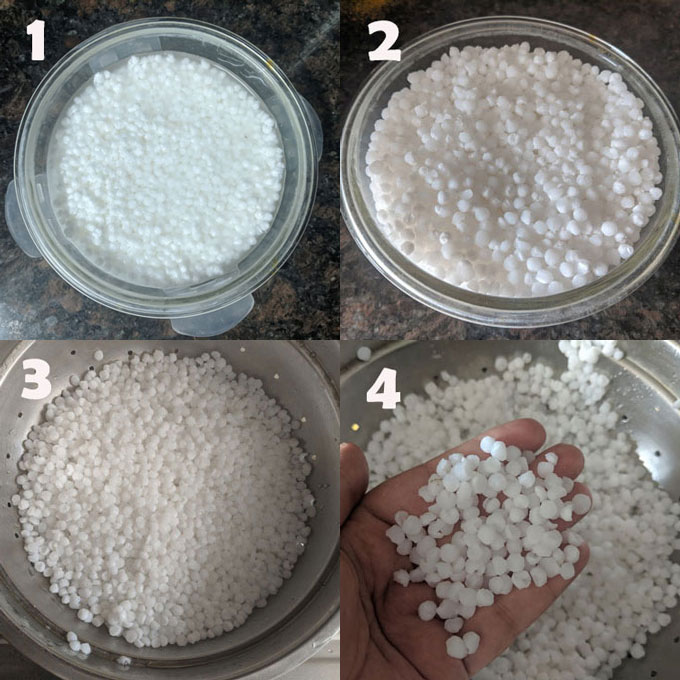
Tip 1: The perfect ratio of sabudana to water should be 1:1
Use a large bowl to soak sabudana as the pearls swell up after soaking. Soak one cup of sabudana in only one cup of water – enough to drench the sago pearls in the water. Cover the bowl with a net or lid. Let it soak in water for 4 – 5 hours. I usually prefer soaking sabudana in water overnight.
For kheer, I double soak sabudana. After soaking in water, I soak it in milk for 1 hour.
Tip 2: Cook Kheer in 2 Steps
Sabudana Kheer is cooked in 2 phases. One, after adding milk to soften the carrots. Second, after adding sabudana to thicken the kheer.
Tip 3: Grated vs Shredded Carrot
The texture of the kheer made with shredded carrot is more creamy and luscious than the grated ones.
Tip 4: Ghee Roasting Carrot
Do not add carrots directly to the milk. First, saute them in ghee for 3 – 5 minutes. This step ensures that the carrot juices do not leech into the milk resulting in curdled or watery kheer.
Tip 5: Full Fat Milk
The best way to make thick and luscious sabudana kheer is to use full-cream milk. The milk’s fat gives a thick texture and creamy mouthfeel to the kheer. Avoid using toned or skimmed milk for making Indian desserts.
Tip 6: Sugar
Add jaggery powder or sugar only once the kheer is almost ready. Never ever add sugar before milk is thickened and the key ingredient is fully cooked.
Watch Sabudana Kheer Video
Storing Suggestion
You can serve carrot sabudana kheer warm or chilled.
For storing, let the kheer cool down completely. Transfer the leftover kheer to an airtight container. Store it in the refrigerator for 2 – 3 days. It remains fresh.
The sabudana kheer thickens a bit more after cooling down. Hence, add ⅛ cup water or milk while reheating in a saucepan to get the desired consistency. Else, you can enjoy it chilled like a thick, creamy milk pudding.
It cannot be frozen, as the milk will curdle when thawed or reheated.
More Indian Kheer Recipe
- Rice Kheer
- Paneer Kheer
- Lauki Ki Kheer
- Badam Kheer
- Seviyan Kheer
- Dry Fruits Makhana Kheer
more Indian kheer recipes for all festive celebrations.
Ingredients
- ▢ ½ Cup sabudana (sago pearls)
- ▢ 2 tablespoon ghee
- ▢ 1 liter full fat milk
- ▢ ½ Cup carrot (shredded or grated)
- ▢ 1 teaspoon green cardamom powder
- ▢ ¼ teaspoon saffron (kesar)
- ▢ ½ Cup jaggery powder or sugar
- ▢ 1 tablespoon almonds (sliced)
Instructions
- Soak sabudana in ½ cup of water for 4 hours. After 4 hours, soak it once again in ½ cup milk for 1 hour.
- Heat ghee in a kadhai. Once hot, add carrot. fry for 5 minutes to soften the carrot. Add milk, cardamom powder, saffron, and cook till one boil comes. Continuously, stir in betwee.
- Add soaked sabudana along with milk it is soaked in. Stir the kheer. Cook over low heat till the milk is reduced to half, sabudana is fully cooked, and the texture of the kheer is thick. Keep on stirring at regular intervals.
- Once the kheer is almost ready add jaggery powder and nuts. Stir to combine. Simmer over low heat for 5 minutes to dissolve the sweetener.
- Garnish sabudana kheer with sliced almonds and pistachio.
- Serve sabudana kheer warm or chilled.
Recipe Notes:
- Soaking sabudana in milk makes it soft, reduces the cooking time, and also removes the bland taste. However, it is an optional step. You can make kheer directly using the water-soaked sabudana.
- Use a food processor for shredding the carrot for kheer. Shredded carrots give a delicious texture to the kheer.
- After cooling down kheer thickens a bit more. So do not thicken the kheer too much while cooking.
Nutrition
We follow a strict NO SPAM Policy
