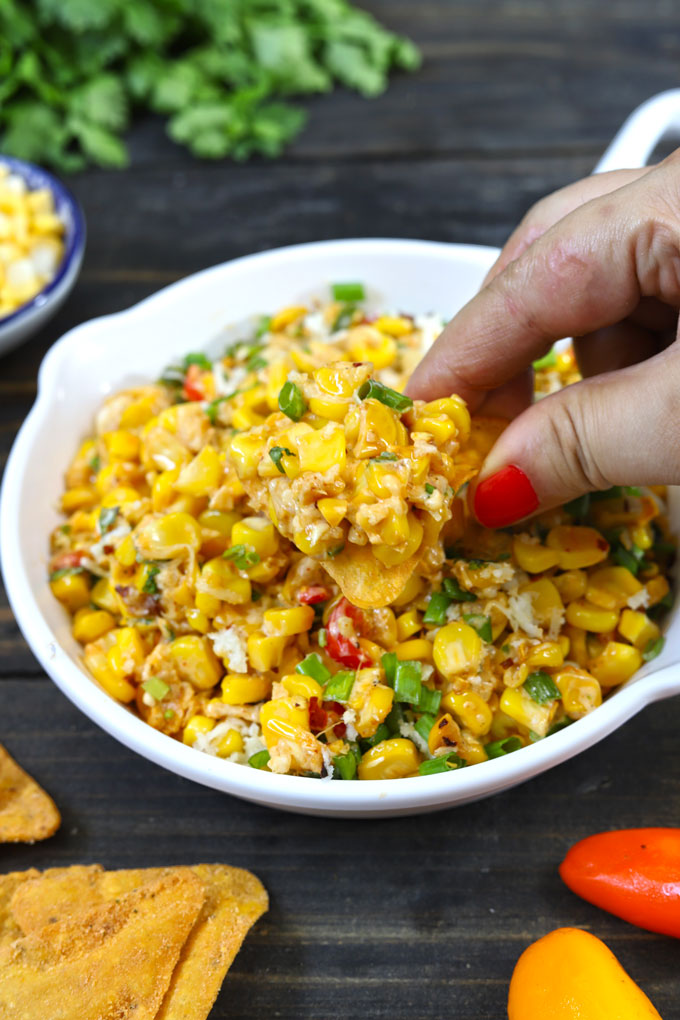
Spicy Chilli Corn Dip is a creamy, cheesy bowl of goodness. A popular side dish for the BBQ, potluck, or picnic.
Estimated reading time: 3 minutes
- Ingredients You’ll Need
- How To Make
- Watch Corn Dip Video
- Storage Suggestion
- Chilli Corn Dip Recipe
What not to love about this creamy corn dip? It is sweet, spicy, sour, creamy, cheesy, and everything you are looking for in a perfect dip. Added bonus – it is gluten-free too!
For the backyard BBQ, potluck get-together , summer picnic, or a large gathering , you can make this dip in advance and serve it warm or cold with a big bag of chips. Or you can enjoy it as a creamy corn salad on a hot summer afternoon.
More Reasons To LOVE Corn Dip
- easy to prepare
- meal-prep friendly
- customizable recipe
- minimal cooking required
- vegetarian and gluten-free
Looking for more easy, creamy dips – try Whipped Paneer Dip , Creamy Avocado Sauce , or the Hummus . You’ll love them!
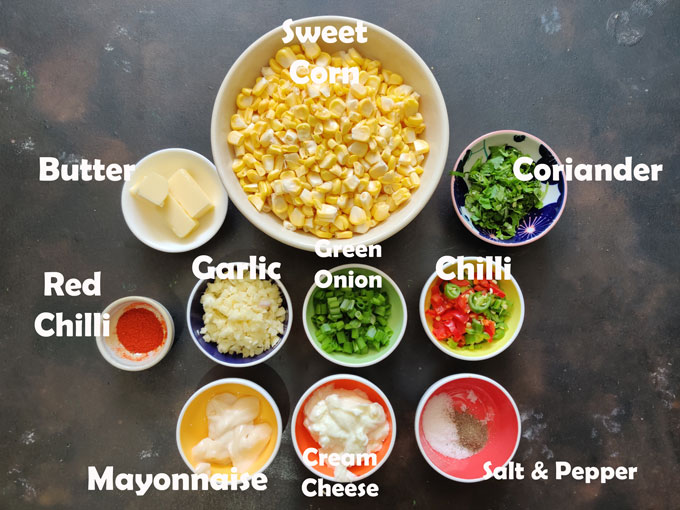
Ingredients You’ll Need
- Sweet Corn Kernels are the hero of this dip recipe. You can use fresh or frozen corn kernels . I always prefer fresh ones over frozen ones for a more natural sweet taste.
- Creaminess: The trilogy of cream cheese, mayonnaise, and grated cheese give the perfect creaminess to the dip. You can use sour cream also instead of cream cheese.
- Spiciness: The chili peppers and the red chili flakes perfectly balance out the sweetness of the corn. Jalapeno, Serano Chilies, and Indian Green Chili are also a perfect fit for this dip recipe.
- Herbs: Fresh Coriander, Cilantro, Green Onion, Parsley. Basil, Chives .
- Seasoning: Butter, Garlic, Chilli Powder, Lime Juice, Salt, Pepper
How To Make
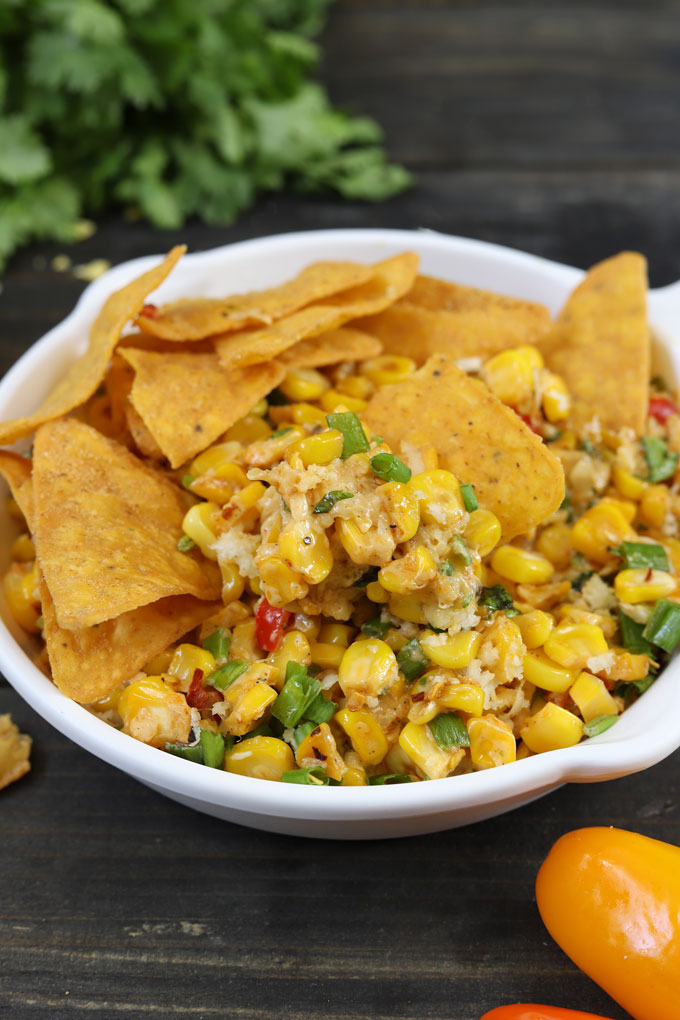
It’s as easy as 1-2-3 to make chili corn dip.
Saute garlic and corn in butter to soften the corn.
Transfer to a bowl and add the remaining ingredients.
Mix, and enjoy!
Watch Corn Dip Video
Storage Suggestion
Refrigerated corn dip will stay fresh for up to 4 days stored in an airtight container. Before serving give it a quick stir and adjust the seasonings.
Leftover corn dip is great to tuck inside sandwiches or tacos.
More Corn Recipes for you to try
- Crispy Corn
- Corn Salsa
- Corn Chaat
- Corn Paneer Cutlet
- Creamy Corn Soup
- Corn Avocado Salad
- Cheese Corn Muffin
- Spinach Corn Sandwich

Ingredients
- ▢ 2 Cup corn kernels (fresh or frozen)
- ▢ 1 ½ tablespoon unsalted butter
- ▢ 2 tablespoon garlic, finely chopped
- ▢ 1 tablespoon green and red chilli
- ▢ Salt & Pepper
- ▢ 1 teaspoon red chili powder or paprika
- ▢ ¼ Cup cream cheese, softened
- ▢ 2 tablespoon plain mayonnaise
- ▢ ¼ Cup green onion, finely chopped
- ▢ 2 tablespoon fresh coriander, chopped
- ▢ ¼ Cup pizza cheese, grated
Instructions
- Cut the corn kernels off the cob. Collect the corn kernels in a bowl. If you are using frozen corn, skip this step and thaw the corn kernels.
- Heat butter in a frying pan. Add garlic and chopped chilli. Saute for less than a minute to infuse the flavor of the garlic and chili into butter. No need to brown the garlic.
- Add corn kernels, spices, salt, and stir fry for 5 – 6 minutes or till corn kernels are tender. Turn off the heat.
- Transfer hot sauteed corn to a bowl. Add remaining ingredients and mix. The heat of corn will melt the cheese.
- Corn Dip is ready to serve. Enjoy it with nachos or munchies of your choice.
Recipe Notes:
- You can use fresh or frozen corn kernels .
- Feel free to use sour cream instead of cream cheese.
- Make sure the corn kernels are piping hot while mixing the cheese. Else, the dip will not have a creamy mouth feel.
- Jalapeno, Serano Chilies, Indian Green Chili are also a perfect fit for this dip recipe.
Nutrition
We follow a strict NO SPAM Policy

Chilli Corn Dip Recipe
Equipment
- Frying Pan
- Mixing Bowl
Ingredients
- 2 Cup corn kernels (fresh or frozen)
- 1 ½ tablespoon unsalted butter
- 2 tablespoon garlic, finely chopped
- 1 tablespoon green and red chilli
- Salt & Pepper
- 1 teaspoon red chili powder or paprika
- ¼ Cup cream cheese, softened
- 2 tablespoon plain mayonnaise
- ¼ Cup green onion, finely chopped
- 2 tablespoon fresh coriander, chopped
- ¼ Cup pizza cheese, grated
Instructions
- Cut the corn kernels off the cob. Collect the corn kernels in a bowl. If you are using frozen corn, skip this step and thaw the corn kernels.
- Heat butter in a frying pan. Add garlic and chopped chilli. Saute for less than a minute to infuse the flavor of the garlic and chili into butter. No need to brown the garlic.
- Add corn kernels, spices, salt, and stir fry for 5 - 6 minutes or till corn kernels are tender. Turn off the heat.
- Transfer hot sauteed corn to a bowl. Add remaining ingredients and mix. The heat of corn will melt the cheese.
- Corn Dip is ready to serve. Enjoy it with nachos or munchies of your choice.
Video
Notes
- You can use fresh or frozen corn kernels .
- Feel free to use sour cream instead of cream cheese.
- Make sure the corn kernels are piping hot while mixing the cheese. Else, the dip will not have a creamy mouth feel.
- Jalapeno, Serano Chilies, Indian Green Chili are also a perfect fit for this dip recipe.
Nutrition
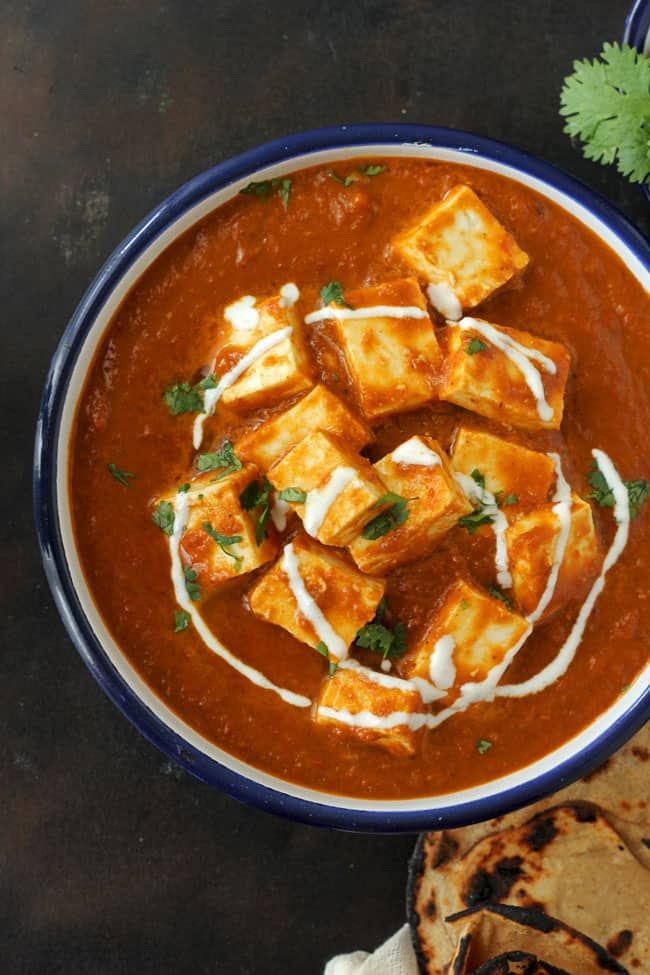
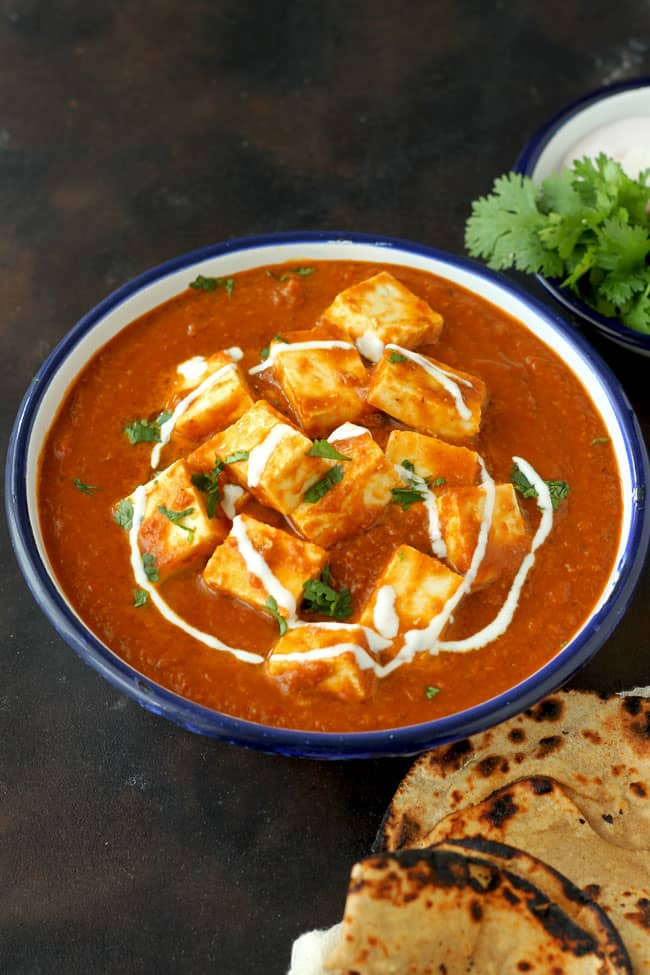
If you are looking for a restaurant-style paneer makhani recipe, your search ends here. Bookmark this multi purpose makhani gravy recipe.
Estimated reading time: 4 minutes
- My Tried and True Tips
- Watch Paneer Makhani Video
- Serving Suggestion
- Frequently Asked Questions
- Paneer Makhani Recipe
According to Google, there are millions of results when you search for a ‘paneer makhani recipe’.
So what makes this one special? – The homemade makhani gravy masala is the answer. The magical makhani masala of mine can be prepared in advance and is freezer friendly. This is the curry paste behind all my drool-worthy restaurant-style Indian makhani dishes.
Now no need to rush to the nearby Indian restaurant for your favourite murgh makhani or paneer butter masala. Prepare a batch of makhani masala over the weekend and store it in the fridge.
This paneer makhani is one of those Indian food recipes I have made so many times on different occasions, and each time it has gotten me tons of compliments.
My Tried and True Tips
- Soak paneer in lukewarm water for 8 – 10 minutes. This process makes the paneer super soft and mouth-melting.
- Use the bright red ripe tomatoes for the gravy. These tomatoes will give colour to the gravy.
- After grinding, filter the makhani gravy using a sieve before adding paneer. This step makes the gravy restaurant style smooth and luscious.
- Do not add too much water while grinding the masala, as the paneer butter masala has a thick and luscious gravy.
- Add ¼ cup of regular or cashew milk to get the desired c onsistency if the makhani gravy is too thick.
- Instead of sugar, you can also use ¼ cup tomato paste or ketchup . Nowadays, no onion, garlic tomato sauce, or ketchup is readily available in supermarkets.
- I highly recommend using Kashmiri red chillies , which are mild in taste and give a bright colour to the gravy.
Watch Paneer Makhani Video
Serving Suggestion
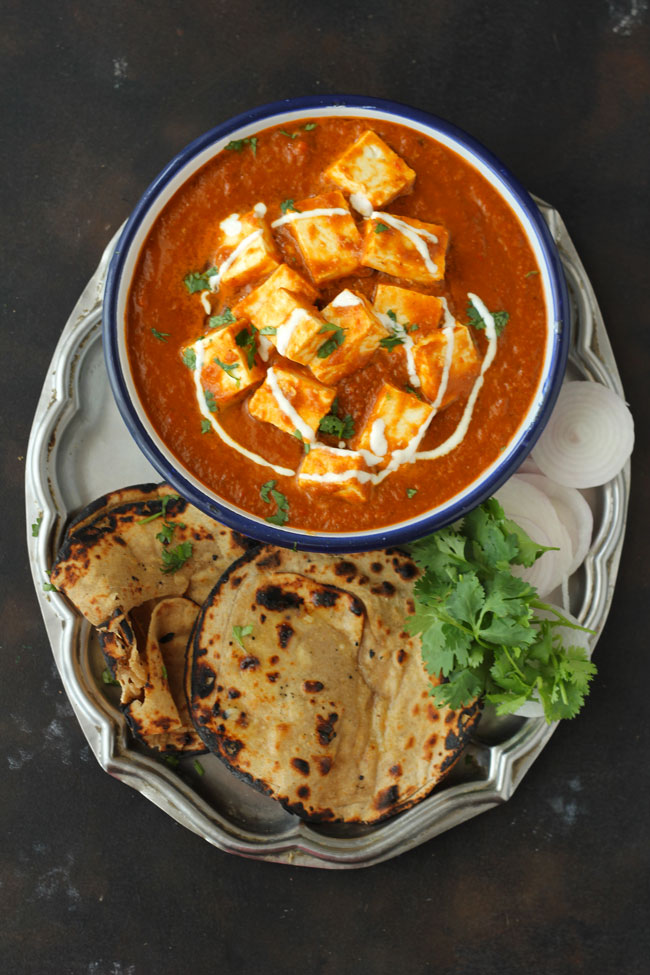
Paneer Makhani and Naan is a favourite food combination of many food lovers worldwide, including mine. It is the ultimate comfort food.
This Indian main course gravy dish tastes perfect with whole wheat naan , paratha, roomali roti, lachha paratha, or jeera rice .
Store the leftover paneer makhani in the refrigerator. While reheating, add ¼ cup of milk to get that creamy consistency. Use the same sauce to make makhani pasta , soya chaap butter masala , or the chicken tikka masala.
The only difference between the two paneer dishes is the grilling paneer before adding it to the gravy. The cubes are marinated and grilled in paneer tikka masala to get a smokey flavour in the gravy. The paneer butter masala cubes are neither grilled nor fried separately. The taste, texture, and colour of both Indian paneer recipes are more or less similar.
Yes, tasty paneer makhani can be prepared without using onion or garlic. My Jain Paneer Makhani Recipe is a huge hit among friends and family who cook without onion/garlic.
More Paneer Recipes
- Chilli Paneer
- Paneer Curry
- Paneer Tikka
- Paneer Jalfrezi
- Paneer Kofta Curry
- Dhaba Style Matar Paneer
- Achari Paneer Tawa Pulao
Get all of my 15+ Best Paneer Recipes here

Ingredients
- ▢ 500 gram paneer (cottage cheese)
- ▢ 1 Cup makhani masala
- ▢ 2 tablespoon ghee or butter
- ▢ 1 teaspoon garam masala
- ▢ Salt to taste
- ▢ 1 bay-leaf
- ▢ 4 tablespoon fresh cream
- ▢ ¼ Cup full-fat milk (optional)
- ▢ 1 teaspoon kasuri methi (dried fenugreek leaves)
Instructions
- Cut the paneer into equal size cubes and set aside.
- Next, prepare the makhani masala as suggested in the recipe here .
- Heat butter or ghee in a pan over medium flame.
- Add bay leaf along with the makhani masala . Stir to combine and cook the masala over low heat for 4 – 5 minutes.
- Now add the cream, salt to taste, garam masala , paneer cubes and milk. Mix nicely and allow the makhani gravy to simmer for 10 – 15 minutes over low heat. Keep stirring at regular intervals.
- Once the makhani gravy gets the desired consistency, turn off the heat. Add crushed kasuri methi and stir to combine.
- Garnish paneer makhani with cream and fresh coriander leaves just before serving.
- Serve Paneer Makhani with naan , jeera rice or lachha paratha.
Recipe Notes:
- Makhani Masala can be prepared few days before as well and can be stored in the fridge. Or you can make it from scratch just before making the dish.
- If you prefer makhani gravy real thick then skip adding milk. I add milk to tone down the thickness of the gravy.
- Many recipes suggest marinating and frying paneer before adding in the masala. But I feel frying makes paneer chewy. So I never follow this step in any of my paneer curry recipes.
- Instead of fresh cream, you can use either cashew nuts paste/poppy seeds paste to make a rich and creamy makhani gravy.
Nutrition
We follow a strict NO SPAM Policy
