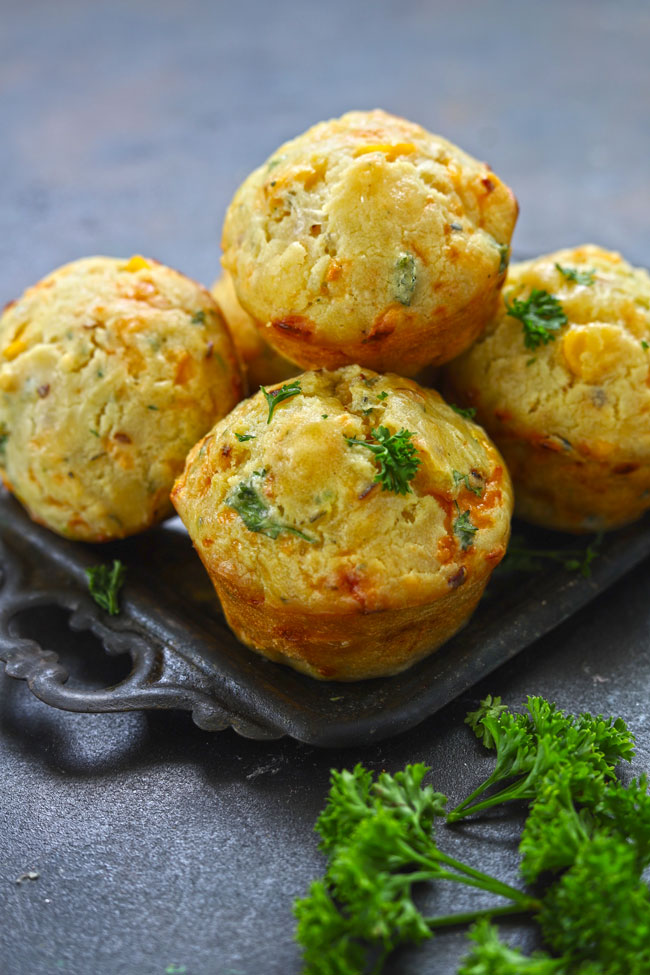
The sweetness of corn, and the creaminess of cheese make these cheese muffin an absolute crowd-pleaser.
Estimated reading time: 2 minutes

- How To Customize Cheese Muffins
- Watch Cheese Muffin Video
- My Tried and True Tips
- Corn Cheese Muffin Recipe
It is highly recommended to make cheese muffins in large batches because they disappear fast.
Cheese Muffin is a perfect teatime snack loaded with cheese, sweet corn, and fresh herbs. These cheesy muffins can also be served along with your favourite wine or soup around dinnertime.
How To Customize Cheese Muffins
- Greens – From fresh spinach, kale, basil to coriander you can add any greens of your choice in these muffins.
- Vegetables – Grated zucchini, carrot, broccoli or chopped mushrooms any easy to cook vegetables are perfect for these savoury muffins. Sun-dried tomatoes are a great addition as well in these muffins.
- Meat: These cheese muffins can be turned into meat lovers paradise by adding bacon, chopped ham, prawns, or cooked chicken. So take your pick!
- Cheese: Any variety of hard cheese such as cheddar, gouda, or processed pizza cheese is suitable for these muffins.
- Seasoning: Add a dash of chopped garlic for the extra kick in the flavour. Or add a mix of dry herbs such as oregano, sage, and black pepper.
Watch Cheese Muffin Video
My Tried and True Tips
- Measure all the ingredients . Baking is not at all about intuitions. Use standard measuring cups and spoons.
- Make sure all the ingredients are at room temperature before preparing the batter. Else, cold ingredients straight from the fridge might affect the texture of the muffins.
- Cheese also has some amount of salty flavour so add the salt in the batter accordingly.
- Store cheese muffins in an airtight container for 2 – 3 days in the fridge. Reheat muffins in the microwave for 1 – 2 minutes before serving.
More Muffin Recipes For You
- Easy Banana Muffins
- Apple Muffin with Oats
- Wheat Mocha Muffins
- Whole Wheat Mocha Muffin
- Double Chocolate Chip Muffins

Ingredients
1 Cup = 250 ml iquid, 200 g flour
Dry Ingredients:
- ▢ 1 Cup all purpose flour (maida)
- ▢ 1 ½ teaspoon Baking Powder
- ▢ ¼ Cup corn kernels
- ▢ 1 teaspoon red chili flakes
- ▢ 1 teaspoon dry or fresh oregano
- ▢ Salt to taste
- ▢ ¼ Cup grated cheese (any hard cheese)
- ▢ ½ Cup chopped parsley or basil or coriander
Wet Ingredients:
- ▢ ¼ Cup extra virgin olive oil
- ▢ 2 eggs, at room temperature
- ▢ ¼ Cup milk, at room temperature
Instructions
- Preheat oven at 180 degree celsius. Line muffin tray with paper liners or grease lightly with olive oil.
- In a bowl whisk milk and olive oil until combined well using hand blender.
- Add eggs and whisk again for 2 – 3 minutes. Keep aside.
- In a separate bowl sift flour, baking powder, salt together.
- Combine flour and egg mixture to form a smooth batter for the bread.
- Next add corn kernels, grated cheese, red chilli flakes and chopped herb mix in the flour muffin batter. Stir to combine.Do not over mix the batter and make sure no lumps of flour remain in the batter.
- Fill the muffin cups ¾ with the muffin batter. Bake in the preheated oven for 20 – 25 minutes. Insert toothpick to check for doneness.
- Once baked, transfer cheese muffins to a wire rack to cool down.
- Serve Corn Cheese Muffin warm or store in an airtight container in the fridge.
Recipe Notes:
- Make sure all the ingredients are at room temperature before preparing the batter.
- Cheese also has some amount of salty flavor so add the salt in the batter accordingly.
- Store cheese muffins in an airtight container for 2 – 3 days in the fridge. Reheat muffins in the microwave for 1 – 2 minutes before serving.
Nutrition
We follow a strict NO SPAM Policy

Corn Cheese Muffin Recipe
Equipment
- Mixing Bowl
- Muffin Tray
- Oven
Ingredients
1 Cup = 250 ml iquid, 200 g flour
Dry Ingredients:
- 1 Cup all purpose flour (maida)
- 1 ½ teaspoon Baking Powder
- ¼ Cup corn kernels
- 1 teaspoon red chili flakes
- 1 teaspoon dry or fresh oregano
- Salt to taste
- ¼ Cup grated cheese (any hard cheese)
- ½ Cup chopped parsley or basil or coriander
Wet Ingredients:
- ¼ Cup extra virgin olive oil
- 2 eggs, at room temperature
- ¼ Cup milk, at room temperature
Instructions
- Preheat oven at 180 degree celsius. Line muffin tray with paper liners or grease lightly with olive oil.
- In a bowl whisk milk and olive oil until combined well using hand blender.
- Add eggs and whisk again for 2 – 3 minutes. Keep aside.
- In a separate bowl sift flour, baking powder, salt together.
- Combine flour and egg mixture to form a smooth batter for the bread.
- Next add corn kernels, grated cheese, red chilli flakes and chopped herb mix in the flour muffin batter. Stir to combine.Do not over mix the batter and make sure no lumps of flour remain in the batter.
- Fill the muffin cups ¾ with the muffin batter. Bake in the preheated oven for 20 – 25 minutes. Insert toothpick to check for doneness.
- Once baked, transfer cheese muffins to a wire rack to cool down.
- Serve Corn Cheese Muffin warm or store in an airtight container in the fridge.
Video
Notes
- Make sure all the ingredients are at room temperature before preparing the batter.
- Cheese also has some amount of salty flavor so add the salt in the batter accordingly.
- Store cheese muffins in an airtight container for 2 – 3 days in the fridge. Reheat muffins in the microwave for 1 – 2 minutes before serving.
Nutrition
Mooli Ki Kadhi is a variety of kadhi from the hills of Uttarakhand, also known as jholi or jhoi in the region. It is light on the stomach and big on flavours.
Estimated reading time: 5 minutes

- About Pahadi Jholi
- Ingredients You’ll Need
- How To Make Pahadi Jholi
- Serving Suggestion
- Mooli Ki Kadhi Recipe
About Pahadi Jholi
In our Kumaoni dialect, we use the term jholi for kadhi. The consistency of Kumaoni jholi is on the thinner side, like a shorba or jhol. Perfect for mopping steamed rice using your fingers.
The flavours of mooli ki kadhi are intriguing. There is a slight pungent tone of radish, a hint of bitterness from fenugreek seeds, curd sourness, and green chillies’ spiciness.
Unlike Punjabi Kadhi Pakora or Rajasthani Kadhi , Pahadi Jholi is made without gram flour, onion, ginger, garlic, or tomato. Instead, rice paste is used to thicken the kadhi.
In most traditional Kumaoni dishes, processed ingredients like gram flour (besan) or ginger garlic paste are not used. Everything is prepared from scratch, like in this kadhi recipe; instead of rice flour, we use soaked rice combined with green chilli and coriander stalks to make the paste.
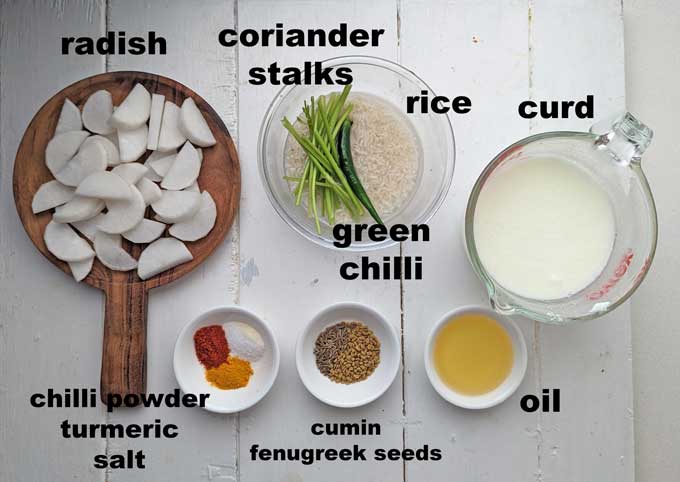
Ingredients You’ll Need
- Radish: If you can get your hands on Pahadi radish, nothing like it. If not, then use the regular white radish for making the kadhi. Ensure the radish is fresh, blemish-free, and has a crunch.
- Rice: You need short to medium-grain white rice to make the paste. This paste in the local dialect is called bis waar .
- Curd: For mooli ki kadhi, use sour curd. It should be more like buttermilk or chaas with a thin consistency. Do not use thick, set curd.
- Oil: Use either ghee or flavourless refined oil to make mooli ki kadhi.
- Spices: Cumin Seeds (Jeera), Fenugreek Seeds (Methi Dana), Turmeric Powder, Chilli Powder
- Other Ingredients: Green Chilli, Coriander Stalks, Coriander Leaves, Salt, Water
How To Make Pahadi Jholi
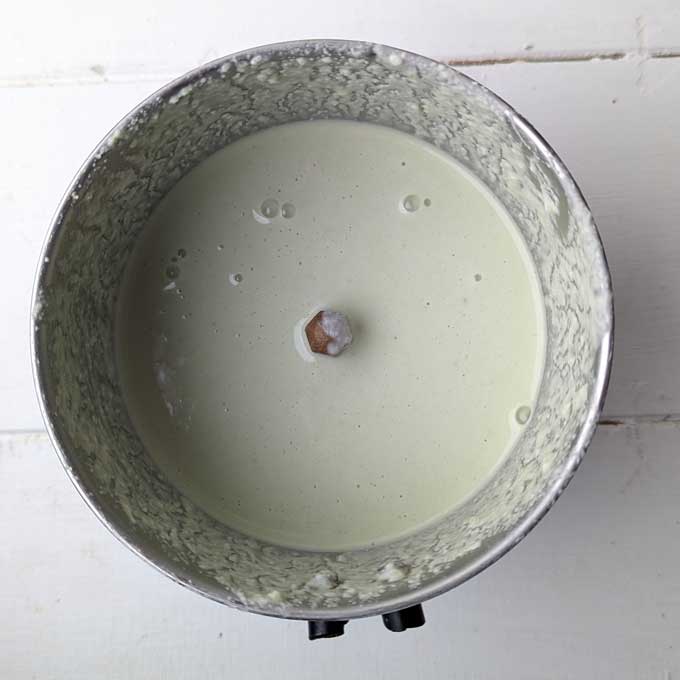
Step 1) Start by soaking rice in water for 15 – 20 minutes.
Step 2) After 15 minutes, make a smooth paste of soaked rice, green chilli, and coriander stalks in a blender. Keep it aside.
Step 3) Whisk curd nicely using a wire whisk or churner to a smooth, lump-free consistency.
Step 4) Remove the skin of the radish. Rinse it with water. Cut radish into square pieces or thin slices.
Step 5) Heat oil in a heavy bottom kadhai. Once the oil is hot, add cumin, fenugreek seeds, and dried red chillies (optional). Fry for 10 – 20 seconds.
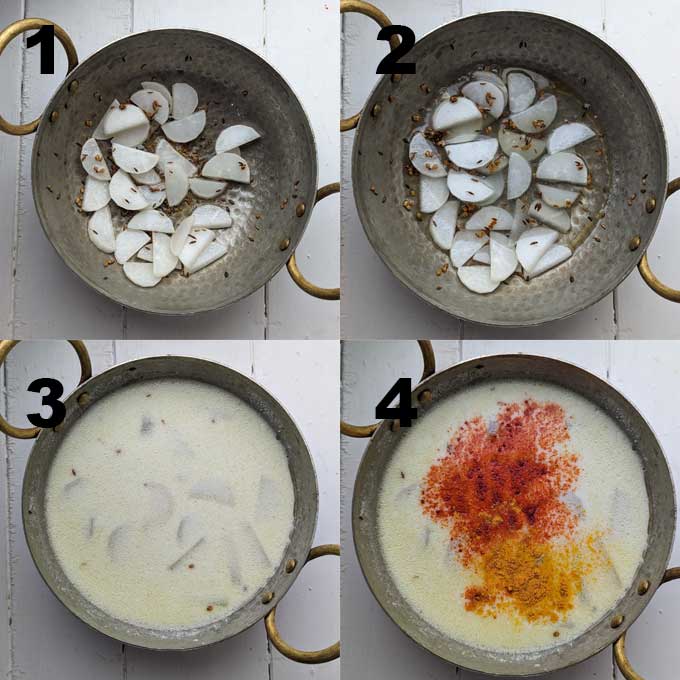
Step 6) Add radish. Fry over low heat for 20 – 30 seconds. Once the radish becomes translucent, add ¼ Cup of water, and cover the kadhai with a lid. Cook over low heat till the radish is 80% cooked.
Step 7) Add rice paste and whisked curd, salt, turmeric, and chilli powder. Mix nicely. Stir continuously to avoid lump formation.
Step 9) Simmer mooli ki kadhi over low heat for 15 – 20 minutes or until the radish and the rice paste are cooked. Keep stirring at regular intervals to avoid forming lumps.
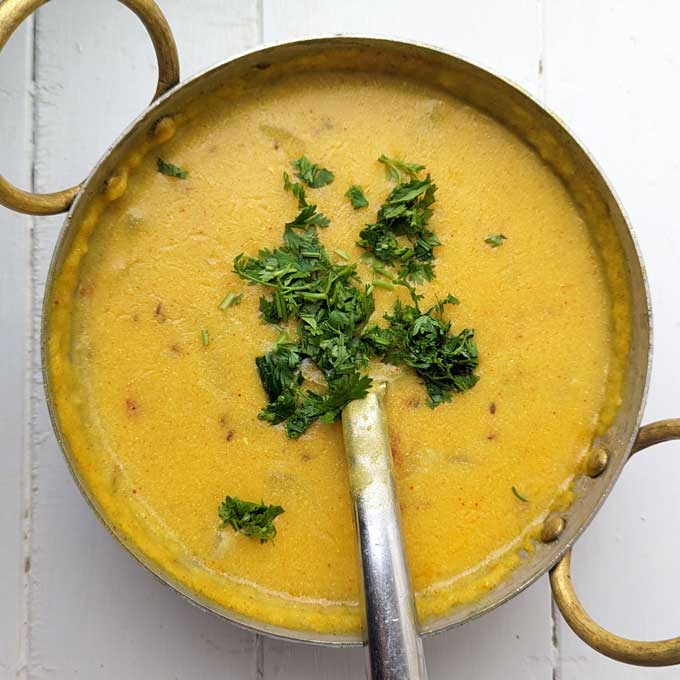
Garnish mooli ki kadhi with chopped coriander leaves.
Serving Suggestion
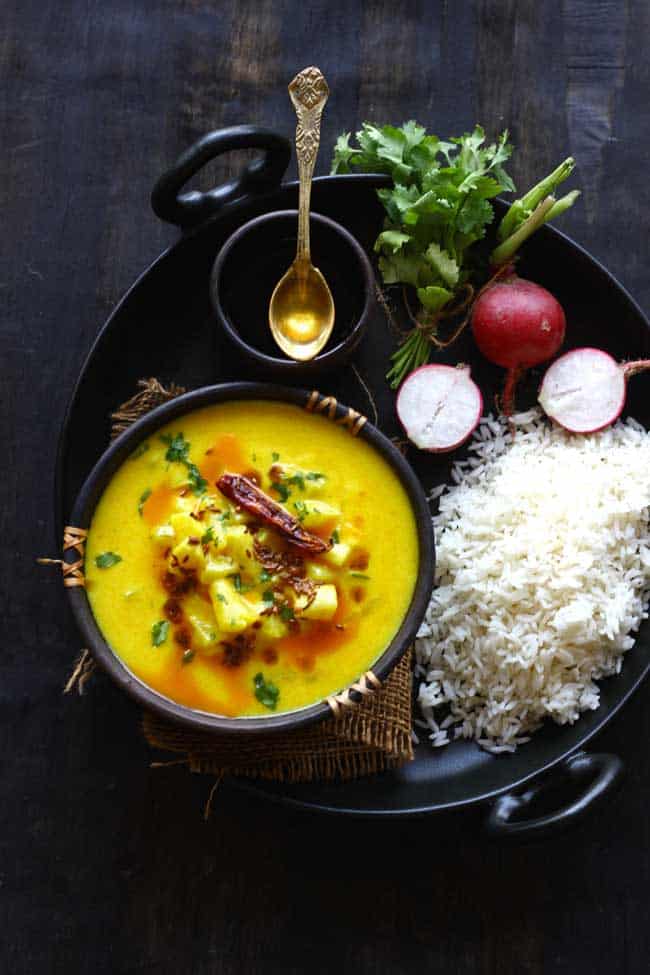
Traditionally, mooli ki kadhi is served with short-grain white rice. No phulka or chapati. The slightly starchy, sticky short-grain rice absorbs the flavour of the kadhi nicely. In Kumaoni language we call this combination, jholi – bhaat .
During winter, green vegetable stir fries like Pahadi lai ki sabzi or Pahadi Palak Ki Sabji are served with jholi bhaat to make everyday meals more nourishing and nutritious.
More Kumaoni Recipes
- Aloo Paani
- Gahat Ki Dal
- Aloo Ke Gutke
- Urad Dal Khichdi
- Pahadi Lai Ki Sabzi
- Pahadi Badi Ki Sabji
- Pahadi Chainsa Bhaat
- Kumaoni Cucumber Raita

Ingredients
- ▢ 200 gram white radish peeled and diced
- ▢ 4 tablespoon refined oil
- ▢ 1 teaspoon cumin seeds (jeera)
- ▢ ½ teaspoon fenugreek seeds methi dana
- ▢ a pinch of asafoetida
- ▢ 2 dried red chillies (optional)
- ▢ 1 Cup curd
- ▢ 1 ¼ teaspoon salt or to taste
- ▢ 1 teaspoon turmeric powder
- ▢ 1 teaspoon red chili powder
- ▢ 4 Cup water
Ingredients for Rice Paste (Biswaar)
- ▢ 2 tablespoon short to medium grain white rice besan
- ▢ 2 green chilli chopped
- ▢ ¼ Cup fresh coriander stalks
Instructions
- Start by soaking rice in water for 15 – 20 minutes. After 15 minutes, make a smooth paste of soaked rice, green chilli, and coriander stalks in a blender. Keep it aside. Biswaar is ready for kadhi.
- Whisk curd nicely using a wire whisk or churner to a smooth, lump-free consistency. If the curd is thick add 1 Cup of water and whisk it to a buttermilk or chaas like thin consistency.
- Remove the skin of the radish. Rinse it with water. Cut radish into square pieces or thin slices.
- Heat oil in a heavy bottom kadhai. Once the oil is hot, add cumin, fenugreek seeds, asafoeida, and dried red chillies (optional). Fry for 10 – 20 seconds.
- Add radish. Fry over low heat for 20 – 30 seconds. Once the radish becomes translucent, add ¼ Cup of water, and cover the kadhai with a lid. Cook over low heat till the radish is 80% cooked.
- Add rice paste and whisked curd, water, salt, turmeric, and chilli powder. Mix nicely. Stir continuously to avoid lump formation.
- Simmer mooli ki kadhi over low heat for 20 minutes or until the radish and the rice paste are cooked. Keep stirring at regular intervals to avoid forming lumps.
- Garnish Mooli Ki Kadhi with chopped coriander leaves. Taste and if required, add more seasoning.
- Serve Mooli Ki Kadhi warm with white rice.
Recipe Notes:
- Mooli Ki Kadhi has a thin, drinking consistency, unlike the creamy Punjabi Kadhi.
- After adding the rice paste, immediately add curd and water else; there will be a lump formation.
- Make sure the radish is cooked before adding rice paste and curd.
Nutrition
We follow a strict NO SPAM Policy
