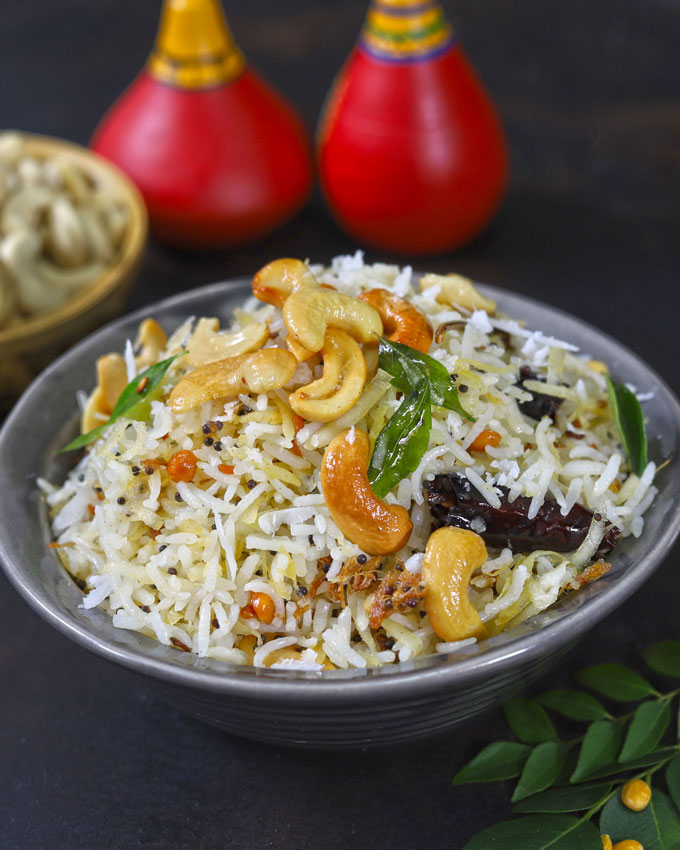
Coconut Rice is an easy, tasty and vegan Indian fried rice perfect for accompanying spicy curries or the main course dishes.
Estimated reading time: 3 minutes
- About Coconut Rice
- Ingredient You’ll Need
- Watch Coconut Rice Video
- Serving Suggestion
- Coconut Rice Recipe (Thengai Sadam)
About Coconut Rice
If you travel across the coastal and southern regions of India, one rice dish that you will easily find everywhere is coconut rice. It is also known as Thengai Sadam. The word ‘Thenga’ means coconut and ‘sadam’ is for rice.
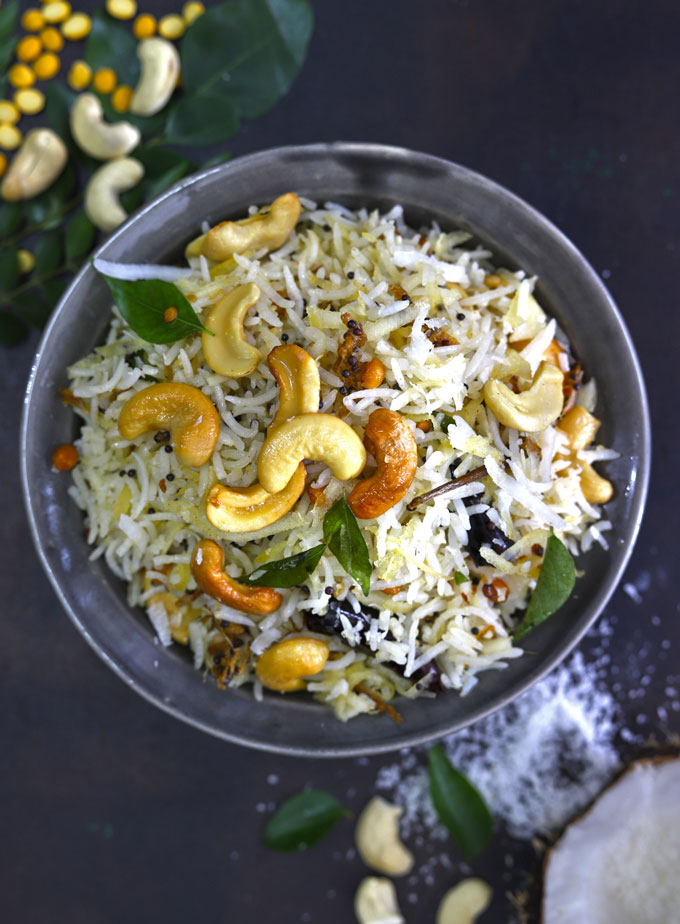
Coconut Rice is nothing but a bowl of vegetarian fried rice made with cooked rice, coconut, cashews, and other staple South Indian ingredients. Like any other fried rice recipe, it is too an ultimate comfort food that you can enjoy during any hour of the day.
The addition of curry leaves, red chilies, chana dal, and urad dal not only gives a crunch to the rice but also a subtle flavour.
Why You’ll Love This Recipe
- easy one-pot dish
- meal prep friendly
- gluten-free and vegan
- perfect for toddlers and kids
- compliments spicy curries, and meat dishes
Ingredient You’ll Need
- Rice: Leftover cooked rice is my first choice for making thengai sadam. Use short to medium-grain rice.
- Coconut: Fresh coconut is the key to making a bowl of delicious coconut rice. You can use frozen grated coconut as well. Avoid using packaged desiccated coconut.
- Tadka (tempering): Black Mustard Seeds (rai), White Urad Dal, Chana Dal, Curry Leaves, Dried Red Chilies, Grated Ginger
- Nuts: Add either cashew nuts or peanuts.
- Salt, Coconut Oil, or any other cooking oil
Watch Coconut Rice Video
Serving Suggestion
What to serve with coconut rice? It is one side dish that tastes excellent with a variety of South Indian Curries like prawn ghee roast, chicken Chettinad , mutton stew, or any other fish curry.
For a pure vegan meal, you can serve it with dal, veg stew, or any vegetarian curry.
I like to enjoy it on its own on busy weekdays for a quick lunch. You can pack it for kids’ school lunch boxes . Easy to eat, digest, carry around and remains fresh for hours.
More Indian Rice Recipes
- Chana Pulao
- Pudina Pulao
- Vegetable Pulao
- Mushroom Pulao
- Paneer Tikka Pulao
- Curd Rice (Thayir Sadam)
- Lemon Rice (Elumichai Sadam)
Ingredients
- ▢ 4 tablespoon coconut oil
- ▢ 2 teaspoon black mustard seeds (rai)
- ▢ 1 teaspoon chana dal (Bengal Gram)
- ▢ 1 teaspoon white urad dal
- ▢ 2 dried red chilies
- ▢ 2 tablespoon curry leaves
- ▢ 1 tablespoon ginger, grated
- ▢ ¼ Cup cashews (kaju)
- ▢ ½ Cup coconut, grated
- ▢ 2 Cup cooked rice
- ▢ 1 ¼ teaspoon salt or to taste
Instructions
- Heat oil in a stir frying pan or wok.
- Once the oil is hot, add mustard seeds, chana dal, urad dal, red chilies, curry leaves, and ginger. Saute for less than 1 minute or till urad dal turn light golden.
- Add cashew, and saute till they become light golden followed by the grated coconut. Do not fry the coconut for too long as it might burn and taste bitter.
- Add cooked rice, salt, mix and stir fry the rice for 2 minutes more. Turn off the heat. Coconut Rice is ready to serve.
Recipe Notes:
- Use only fresh grated coconut for making this fried rice. Do not use dry desiccated coconut. Both have different tastes and textures.
- Do not fry the coconut for too long as it burns very fast and then tastes bitter.
- Pre-cooked rice is always the best choice for making any type of fried rice.
- I prefer making a large batch of coconut rice and storing it in the refrigerator. Transfer the leftover fried rice to an airtight container. Seal and store in the refrigerator for 1 week. Reheat in a microwave before eating or in a frying pan.
Nutrition
We follow a strict NO SPAM Policy

Coconut Rice Recipe (Thengai Sadam)
Equipment
- Kadai (Indian Wok)
Ingredients
- 4 tablespoon coconut oil
- 2 teaspoon black mustard seeds (rai)
- 1 teaspoon chana dal (Bengal Gram)
- 1 teaspoon white urad dal
- 2 dried red chilies
- 2 tablespoon curry leaves
- 1 tablespoon ginger, grated
- ¼ Cup cashews (kaju)
- ½ Cup coconut, grated
- 2 Cup cooked rice
- 1 ¼ teaspoon salt or to taste
Instructions
- Heat oil in a stir frying pan or wok.
- Once the oil is hot, add mustard seeds, chana dal, urad dal, red chilies, curry leaves, and ginger. Saute for less than 1 minute or till urad dal turn light golden.
- Add cashew, and saute till they become light golden followed by the grated coconut. Do not fry the coconut for too long as it might burn and taste bitter.
- Add cooked rice, salt, mix and stir fry the rice for 2 minutes more. Turn off the heat. Coconut Rice is ready to serve.
Video
Notes
- Use only fresh grated coconut for making this fried rice. Do not use dry desiccated coconut. Both have different tastes and textures.
- Do not fry the coconut for too long as it burns very fast and then tastes bitter.
- Pre-cooked rice is always the best choice for making any type of fried rice.
- I prefer making a large batch of coconut rice and storing it in the refrigerator. Transfer the leftover fried rice to an airtight container. Seal and store in the refrigerator for 1 week. Reheat in a microwave before eating or in a frying pan.
Nutrition
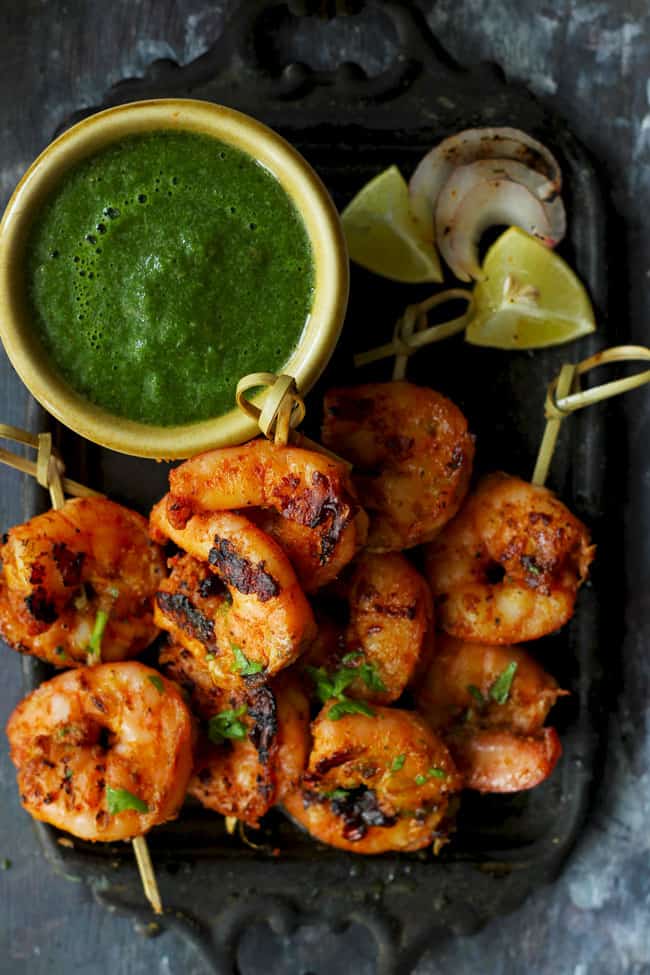
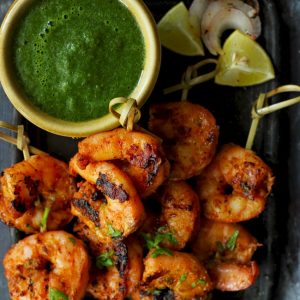
The big, juicy, grilled tandoori prawns are a real outburst of flavours – a perfect snack for the drink or barbecue parties.
Estimated reading time: 5 minutes
- Ingredients You’ll Need
- How To Make Tandoori Prawns
- Serving Suggestion
- Tandoori Prawns Recipe
Tandoori Prawns are the grilled skewers loaded with the bold Indian flavours. Marinate prawns a few hours before the party and forget about them. Last-minute set the grill and fire the prawns.
Once you set these prawns on fire, the air nearby is engulfed in the whiff of charcoal and the grilled deliciousness. Ohh man, these tandoori prawns will make you fall in love with the shellfish once again.
Why You’ll Love This Tandoori Prawn
- The best BBQ snack. Grilled prawns has the best smoky flavour, and when cooked on an outdoor grill, you get a nice charred flavour that complements the fish’s, natural sweetness.
- Quick and easy. Prawn is a quick and easy ingredient to work with, making it a perfect choice for busy schedules or last-minute get-togethers. Plus, it takes less than 10 minutes to grill them in a pan on stovetop.
- Versatility: Whether you’re hosting a BBQ party or looking for a quick weeknight dinner, these tandoori prawns fit the bill.
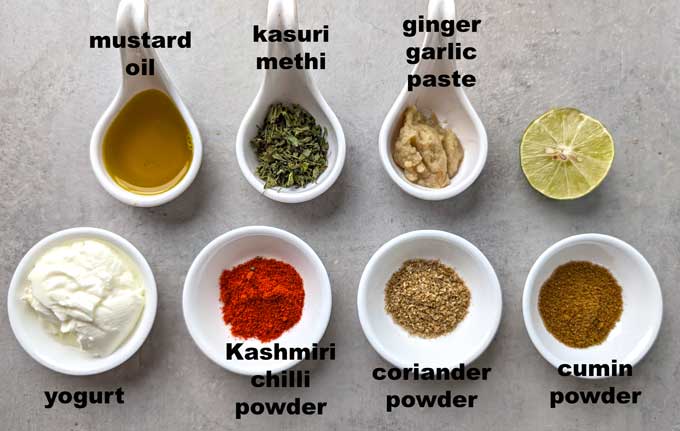
Ingredients You’ll Need
- Prawns: I used jumbo, large or king size peeled and deveined prawns for this recipe. Use a paper towel to remove any extra moisture before tossing in the seasoning mixture. This will help it adhere better to the prawn. If using frozen fish, defrost before marinating.
- Mustard Oil: The smokey, sharp and spicy flavour of the oil is the key flavouring agent in this prawn recipe. The oil is used as part of the marinade, and extra is used to grease the grill grates or grill pan.
- Yogurt: Thick, creamy, plain yogurt or curd bring the whole marinade together.
- Kashmiri Red Chilli Powder gives the bright red colour to the prawns. Many restaurants and takeaway joints add artificial colour to the marinade.
- Tandoori Seasoning: Cumin Powder, Coriander Powder, Garam Masala , Salt, and crushed Kasuri Methi.
- Ginger and Garlic Paste is the holy grail of Indian cooking and marinades.
How To Make Tandoori Prawns
Step 1: Prepare the prawns
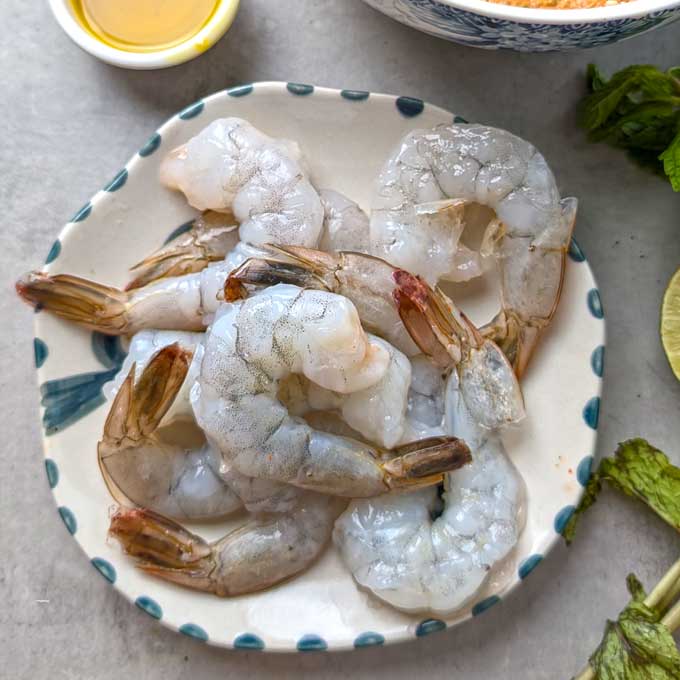
- Clean, devein and rinse the shrimps. Leave the tail intact.
- Use a paper towel to remove any extra moisture before tossing in the seasoning mixture.
Step 2: Make marinade
- Combine yogurt, red chilli powder, spices, ginger garlic paste, salt, and half of mustard oil in a bowl. Whisk nicely till combined well and looks smooth.

Step 3: Marinate prawns
- Add the cleaned prawns to the marinade.
- Mix gently to coat each piece with the marinade.
- Let the prawns sit in the marinade overnight or for at-least one hour.
Step 4: Skewer and Grill
- Soak the bamboo skewers in water for 10 – 15 minutes before threading the prawns.
- Thread the marinated prawns onto the bamboo skewers, set aside. The number of shrimp you add to the skewer will depend on the size of the shrimp you use.
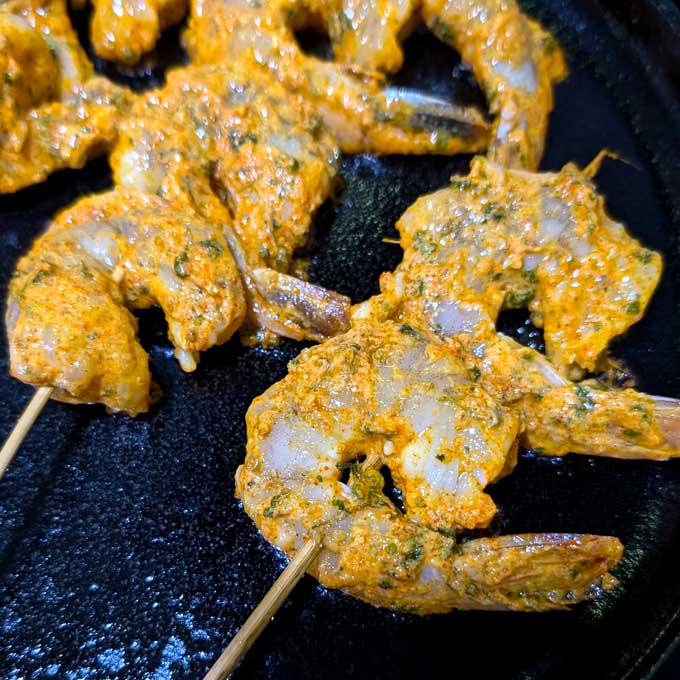
- Lightly grease your grill pan with mustard oil, or if using an outdoor grill, use a paper towel and tongs to oil the grates. Once pan is sizzling hot, place the tandoori prawns and cook for 5 – 6 minutes on one side.
- Gently brush them with mustard oil while grilling.
Drizzle lemon juice and tandoori prawns are ready to serve!
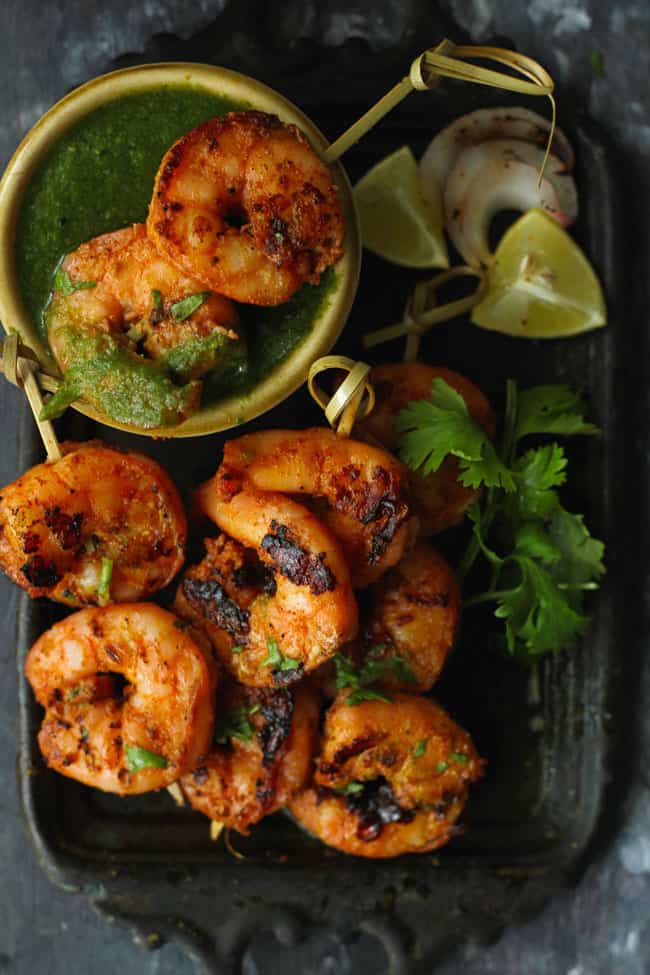
Serving Suggestion
Tandoori Prawns are perfect as an appetizer, a main dish paired with a side of grilled veggies, or even tucked into a tortilla or taco. The possibilities are endless!
These side-dishes tastes delicious with these tandoori prawns – Mint and Coriander Chutney , Corn Salsa , Tomato Salsa , Mango Chutney , and tons of fresh salad like Fattoush Salad . With these essentials on your table, nothing can hold you from hosting a super fun BBQ Party.

More Grilling Recipes
- Fish Tikka
- Paneer Tikka
- Thai Chicken Satay
- Indian Grilled Paneer
- Tandoori Gobi (Cauliflower)
Ingredients
- ▢ 500 gram jumbo prawns, cleaned and tails intact
- ▢ 1 lemon, juiced
Ingredients For Marinade:
- ▢ ¼ Cup plain yogurt or curd
- ▢ 1 teaspoon ginger garlic paste ( get recipe )
- ▢ 1 teaspoon Kashmiri red chili powder
- ▢ 1 teaspoon cumin powder (jeera powder)
- ▢ 1 teaspoon coriander powder
- ▢ ½ teaspoon Garam Masala ( get recipe )
- ▢ ½ teaspoon salt or to taste
- ▢ 1 tablespoon dried fenugreek leaves (kasuri methi)
- ▢ 2 tablespoon mustard oil (sarson oil)
Instructions
- Clean, devein and rinse the shrimps. Leave the tail intact. Use a paper towel to remove any extra moisture before tossing in the seasoning mixture.
- Combine yogurt, red chilli powder, spices, ginger garlic paste, salt, and half of mustard oil in a bowl. Whisk nicely till combined well and looks smooth.
- Add the cleaned prawns to the marinade. Mix gently to coat each piece with the marinade. Let the prawns sit in the marinade overnight or for at-least one hour.
- Soak the bamboo skewers in water for 10 – 15 minutes before threading the prawns. Thread the marinated prawns onto the bamboo skewers, set aside. The number of prawns you add to the skewer will depend on the size of the shrimp you use.
- Lightly grease your grill pan with mustard oil, or if using an outdoor grill, use a paper towel and tongs to oil the grates. Once pan is sizzling hot, place the tandoori prawns and cook for 5 – 6 minutes on one side.
- Gently brush them with mustard oil while grilling.
- Drizzle lemon juice and tandoori prawns are ready to serve!
Recipe Notes:
- Marination is one of the most important steps in the making of flavoursome tandoori prawns. I prefer marinating the prawns at least a night before the grilling day. Or you can say 5 – 6 hours is a good enough time for the prawns to absorb the flavour of the spices and seasoning.
- While grilling, brush the prawns with marinade or mustard oil to add extra flavour and a caramelized finish. Do this during the last minute or two of grilling, turning them once or twice to coat them evenly.
- If you’d like to store leftovers of your grilled prawns, store them in an airtight container in the fridge.
Nutrition
We follow a strict NO SPAM Policy
