

How to Make Perfect Veg Pizza at home?
- Kneading is the crucial step in the making of perfect pizza base. Knead the dough for 6 – 10 minutes before allowing it to rise.
- I prefer a dark, damp free space like inside the microwave or oven to rest the pizza dough. And these places have the right temperature to allow the perfect rising of the dough.
- You can always adjust the thickness of base as per your preference. It can be thick and pillowy or thin and crusty. Adjust the baking time accordingly.
- Tomato sauce is one of the important taste deciding factor in a homemade pizza. That is the reason I stick to homemade pizza/pasta sauc e .
- Be generous while adding the cheese to your pizza. And stick to a good quality mozzarella/pizza cheese. This makes a hell lot of difference in the taste.
- Always bake your pizza on the middle rack of the oven. If baked on the top rack there is a high probability the top might get overcooked while leaving the base under-cooked.
- And, last but not the least, you can bake this veg pizza in the convection mode of a microwave oven.


Ingredients
For the pizza base:
- ▢ 2 Cup all-purpose-flour maida
- ▢ 2 ½ teaspoon dry yeast
- ▢ 1 teaspoon sugar
- ▢ 1 teaspoon salt
- ▢ 1 tablespoon olive oil
- ▢ 1 Cup lukewarm water
Other Ingredients:
- ▢ 1 Cup Pizza/Pasta Sauce (see recipe in notes)
- ▢ 2 medium size onion sliced
- ▢ 3 – 4 baby corn cut into inch pieces
- ▢ ¼ Cup sweet corn kernels
- ▢ 1 tablespoon red chili sliced
- ▢ 1 large-size capsicum chopped
- ▢ ¼ Cup black olives sliced
- ▢ 5 – 6 fresh basil leaves optional
- ▢ 1 teaspoon mixed herbs seasoning
- ▢ 1 Cup grated pizza cheese
Instructions
To make the pizza base
- Combine flour and salt. Set aside. In the lukewarm water add yeast and sugar. Mix nicely. Let it sit for 5-10 mins until frothy. This means that the yeast is active. Make well in the centre of the flour mixture. Pour activated yeast. Cover it with flour and let it sit for another 5 minutes. Add the olive oil. Knead the dough by rolling it backwards and forward, using your left hand to stretch the dough toward you and your right hand to push the dough away from you at the same time. Repeat this for 10 minutes, until you have a smooth, springy, soft dough. Place the dough in a lightly greased bowl. Cover with a kitchen towel or plastic wrap and let double in size for about 45 minutes. This could take 30 minutes to 1 hour depending on the weather. I usually place it inside the oven or microwave for proofing. Divide the dough into two equal halves and again allow to double in size for 30 minutes.
To assemble the pizza:
- Preheat oven to 200 degree Celsius. Grease a large baking tray with olive oil. Place the ball of dough and with fingers stretch it out by pressing, into 7-8″ diameter circle. Smear the generous amount of pizza sauce over the base of your pizzas and spread it out to the edges. Top with grated cheese. Arrange the toppings of your choice over the layer of cheese. Drizzle with a tiny bit of extra virgin olive oil and add a pinch of salt and pepper. Bake for 20 – 30 minutes. Check the pizza base for doneness. Scatter fresh basil leaves over the pizza. Sprinkle seasoning. Cut into wedges and drizzle a splash of olive oil. Serve Classic Veg Cheese Pizza warm.
Nutrition
We follow a strict NO SPAM Policy

Classic Veg Cheese Pizza
Ingredients
For the pizza base:
- 2 Cup all-purpose-flour maida
- 2 ½ teaspoon dry yeast
- 1 teaspoon sugar
- 1 teaspoon salt
- 1 tablespoon olive oil
- 1 Cup lukewarm water
Other Ingredients:
- 1 Cup Pizza/Pasta Sauce (see recipe in notes)
- 2 medium size onion sliced
- 3 – 4 baby corn cut into inch pieces
- ¼ Cup sweet corn kernels
- 1 tablespoon red chili sliced
- 1 large-size capsicum chopped
- ¼ Cup black olives sliced
- 5 – 6 fresh basil leaves optional
- 1 teaspoon mixed herbs seasoning
- 1 Cup grated pizza cheese
Instructions
To make the pizza base
- Combine flour and salt. Set aside. In the lukewarm water add yeast and sugar. Mix nicely. Let it sit for 5-10 mins until frothy. This means that the yeast is active. Make well in the centre of the flour mixture. Pour activated yeast. Cover it with flour and let it sit for another 5 minutes. Add the olive oil. Knead the dough by rolling it backwards and forward, using your left hand to stretch the dough toward you and your right hand to push the dough away from you at the same time. Repeat this for 10 minutes, until you have a smooth, springy, soft dough. Place the dough in a lightly greased bowl. Cover with a kitchen towel or plastic wrap and let double in size for about 45 minutes. This could take 30 minutes to 1 hour depending on the weather. I usually place it inside the oven or microwave for proofing. Divide the dough into two equal halves and again allow to double in size for 30 minutes.
To assemble the pizza:
- Preheat oven to 200 degree Celsius. Grease a large baking tray with olive oil. Place the ball of dough and with fingers stretch it out by pressing, into 7-8″ diameter circle. Smear the generous amount of pizza sauce over the base of your pizzas and spread it out to the edges. Top with grated cheese. Arrange the toppings of your choice over the layer of cheese. Drizzle with a tiny bit of extra virgin olive oil and add a pinch of salt and pepper. Bake for 20 – 30 minutes. Check the pizza base for doneness. Scatter fresh basil leaves over the pizza. Sprinkle seasoning. Cut into wedges and drizzle a splash of olive oil. Serve Classic Veg Cheese Pizza warm.
Nutrition
Ingredients
- ▢ 1 Litre Milk Try use full cream
- ▢ 3 tablespoon lemon Juice/Vinegar
- ▢ 2 Cup Sugar
- ▢ 3 Cup Water
- ▢ 1 teaspoon Cardamom powder
- ▢ Few Saffron Strands for Garnish optional
Instructions
- Pour the milk into a deep heavy bottomed pot. Bring it to boil and when the milk comes to a roaring boil, add the lemon juice (or vinegar) a little at a time (about a tablespoon), and lower the heat. Keep stirring the milk as you add the lemon juice.
- After sometime the milk will start separating and a greenish but clear whey along with the curdled milk will start forming. Now immediately stop adding the lemon juice/or vinegar and stop stirring. If too much of the curdling agent, the chenna will be tough and also sour.
- Turn off the heat, remove the pot from the stove and allow the curdled milk to sit for about 8-12 minutes. Do not stir. At this stage some people add ice cubes also to prevent milk from further curdling and it prevents chenna from becoming sour and tough.
- Place a clean kitchen cloth or a muslin cloth over a colander or strainer. Pour curdled milk over the strainer. Give the chenna/cheese a quick wash with a spray of cold water. This removes the smell of the curdling agent and also prevents the cheese from getting stiff. Allow the whey to drain completely, about 30 minutes.
- Tie all the ends of the cloth, squeeze out the excess liquid from chenna and hang it on tab of kitchen sink. Leave it this way for about 2 – 3 hours. When you squeeze there should be no more moisture dripping out and yet the chenna should should be really soft and moist.
- Now start kneading the chenna with your fingers at initial stage it will be sticky but gradually it will form into a smooth dough, it takes around 20 – 30 minutes to get the perfect consistency dough.
- Divide the dough into 10 rough portions. Roll them in into small sized balls gently in your palms.
- Take the sugar,cardamom powder and water in a pressure cooker and boil it until the sugar has completely dissolved and the solution is in roaring boil. Just before you add the chenna balls, reduce the heat to medium-high. If there are too many chenna balls you might have to cook them in batches because chenna balls increase in size once cooked. The level of the liquid should be just high enough that the balls completely submerge. Add chenna balls one by one in pressure cooker.
- Cover the pressure cooker and cook it till you get one whistle in low flame. After a whistle,simmer more and keep for another 5 minutes.
- Put off the flame and let the pressure gets released by itself,then open the lid to see the rasgullas – by now it would have doubled in size.
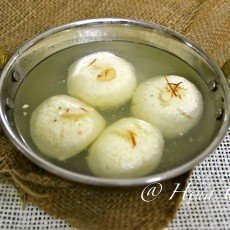
- Let the rasgullas cooled down in the same sugar syrup. Once rasgullas cooled down completely garnish with saffron and nuts and keep in the refrigerator.
- Serve Rasgulla chilled!!

We follow a strict NO SPAM Policy
