Once you try these homemade potato cheese balls you will never go back to readymade ones. Be sure to watch the video!
Estimated reading time: 4 minutes

- Ingredients You’ll Need
- Baking vs. Deep-Frying
- Watch Cheese Balls Video
- Serving Suggestion
- Potato Cheese Balls FAQs
- Potato Cheese Balls Recipe
We all love CHEESE BALLS. Whether they come from a ready to fry packet, frozen section of a deli shop, or a cafe, we all have our favourites.
Potato Cheese Balls are a crispy vegetarian snack with the melted cheese heaven inside.
What’s so special about potato cheese balls?
- freezer-friendly
- purely vegetarian
- preservatives free
- super crisp exterior
- melt-in-mouth cheese lava
- require a few basic ingredients
Isn’t that a winning cheese ball recipe already?
In case you are a chicken lover, try my most popular chicken cheese balls recipe .
Ingredients You’ll Need
You need a few pantry staples to make cheese balls at home:
For Cheese Balls:
- Boiled Potato – without skin and grated. Feel free to use leftover or readymade mashed potato for making cheese balls. You can use boiled sweet potato as well.
- Corn flour (corn starch) – to bind the cheese balls. Instead of cornflour you can use all-purpose flour (maida).
- Grated Cheese like cheddar or any hard/processed cheese
- Salt, Pepper, Garlic Powder, Italian Herbs
For Stuffing:
- Mozzarella or Pizza Cheese – cut into small squares/bites to stuff inside the cheese balls.
For Coating:
- Bread Crumbs – you can use Panko bread crumbs or a mixture. Or coarsely ground cornflakes and bread slices. Subsitute: Pulse ¼ cup plain unsweetened breakfast cornflakes and 1 bread slice (with brown edges) in a food processor to make a coarse mixture. Use this for coating cheese balls.
- Corn Starch Paste – combine 1 tablespoon of corn flour with ¼ cup of water to make a thick paste or slurry.

Baking vs. Deep-Frying
Nothing can beat the texture and crispness of deep-fried potato cheese balls. If you are looking for authentic cafe-style cheese balls then stick to the deep-frying technique.
Whereas, for healthy cheese balls bake them at 200-degree Celcius for 15 – 20 minutes . Brush them with oil or use the cooking spray before baking.
You can air-fry the cheese balls as well.
To make it in an air fryer, preheat the air fryer at 180 degrees for 10 minutes. Then, arrange the cheese balls in an air fryer basket and brush them with oil. Bake for 15 -18 minutes or until golden and crisp. Keep in mind to flip cheese balls once halfway through the cooking time.
Watch Cheese Balls Video
Serving Suggestion
Potato Cheese Balls are incomplete without an excellent dipping sauce. Serve them with your favorite dipping sauce for a cafe-style snacking experience at home.
My favourite dipping sauces to accompany a cheese ball are:
- Spicy Mango Dip
- Green Mint Chutney
- Good Old Tomato Ketchup
We need slightly hard-boiled potatoes for making cheese balls. I prefer boiling them in the microwave. Put potatoes inside a ziplock bag. Heat in microwave for 5 – 6 minutes. Peel and use. This way, potatoes are totally dry and not water clogged. Or boil them in a pressure cooker. Keep boiled potatoes in the fridge overnight or at least 2 – 3 hours before using.
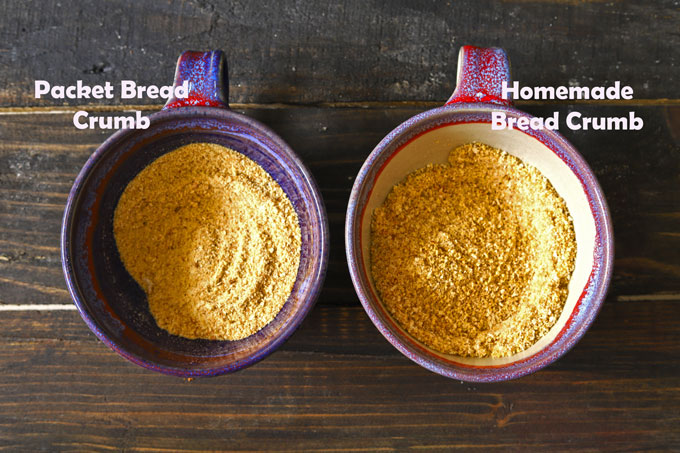
Combine ¼ Cup unsweetened breakfast cornflakes and 1 slice of bread in a mixer. Blend to make a coarse powder. Use it for coating any cutlet or other dishes. You can store it in the fridge for months.
If you need that melted cheesy goodness in the center of your cheese balls, always use mozzarella or good-quality pizza cheese. No other cheese will give you the same result.
You can freeze uncooked cheese balls for 1 – 2 months. Or you can store them in the refrigerator for 2 – 3 days.
The answer is NO. Cheese Balls are best served and enjoyed piping hot. The cheese stuffed inside is gooey, and the exterior is crisp. After a few hours, potato cheese balls turn a bit soggy and lose their crunch.
More Vegetarian Snack Recipes
- Falafel
- Oats Cutlet
- Zucchini Fritters
- Vegetable Cutlet
- Masoor Dal Cutlet
- Corn Paneer Cutlet
- Cheese Suji Cutlet

Ingredients
Ingredients For Cheese Balls:
- ▢ 4 boiled potato
- ▢ ¼ Cup grated cheese (any hard cheese)
- ▢ ¼ Cup cornflour (corn starch)
- ▢ 1 teaspoon red chilli flakes
- ▢ 1 teaspoon dried oregano
- ▢ 1 teaspoon garlic powder
- ▢ 1 teaspoon black pepper
- ▢ Salt to taste
Ingredient For Stuffing:
- ▢ 100 gram mozarella or pizza cheese (cut into small squares)
Ingredients For Coating:
- ▢ 1 Cup bread crumbs
- ▢ 1 tablespoon cornflour
- ▢ ¼ Cup water
Ingredient For Frying:
- ▢ 2 ½ Cup cooking oil
Instructions
Prepare Cheese Balls:
- Grate potato in a mixing bowl. Add grated cheese, cornflour, spices, salt, and pepper. Mix nicely and form a smooth, non-sticky dough. There shouldn’t be any lumps in the dough.
- To shape balls, grease your hands with a teaspoon of oil. Pinch a spoonful of dough. Shape it into a round ball. Gently flatten using fingers. Place a small piece of mozzarella cheese. Cover it neatly with the potato mixture. Once again, shape it into a round ball. Similarly, shape all the cheese balls. Keep in the fridge until ready to fry.
Coating Cheese Balls:
- Combine cornflour with water and make a smooth paste. Set aside.
- In another bowl, add bread crumbs. Place these two bowls next to each other.
- Dip each cheese ball in cornflour liquid and then coat with bread crumbs evenly. Arrange coated cheese balls on a plate. Keep in the fridge while heating the oil.
Frying:
- Heat oil in a frying pan over medium-high heat.
- Once the oil is preheated, carefully add cheese balls into the hot oil in small batches. Fry till golden, and crisp from all the sides.
- Transfer fried balls to a metal seive.
- Serve potato cheese balls immediately with ketchup or dip of your choice.
Recipe Notes:
- For perfect cheese balls, please follow the ingredient measurements.
- Always grate the potato and not mash them. If you are using leftover mashed potato then it’s fine.
- Do not boil the potatoes in too much water for making cheese balls. Try to use microwave boiled potatoes or slightly hard-boiled potatoes instead of water clogged ones.
- If the cheese ball dough/mixture seems too sticky add more cornflour or apply a teaspoon of oil. You can keep it in the fridge too for 15 – 20 minutes. It becomes easy to handle.
- You can store cheese ball dough in the refrigerator for 2 – 3 days. You can freeze cheese balls for 1 month.
- Be careful while frying the cheese balls. Sometimes, the cheese might burst. Always fry cheese balls on medium-high flame.
- These cheese balls are highly customizable in that sense. Feel free to season them with herbs and spices of your choice. From coriander, minced garlic, thyme, oregano to chilli flakes, pick any seasoning you like to flavor the potato cheese balls.
Nutrition
We follow a strict NO SPAM Policy

Potato Cheese Balls Recipe
Equipment
- Mixing Bowl
- Deep Frying Pan
Ingredients
Ingredients For Cheese Balls:
- 4 boiled potato
- ¼ Cup grated cheese (any hard cheese)
- ¼ Cup cornflour (corn starch)
- 1 teaspoon red chilli flakes
- 1 teaspoon dried oregano
- 1 teaspoon garlic powder
- 1 teaspoon black pepper
- Salt to taste
Ingredient For Stuffing:
- 100 gram mozarella or pizza cheese (cut into small squares)
Ingredients For Coating:
- 1 Cup bread crumbs
- 1 tablespoon cornflour
- ¼ Cup water
Ingredient For Frying:
- 2 ½ Cup cooking oil
Instructions
Prepare Cheese Balls:
- Grate potato in a mixing bowl. Add grated cheese, cornflour, spices, salt, and pepper. Mix nicely and form a smooth, non-sticky dough. There shouldn’t be any lumps in the dough.
- To shape balls, grease your hands with a teaspoon of oil. Pinch a spoonful of dough. Shape it into a round ball. Gently flatten using fingers. Place a small piece of mozzarella cheese. Cover it neatly with the potato mixture. Once again, shape it into a round ball. Similarly, shape all the cheese balls. Keep in the fridge until ready to fry.
Coating Cheese Balls:
- Combine cornflour with water and make a smooth paste. Set aside.
- In another bowl, add bread crumbs. Place these two bowls next to each other.
- Dip each cheese ball in cornflour liquid and then coat with bread crumbs evenly. Arrange coated cheese balls on a plate. Keep in the fridge while heating the oil.
Frying:
- Heat oil in a frying pan over medium-high heat.
- Once the oil is preheated, carefully add cheese balls into the hot oil in small batches. Fry till golden, and crisp from all the sides.
- Transfer fried balls to a metal seive.
- Serve potato cheese balls immediately with ketchup or dip of your choice.
Video
Notes
- For perfect cheese balls, please follow the ingredient measurements.
- Always grate the potato and not mash them. If you are using leftover mashed potato then it’s fine.
- Do not boil the potatoes in too much water for making cheese balls. Try to use microwave boiled potatoes or slightly hard-boiled potatoes instead of water clogged ones.
- If the cheese ball dough/mixture seems too sticky add more cornflour or apply a teaspoon of oil. You can keep it in the fridge too for 15 - 20 minutes. It becomes easy to handle.
- You can store cheese ball dough in the refrigerator for 2 - 3 days. You can freeze cheese balls for 1 month.
- Be careful while frying the cheese balls. Sometimes, the cheese might burst. Always fry cheese balls on medium-high flame.
- These cheese balls are highly customizable in that sense. Feel free to season them with herbs and spices of your choice. From coriander, minced garlic, thyme, oregano to chilli flakes, pick any seasoning you like to flavor the potato cheese balls.
Nutrition
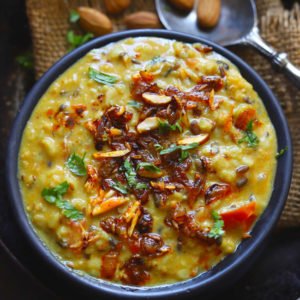
Shahi Dal, as the name advocates, is an aromatic, and rich Mughlai style urad dal recipe with a delicious creaminess.
Estimated reading time: 1 minute
- How to Make Shahi Dal
- Urad Dal Recipe FAQs
- Shahi Urad Dal Recipe
If you are fond of rich Mughlai dishes, then bookmark this urad dal recipe!
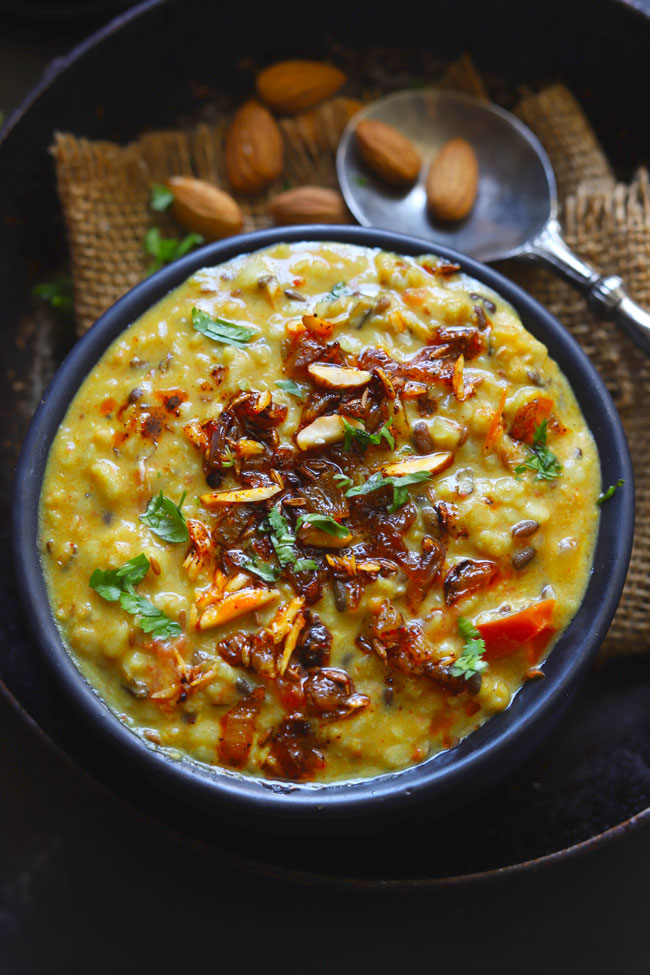
Shahi Urad Dal is a rich, creamy Indian dal made with split black lentils characterized by the use of dry fruits, caramelized onion, and ghee. It is a kind of dal recipe that is befitting for the royal dinner parties or the special occasion in the family.
How to Make Shahi Dal
Soaking Dal
- Rinse lentil 2 – 3 times or till water runs clear.
- Soak split urad overnight or atleast 5 hours in clean water.

- Scrub soaked lentil between fingers to remove the dark outer husk from the dal. The same dal can be used to make pahadi bada , chainsa , or khichdi .
Pressure Cook
- Add clean dal to pressure cooker along with tomato, ginger, garlic, green chilli, whole spices , turmeric, red chilli powder, asafoetida, salt and water. Mix well to combine.
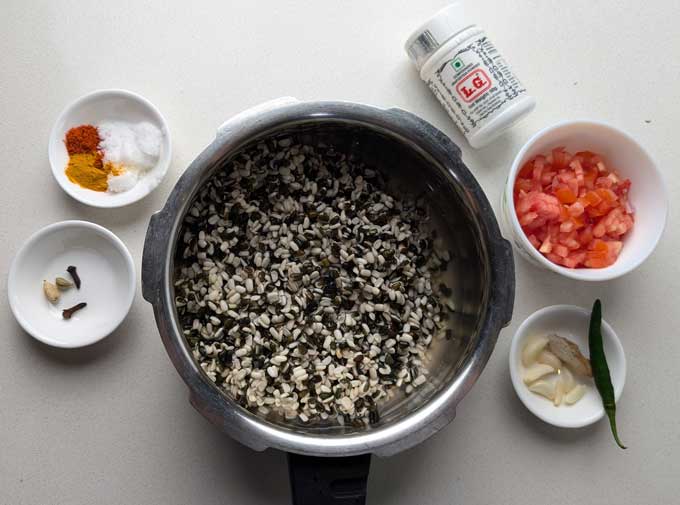
- Pressure cook for 3 whistles over low heat or till urad dal gets cooked.
- Allow the steam of pressure cooker to escape naturally before opening the lid.
- Use the back of a spoon to mash the dal for that thick, saucy consistency.
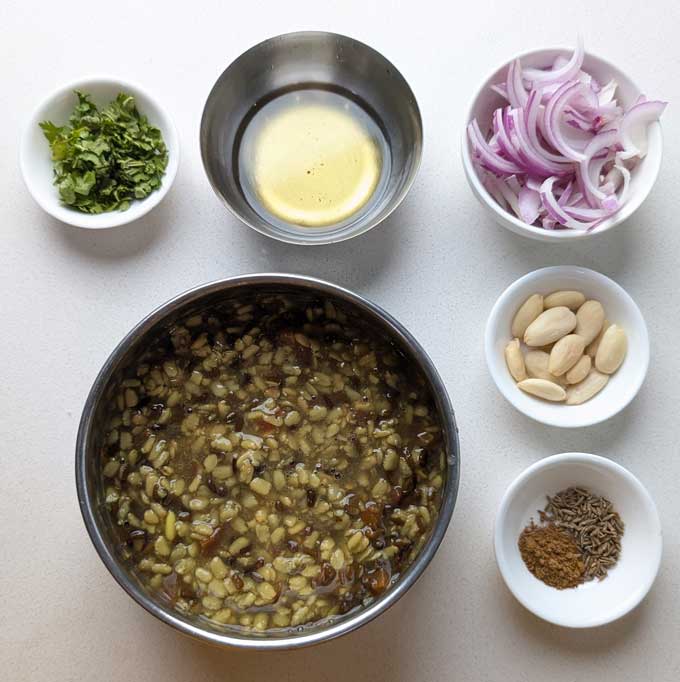
Preparing Tempering (Tadka):
- Heat ghee in a deep pan and add the sliced almonds. Fry them till light golden. Transfer to a plate and set aside.
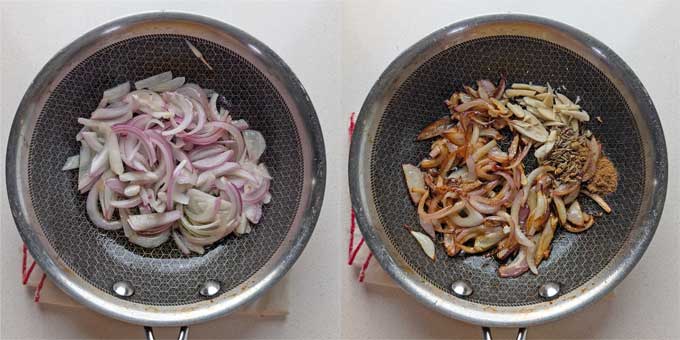
- Add the onions, and sauté on a medium flame till onion turns light brown. Towards the end add cumin seeds and garam masala powder.
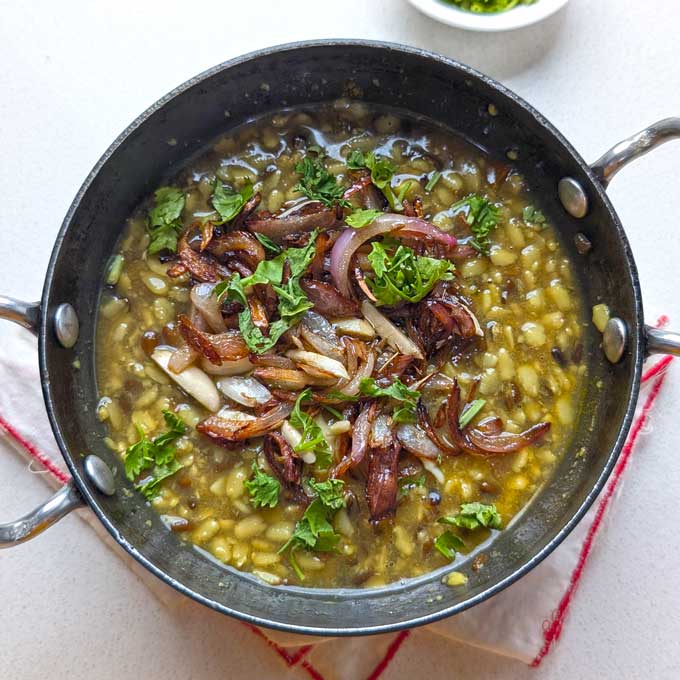
Garnish and Serve:
- Heat urad dal right before serving. Once hot, transfer it to a serving bowl.
- Pour the sizzling hot tadka of camaelized onion over the dal along with fried almonds and chopped coriander leaves.
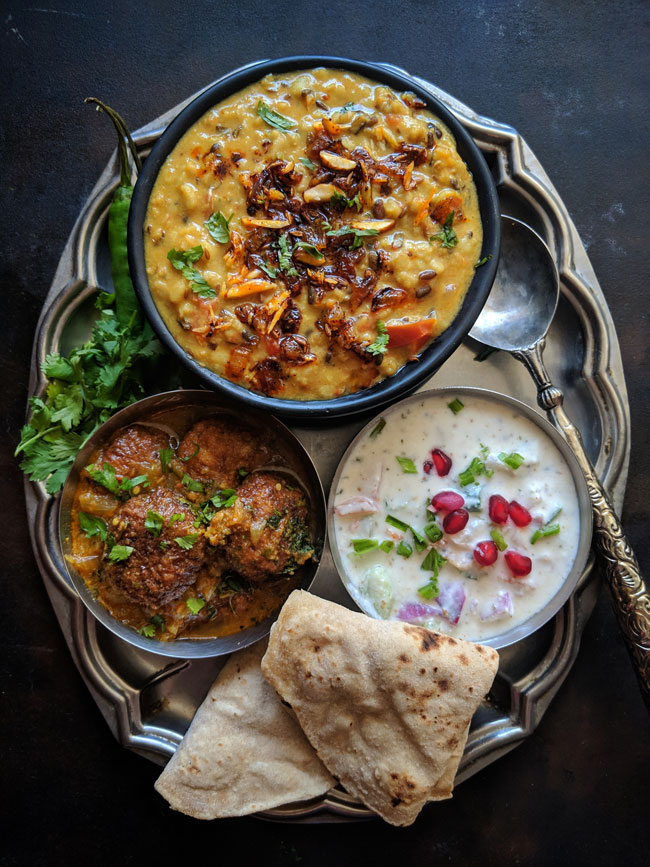
Serve Shahi Urad Dal with naan , lachha paratha, or jeera rice for an indulgent Indian style dinner with side dishes like kachumber salad or mint raita .
This Shahi Urad Dal Recipe can be easily transformed into a vegan deliciousness. All you need to substitute two ingredients in the recipe: Ghee: Use either coconut oil, vegan butter or vegetable cooking oil. Milk: Use almond milk or cashew milk
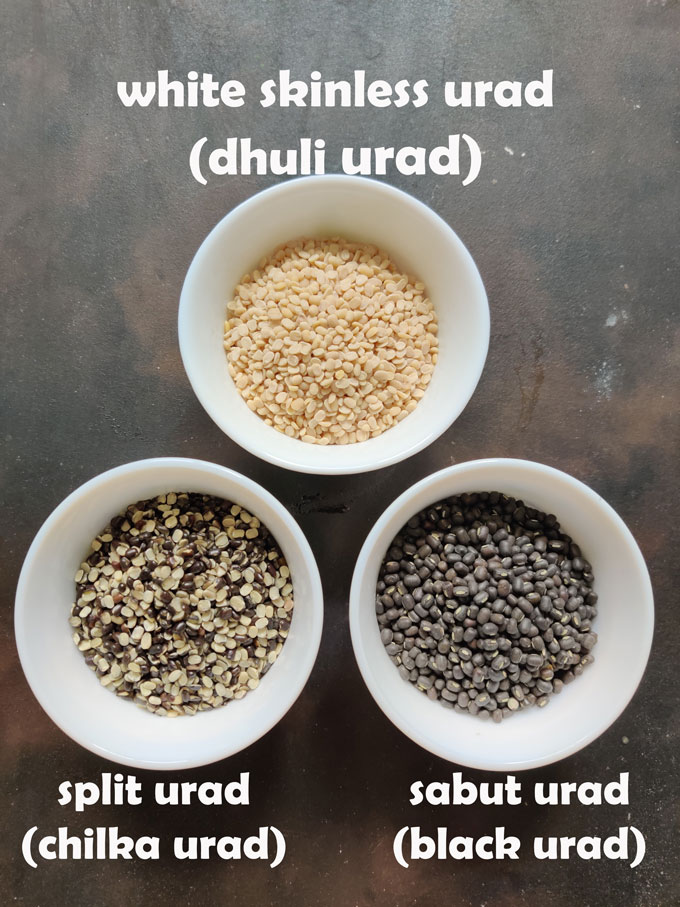
Whole urad dal or the sabut urad is also known as black urad dal. The husk is attached to the grain and this is the dal used for making famous Dal Makhani . The split urad or the chilka urad is black and white. It has a removable husk attached to the grain. After soaking the lentil this husk is easily removable. The white urad or the dhuli urad is pale white and has no husk attached to the grain.
Whole urad dal or the split urad dal needs to be soaked for at least 4 – 5 hours in water. Urad dal takes a longer time to get cooked even in a pressure cooker. Hence, soaking helps in reducing the cooking time. In the case of split urad dal, soaking softens the husk, and it can be easily removed by gently rubbing the grains in between fingers.
More Indian Dal Recipes
- Dal Makhani
- Panchmel Dal
- Arhar Dal Fry
- Palak Chana Dal
- Everyday Masoor Dal
- Punjabi Sookhi Urad Dal
- Moradabadi Moong Dal
Ingredients
Ingredients For Cooking Dal:
- ▢ 1 Cup chilka urad dal (split black lentils)
- ▢ 1 medium size tomato, finely chopped
- ▢ 1 inch ginger, chopped
- ▢ 2 cloves garlic, chopped
- ▢ 1 green chilli, fine chopped
- ▢ 2 cloves (laung)
- ▢ 2 green cardamom (hari elaichi)
- ▢ 1 teaspoon red chili powder
- ▢ 1 teaspoom turmeric powder
- ▢ 1 teaspoon salt or to taste
- ▢ ¼ teaspoon hing (asafoetida)
- ▢ 3 Cup water
Ingredients For Tempering (tadka):
- ▢ 2 tablespoon ghee (clarified butter)
- ▢ 1 teaspoon jeera (cumin seeds)
- ▢ 1 large size onion, thinly sliced
- ▢ 1 tablespoon sliced almonds (badam)
- ▢ ½ teaspoon Garam Masala ( see recipe here )
Instructions
How To Cook Urad Dal:
- To make Shahi Dal, first clean, wash and soak the urad dal in enough water for 5 hours or overnight.
- Next morning you will notice the black husk of dal starts leaving the white skin underneath. Rub the dal in small batches in between your palms to remove the black peel. Rinse again and you will end up with majorly white skinned dal with few black peel here and there.
- Combine the dal, cardamom pods, cloves, chopped tomato, ginger, garlic, green chilli, salt, red chilli powder, turmeric powder, asafoetida, and water in a pressure cooker. Mix well to combine.
- Pressure cook for 4 whistles over low heat or till urad dal gets cooked. Allow the steam of pressure cooker to escape naturally before opening the lid. Gently whisk the dal with the spoon to thicken it. It should have a thick, creamy consistency.
Tempering (Tadka)
- Heat ghee in a deep pan and add the sliced almonds. Fry them till light golden. Transfer to a plate and set aside.
- Add the onions, and fry on a medium flame till onion turns light brown. Towards the end add cumin seeds and garam masala. Cook for few seconds. Turn off the heat.
- Heat dal before serving. Taste and if required add more salt or spices. Pour the sizzling tadka over dal.
- Garnish Shahi Urad Dal with fresh coriander leaves.
- Serve Shahi Urad Dal warm with jeera rice or chapati.
Recipe Notes:
- You can make this dal in an electric pressure cooker, multi-pot, or instant pot . In electric pressure cooker, it takes 15 minutes to cook fully.
- If after pressure cooking, the dal seems too thick, add more water/full fat milk/cooking cream to get the desired consistency and creaminess.
- Urad dal or the split urad dal needs to be soaked for at least 4 – 5 hours in water. This reduces the cooking time.
Nutrition
We follow a strict NO SPAM Policy
