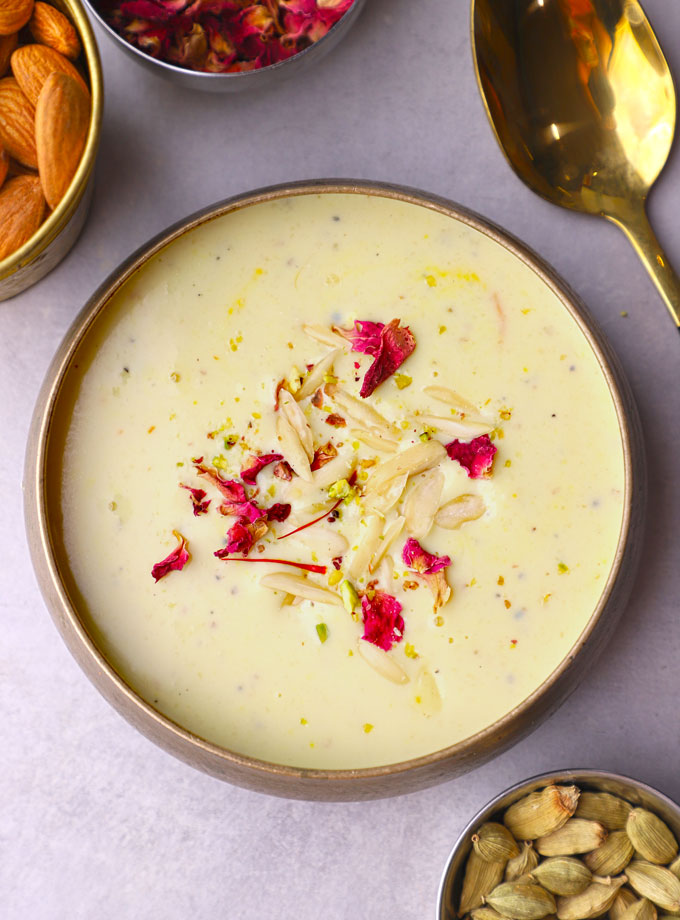
Badam Kheer, also known as Badam Payasam, is a rich and creamy South Indian dessert. Whether it’s a festive occasion or an everyday sweet craving, a Badam Kheer never fails to impress.
- Ingredients Required
- How To Make Badam Kheer
- Serving and Storage
- My Tried and True Tips
- More Indian Kheer Recipes
- Badam Kheer Recipe
Badam = Almonds. Kheer = Milk Pudding . Hence the name, Badam Kheer. Unlike the name, this is not a vegan dessert.
Hina says, “In India, we love our desserts, puddings dressed up in vivacious colours, and luring perfumes embellished with edible adornment. Badam Kheer is a timeless classic Indian dessert with a delicious rich taste and a creamy texture. Whether served as a dessert at festive gatherings or as a sweet indulgence on a regular day, this kheer recipe is sure to delight everyone’s taste buds.”
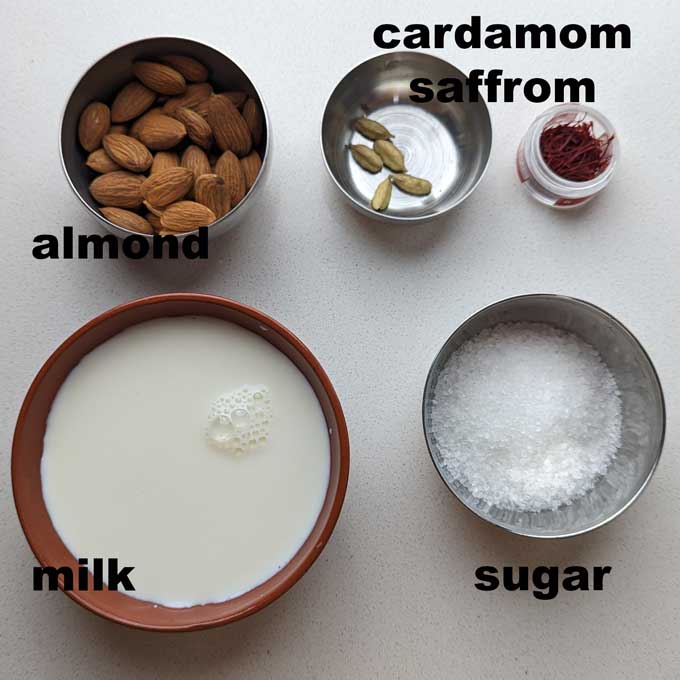
Ingredients Required
- Almond: You can use skinned almonds also for this kheer recipe.
- Milk: It is always best to use full-fat milk to make rich and creamy Indian kheer.
- Sugar: Use granulated white sugar or brown sugar.
- Aromatics: Saffron, Cardamom, Rose Water or Kewra Essence
- Garnishing: Sliced Almonds, Rose Petals, Saffron Strands
How To Make Badam Kheer
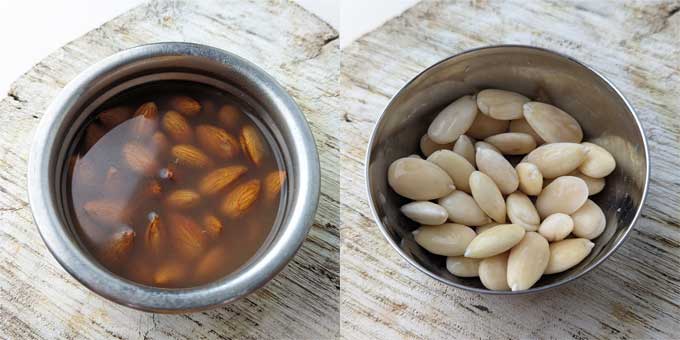
Prepare Almonds :
- Blanch Almonds. Bring water to a boil in a saucepan, then add the almonds and let them boil for about 2-3 minutes.
- Drain the hot water and rinse the almonds under cold water. Peel off the skin from each almond and set them aside.
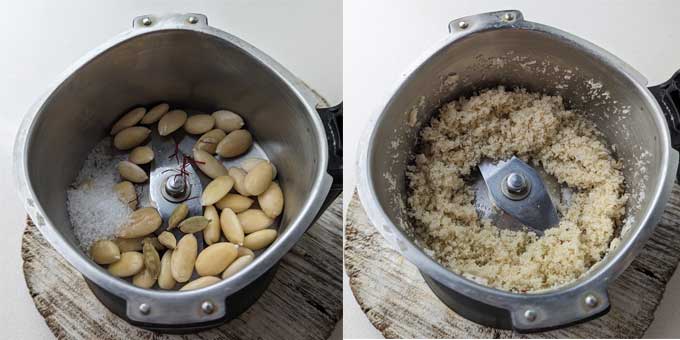
Make Paste:
- Blend skinned almonds , 2 tablespoons of granulated sugar, cardamom, and saffron to a coarse paste without using water.
- You may need to scrape the sides of the blender to ensure uniform blending. Transfer it to a bowl and set aside.
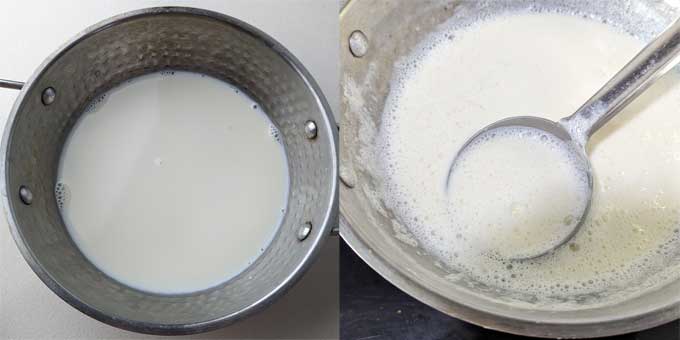
Boil Milk
- Pour the milk into a heavy-bottomed pan and bring it to a gentle boil over medium heat. Stir occasionally to prevent the milk from sticking to the bottom of the pan.
- Simmer the milk over low heat until it becomes almost half of the original quantity.
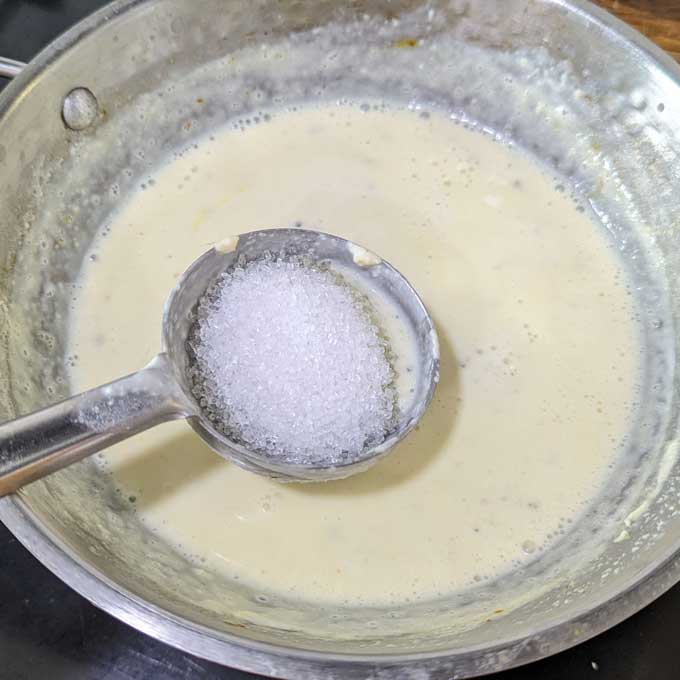
Add Almond Paste :
- Once the milk starts reducing, add the almond paste to it. Stir well to combine. Let it simmer on low heat.
- Allow the mixture to cook until it thickens slightly, stirring regularly to prevent lumps from forming.
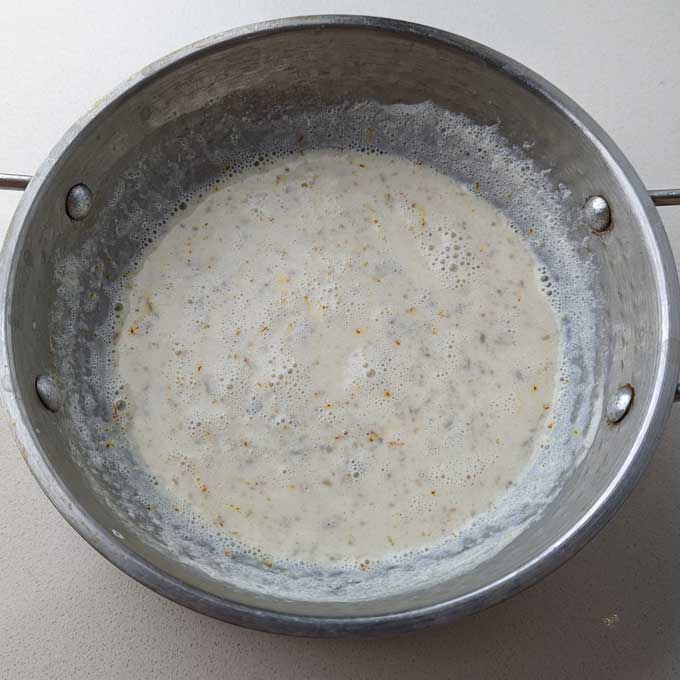
- Add rose water or kewra essence and the remaining sugar.
- Let the kheer simmer on low heat for another 5-10 minutes, allowing all the flavours to meld together and sugar to dissolve completely.
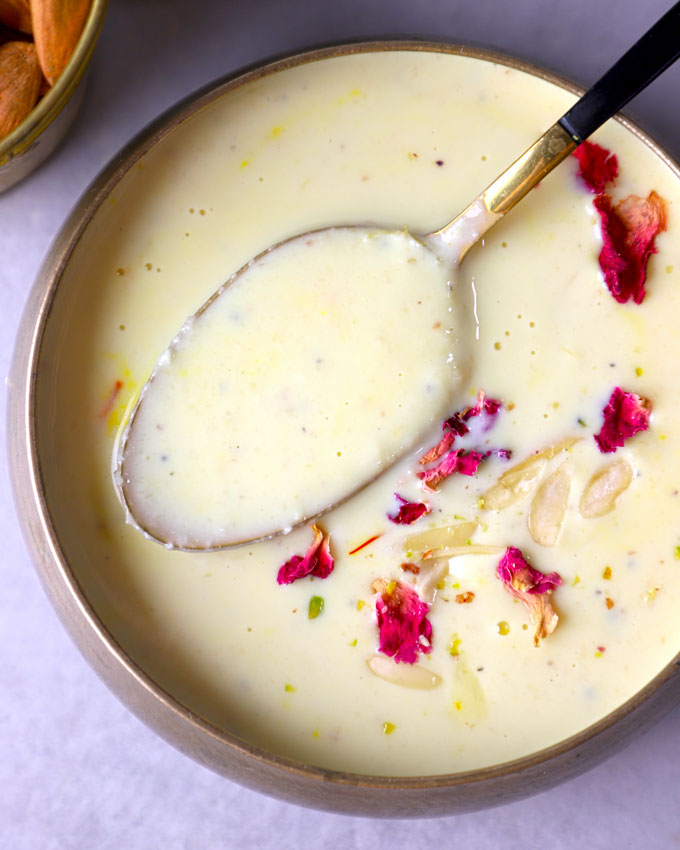
Cool and Garnish : Once the badam kheer reaches your desired consistency, remove it from the heat and let it cool slightly. Transfer the kheer to serving bowls and garnish with sliced almonds and edible rose petals.
Serving and Storage
Badam Kheer can be served warm or chilled, according to your preference. If serving chilled, refrigerate the payasam for a few hours before serving. We love it chilled, it tastes like badam milk .
Allow the kheer to cool down completely before storing. Store the leftover badam payasam in an airtight container in the refrigerator for 2 – 3 days.
My Tried and True Tips
- I prefer using full-fat, organic cow or buffalo milk for making kheer.
- For a delicious tropical flavour, replace regular milk with coconut milk.
- If you prefer a smoother texture , make a smooth paste of almonds and sugar using 1 – 2 tablespoons of milk.
- Adding a pinch of nutmeg enhances the aroma and flavour of the kheer.
- Adjust the sweetness of the kheer according to your taste preferences by adding more or less sugar.
- Keep stirring regularly to prevent the badam kheer from sticking to the bottom of the pan.
- The badam kheer thickens up as it cools. Hence, adjust the consistency accordingly. Do not thicken the kheer too much while cooking.
- If you are looking for a vegan kheer , try my Vegan Badam Phirni Recipe .
More Indian Kheer Recipes
- Rice Kheer
- Seviyan Kheer
- Makhana Kheer
- Carrot Sabudana Kheer
more Indian kheer recipes for all festive celebrations.

Ingredients
- ▢ ⅓ cup almonds (badam)
- ▢ ⅓ cup granulated white sugar
- ▢ 6 green cardamom (elaichi)
- ▢ ¼ teaspoon saffron (kesar)
- ▢ 1 litre full-cream milk (full fat milk)
- ▢ ½ teaspoon rose water
Ingredients for Garnish
- ▢ 1 tablespoon sliced almonds
- ▢ 1 tablespoon edible rose petals
Instructions
- Bring 1 cup of water to a boil in a saucepan, then add the almonds and let them boil for 2-3 minutes.
- Drain the hot water and rinse the almonds under cold water. Peel off the skin from each almond and set them aside.
- Blend skinned almonds, 2 tablespoons of granulated sugar, cardamom, and saffron to a coarse paste without using water. You may need to scrape the sides of the blender to ensure uniform blending. Transfer it to a bowl and set aside.
- Pour the milk into a heavy-bottomed pan or kadhai. Bring it to a gentle boil over medium heat. Stir occasionally to prevent the milk from sticking to the bottom of the pan. Simmer the milk over low heat until it starts reducing in quantity.
- Once the milk starts reducing, add the almond paste to it. Stir well to combine. Let it simmer on low heat.
- Allow the mixture to cook until it thickens slightly, stirring regularly to prevent lumps from forming.
- Add rose water or kewra essence and the remaining sugar. Let the kheer simmer on low heat for another 5-10 minutes, allowing all the flavours to meld together.
- Once the badam kheer reaches your desired consistency, remove it from the heat and let it cool slightly. Garnish with sliced almonds and edible rose petals.
- Serve badam kheer warm or chilled.
Recipe Notes:
- This is not a vegan dessert. You can make it vegan by replacing regular milk with coconut or almond milk.
- Make sure almonds are of good quality and not rancid. Else, kheer will taste bitter.
- Do not add too much rose water or kewra. It’s aroma and taste will become overpowering.
Nutrition
We follow a strict NO SPAM Policy

Badam Kheer Recipe
Equipment
- Blender
- Heavy Bottom Kadhai
Ingredients
- ⅓ cup almonds (badam)
- ⅓ cup granulated white sugar
- 6 green cardamom (elaichi)
- ¼ teaspoon saffron (kesar)
- 1 litre full-cream milk (full fat milk)
- ½ teaspoon rose water
Ingredients for Garnish
- 1 tablespoon sliced almonds
- 1 tablespoon edible rose petals
Instructions
- Bring 1 cup of water to a boil in a saucepan, then add the almonds and let them boil for 2-3 minutes.
- Drain the hot water and rinse the almonds under cold water. Peel off the skin from each almond and set them aside.
- Blend skinned almonds, 2 tablespoons of granulated sugar, cardamom, and saffron to a coarse paste without using water. You may need to scrape the sides of the blender to ensure uniform blending. Transfer it to a bowl and set aside.
- Pour the milk into a heavy-bottomed pan or kadhai. Bring it to a gentle boil over medium heat. Stir occasionally to prevent the milk from sticking to the bottom of the pan. Simmer the milk over low heat until it starts reducing in quantity.
- Once the milk starts reducing, add the almond paste to it. Stir well to combine. Let it simmer on low heat.
- Allow the mixture to cook until it thickens slightly, stirring regularly to prevent lumps from forming.
- Add rose water or kewra essence and the remaining sugar. Let the kheer simmer on low heat for another 5-10 minutes, allowing all the flavours to meld together.
- Once the badam kheer reaches your desired consistency, remove it from the heat and let it cool slightly. Garnish with sliced almonds and edible rose petals.
- Serve badam kheer warm or chilled.
Notes
- This is not a vegan dessert. You can make it vegan by replacing regular milk with coconut or almond milk.
- Make sure almonds are of good quality and not rancid. Else, kheer will taste bitter.
- Do not add too much rose water or kewra. It’s aroma and taste will become overpowering.
Nutrition
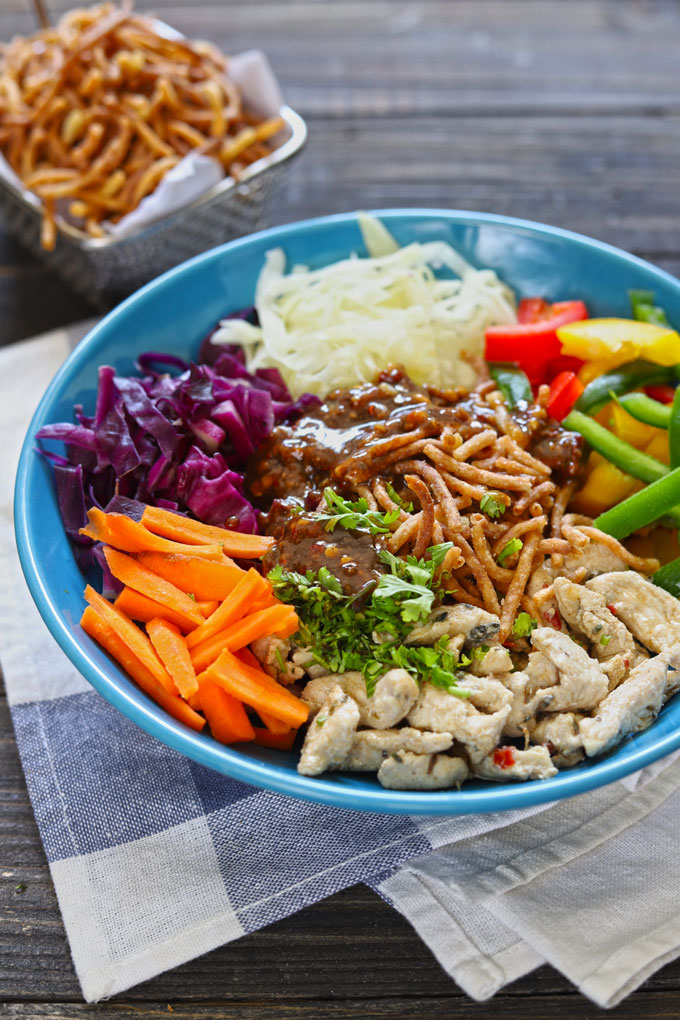
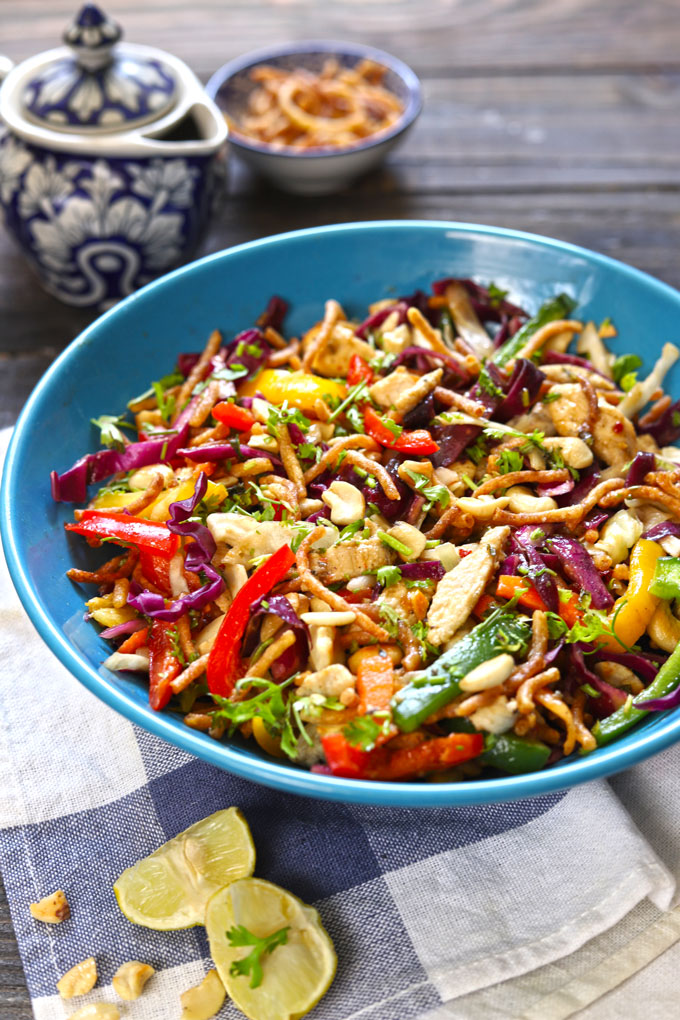
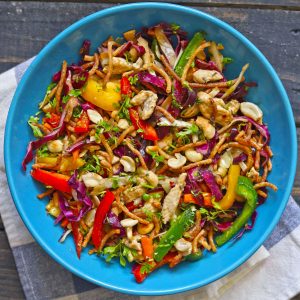
Crispy Noodle Salad is a delicious coleslaw with crunchy noodles, colourful vegetables, chicken and a savoury peanut butter dressing. A must-try Asian salad recipe.
Estimated reading time: 6 minutes
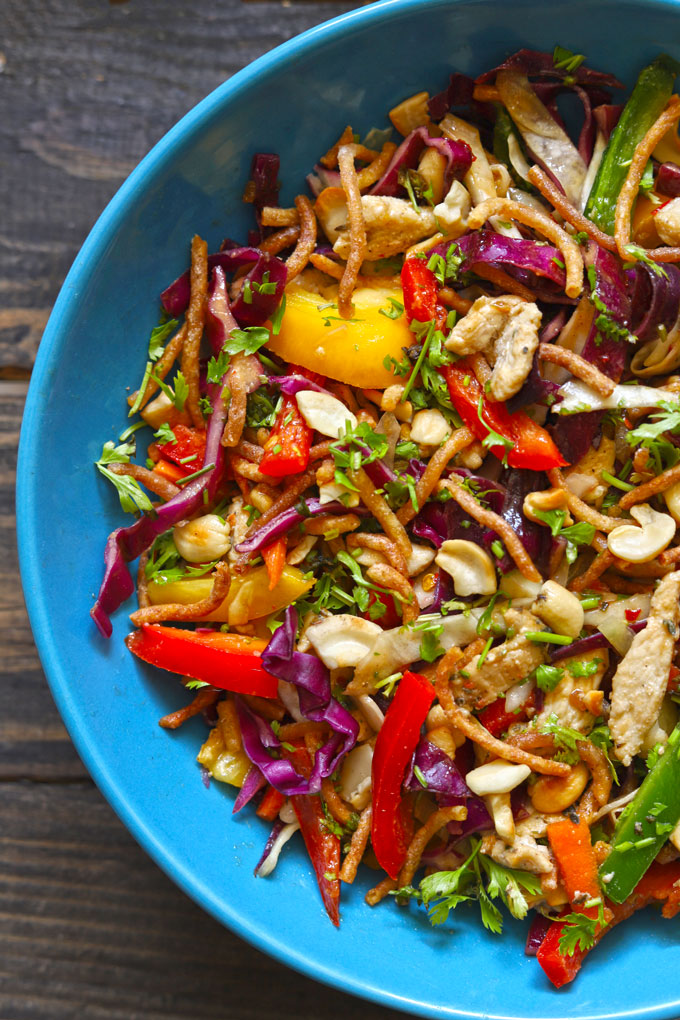
Crispy Noodle Salad is one of my favourite Asian salad recipes. It’s full of colourful vegetables with the perfect crunch and a deliciously good dressing.
There are a few key elements that build a fantastic crispy noodle salad. If you get these basics right, you will never return to the restaurant for this crispy coleslaw cum salad.
- Crispy Noodles
- Coleslaw Style Veggies
- The Flavoursome Chicken
- Peanut Butter Dressing
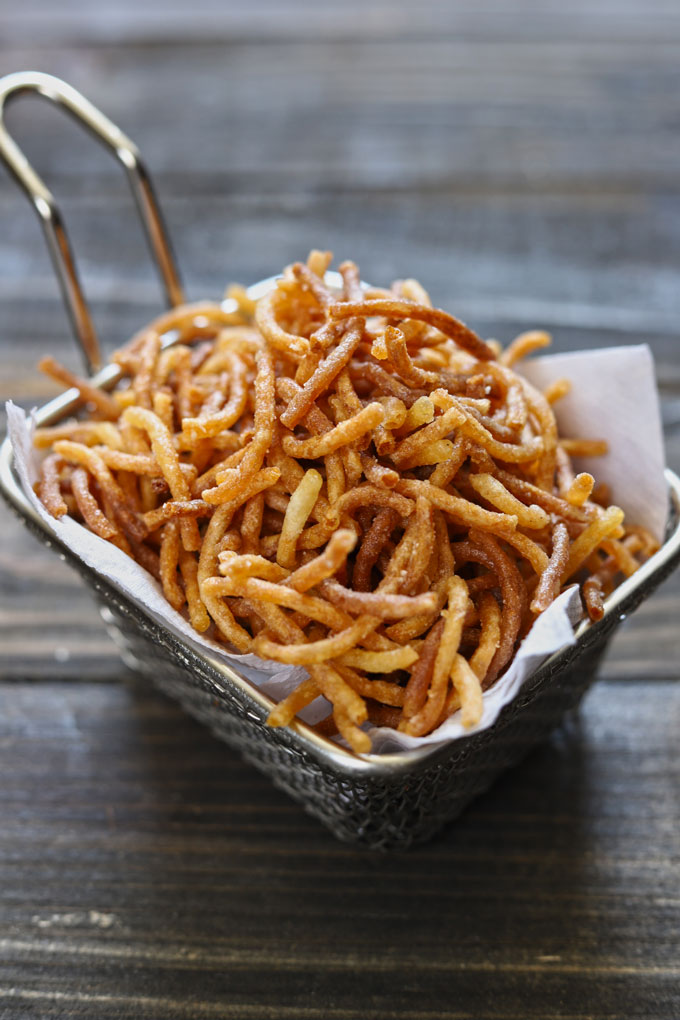
The Crispy Noodles
In some places, you can easily get ready-made fried noodle packets at a very reasonable price in Asian supermarkets or grocery stores.
But if you are in a place like mine, where you don’t get ready-made fried noodles, make them at home.
- You can fry boiled noodles in hot oil on a stovetop or air-fry them. I have tried both cooking methods, and my BIG THUMBS UP is for air fryer crispy noodles because there is less oil wastage, fewer calories, and the same crunch.
- You can store these homemade crispy noodles for 10 – 15 days.
- Use them as crunchy toppings for soup, stews, or even curries. I often make Indian-Chinese Style Bhel Puri with crispy noodles or add them to my Chinese Sweet Corn Soup .
How To Make Crispy Noodles
Deep Fry Method
- Use regular Hakka or Egg Noodles for frying. In one instance, I have also used spaghetti to make fried noodles.
- Next, boil the noodles al dente in salted water. Once fully cooked, drain the water of the noodles. Rinse them with cold water to stop the cooking process. Let them sit in a colander for 15 – 20 minutes to dry completely.

- Spread noodles on a wire basket or baking sheet. Allow them to dry completely for the next 30 minutes. This step will save a lot of cooking time.
- Coat the dry noodles with a tablespoon of cornstarch for extra dryness. Transfer them to a sieve and dust the extra flour.
- Deep-fry the noodles in hot oil on a stovetop till crisp and golden. Transfer to a colander lined with paper towel.
Air Fry Method
- Boil the noodles al dente in salted water. Once fully cooked, drain the water of the noodles. Rinse them with cold water to stop the cooking process. Let them sit in a colander for 15 – 20 minutes to dry completely.
- Spread noodles on a wire basket or baking sheet. Allow them to dry completely for the next 30 minutes. This step will save a lot of cooking time.
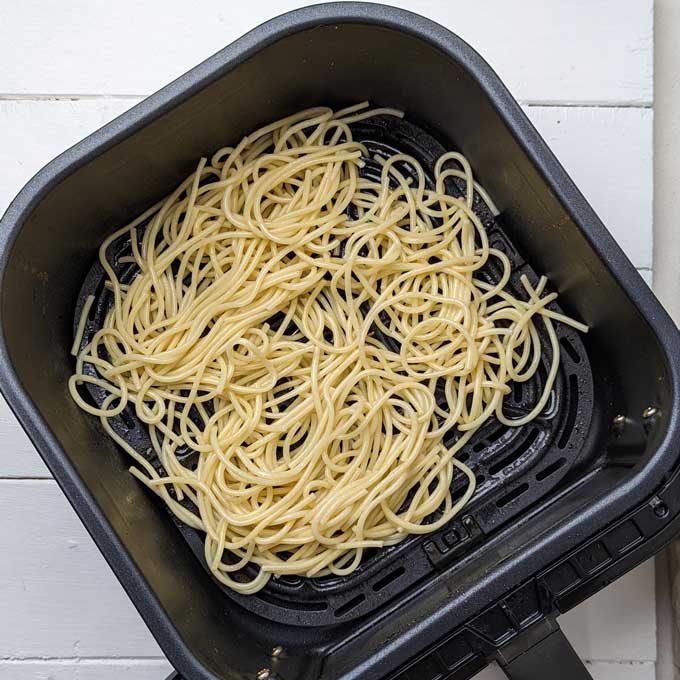
- Coat the dry noodles with two tablespoons of oil.
- Preheat air fryer at 160 degree celcius. Spray oil on the air fryer basket.
- Arrange noodles on a single layer in the air fryer basket. Air Fry for 20 – 25 minutes or till crisp and golden, shaking the basket two to three times during the process.
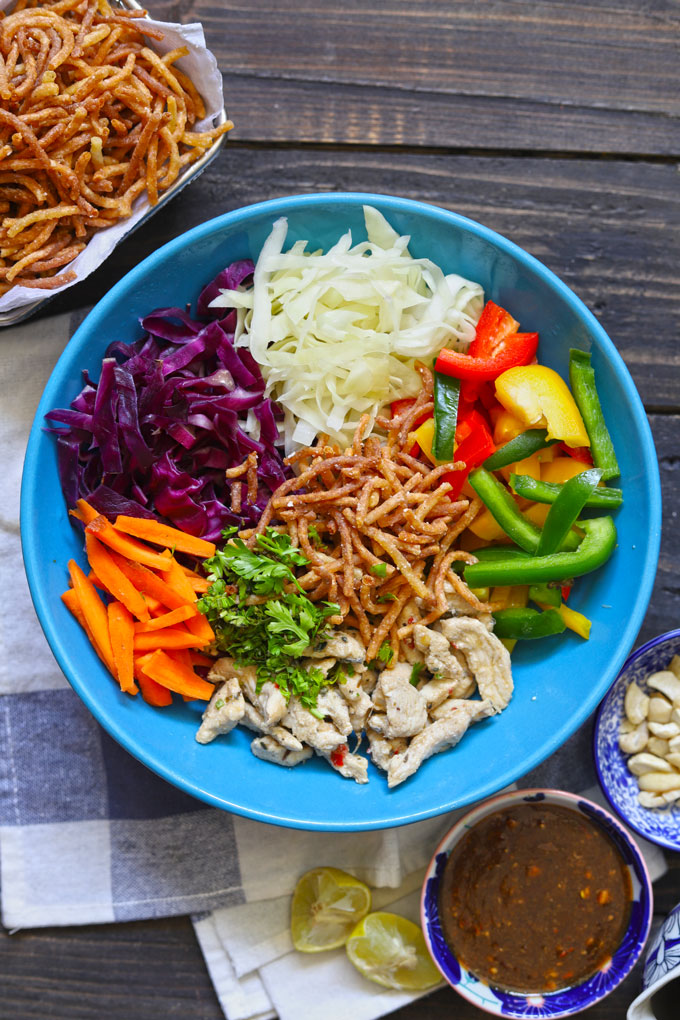
Coleslaw Vegetables
This Asian coleslaw is always a riot of colours. From purple cabbage, Chinese cabbage, bell peppers, carrot, onion, and greens, you can add any crunchy vegetables to this Asian salad.
Try to use vegetables that have a natural crunch to them . Stay away from veggies that get soft or wilted too quickly.
The Flavoursome Chicken
You can use any of these, from shredded grilled chicken and rotisserie chicken to leftover barbecue chicken or stir fry Asian chicken in this crispy noodle salad.
If none is available, follow my method to stir fry chicken for the salad quickly.
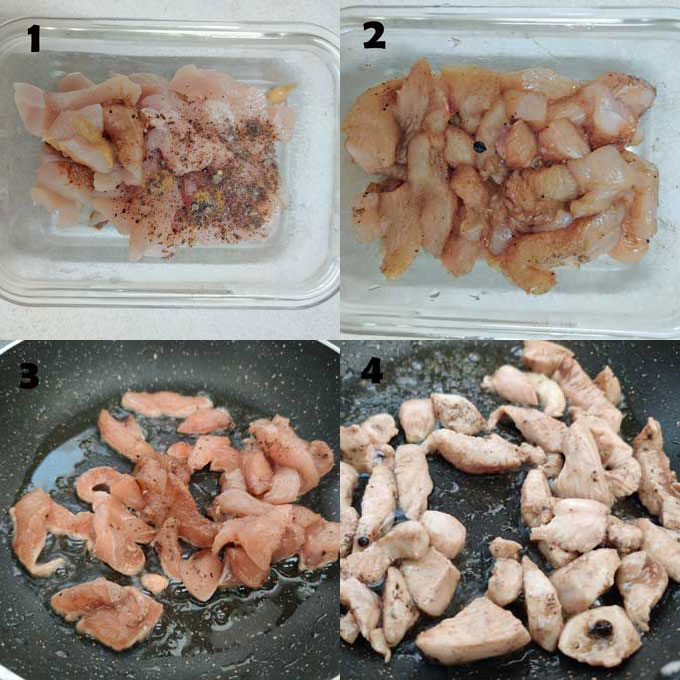
- Take bite-size boneless, skinless chicken pieces. You can cut them into thin strips as well.
- Marinade the chicken pieces in – ginger-garlic paste, soy sauce, salt, and pepper. This marination you can do this as part of your weekly meal prep.
- Heat cooking oil in a wok or stir-fry pan. Add the marinated chicken pieces and stir fry over high heat till the chicken turns pale white and is fully cooked.
- Transfer it to a plate and cool before adding it to the crispy noodle salad.
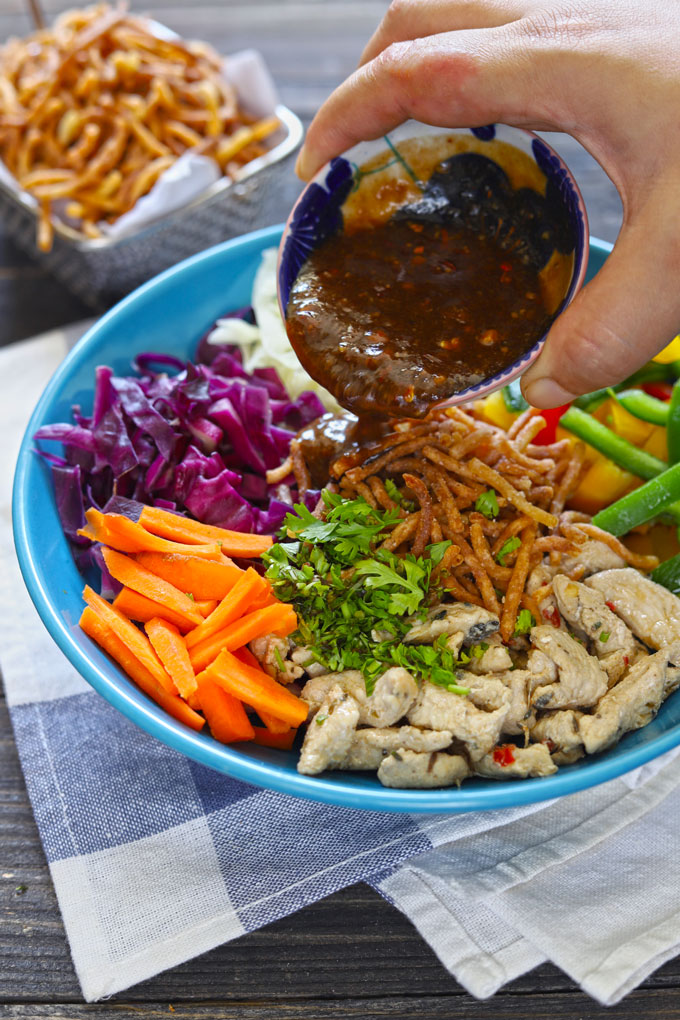
Peanut Butter Dressing for Salad
The soul of this Asian salad is the sweet, spicy, and savoury peanut butter dressing. It is one of my favourite dressing recipes cum dipping sauce.
The addition of creamy peanut butter gives so much flavour to the dressing and makes it quick. If you want a real flavoursome crispy noodle salad, never compromise on the dressing.
Meal-Prep For Salad
- Marinade the chicken in advance during your weekly meal prep. Store in the fridge. Please bring it to room temperature before stir-frying for crispy noodle salad.
- You can fry a large batch and store it for 10 – 15 days. Or use readymade fried noodles.
- Cut the vegetables , especially cabbages and store them in an airtight container for a week. They do not lose their crunch or texture.
- The peanut butter salad dressing is meal prep friendly. You can easily store it for days in the refrigerator . Shake it well before using it for the flavours to combine nicely.
More Salad Recipes
- Lentil Salad
- Chickpea Salad
- Pumpkin Salad
- Mixed Beans Salad
- Summer Fruit Salad
- Mango Shrimp Salad
- Chicken Pasta Salad
- Healthy Cabbage Salad
- Smashed Cucumber Salad
Get all my Salad Recipes here and you can watch the videos on Instagram .
Ingredients
- ▢ 1 Cup crispy fried noodles (see recipe note 1)
- ▢ 1 Cup shredded chicken (see recipe note 2)
- ▢ ½ Cup finely shredded purple cabbage
- ▢ ½ Cup finely shredded cabbage
- ▢ ½ Cup finely julienned carrot
- ▢ ½ Cup red/yellow julienned bell peppers
- ▢ ½ Cup finely julienned capsicum
- ▢ ¼ Cup chopped cilantro or parlsey or spring onion
Ingredients For Dressing:
- ▢ 1 tablespoon creamy peanut butter
- ▢ 2 tablespoon sesame oil or virgin olive oil
- ▢ Juice of one lemon
- ▢ Salt to taste
- ▢ 1 tablespoon light soy sauce
- ▢ 1 teaspoon crushed or finely chopped garlic
- ▢ 1 teaspoon red chilli flakes
- ▢ ½ teaspoon crushed black pepper or to taste
Instructions
Prepare Salad Dressing:
Combine all the ingredients for dressing in a jar with a tight-fitting lid. Close the jar with the lid. Shake vigorously to emulsify the oil with the peanut butter and lemon juice. Set aside.
Combine all the vegetables in a salad mixing bowl.
Pour dressing over the salad. Add shredded chicken, crispy noodles, and mix nicely to coat the vegetables with the dressing.
Serve crispy noodle salad immediately else fried noodles will turn soggy. Or add crispy noodles just before serving.
Recipe Notes:
Nutrition
We follow a strict NO SPAM Policy
