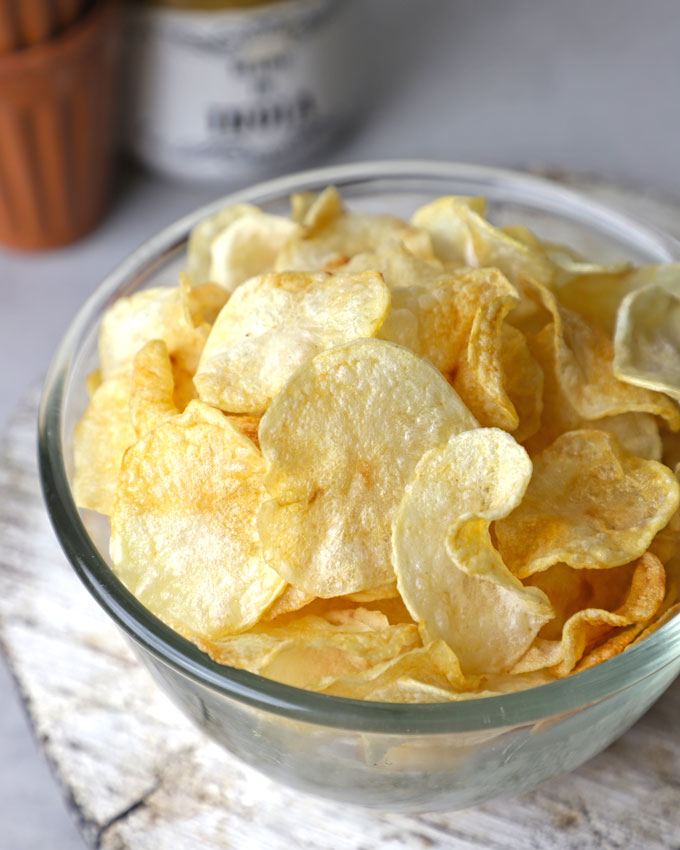
Who doesn’t love the satisfying crunch of a potato chip? Here is a gluten and guilt-free, air fryer potato chips recipe worth bookmarking.
Estimated reading time: 5 minutes
- The Magic of Air Fryers
- Ingredients You’ll Need
- How To Make Chips
- Serving Suggestion
- My Tried and True Tips
- Air Fryer Potato Chips Recipe
While the store-bought versions are convenient, there’s something extraordinary about homemade potato chips.
Homemade Potato Chips are:
- preservative free
- meal prep friendly
- budget friendly
- no added sugar
- gluten free
- dairy free
The Magic of Air Fryers
Air fryers have taken the culinary world by storm , and for good reason. These countertop appliances use hot air circulation to cook food, producing crispy results with significantly less oil than traditional frying methods.
With the rise in popularity of air fryers, creating your crispy potato chips at home has never been easier. Not only is it healthier than traditional deep-frying, but it also allows for endless flavour possibilities.
Ingredients You’ll Need
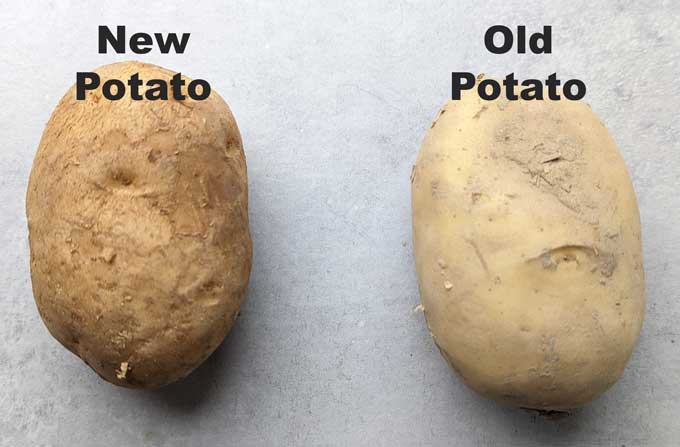
- Potatoes peeled and thinly sliced. Try to use Yukon Gold or Russet potatoes for crispy chips. In India, try to use new potatoes with thin skin . At times, there is a specific variety of potatoes sold in the market for making chips, known as chips ka aloo.
- Oil: Since we are air frying the potato chips, there isn’t much oil required. For spraying the basket and potato slices I use cooking olive oil.
- Salt , Seasoning (Chilli Powder, Mint Powder, Black Pepper, Garlic Powder)
Equipment: You need two essential equipment for this potato chips recipe – Mandoline Slicer and Air Fryer . The Mandoline slicer makes very thin and perfectly consistent slices. If you have a very steady hand, you could try for thin slices with a sharp knife, but it will be time-consuming and require practice.
How To Make Chips
Prep Work
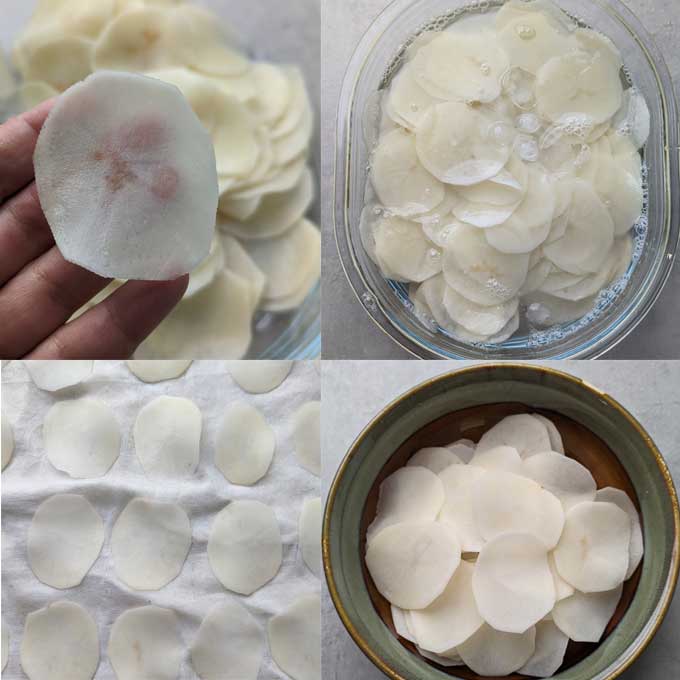
- Remove the skin of potatoes using a peeler.
- Using a sharp knife or mandoline slicer, thinly slice the potatoes into rounds. Aim for slices that are about ⅛ inch thick for optimal crispiness.
- Transfer the potato slices to a large bowl filled with ice-cold water. Let them sit in cold water for 10 – 15 minutes. This helps in removing excess starch from the potato slices.
- Arrange the potato slices on a clean, kitchen cloth in a single layer without overlapping each other. Cover them with another kitchen towel. Pat dry, making sure to remove all the water.
Seasoning
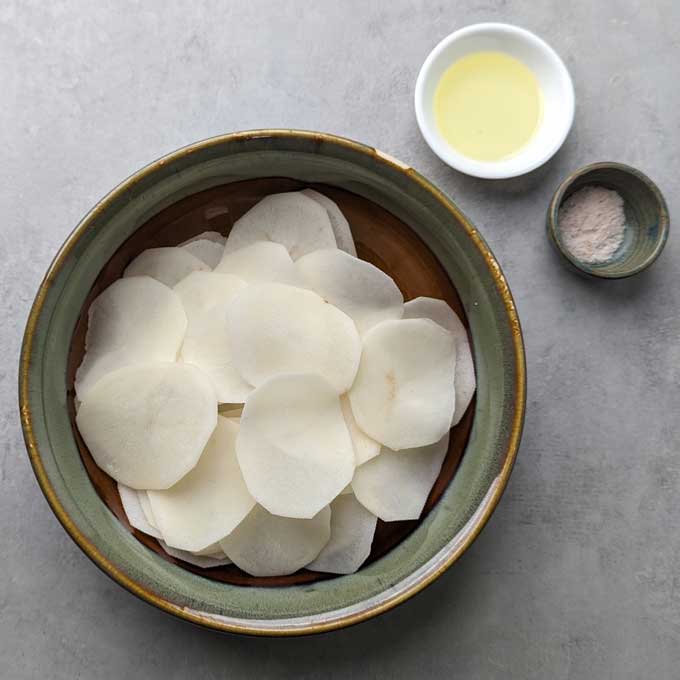
- Place the potato slices on a large sheet and drizzle with olive oil. Toss gently to coat each slice evenly.
- Season the potato slices with salt, pepper, and any additional seasonings of your choice. Get creative here – try experimenting with different flavours!
Air Frying
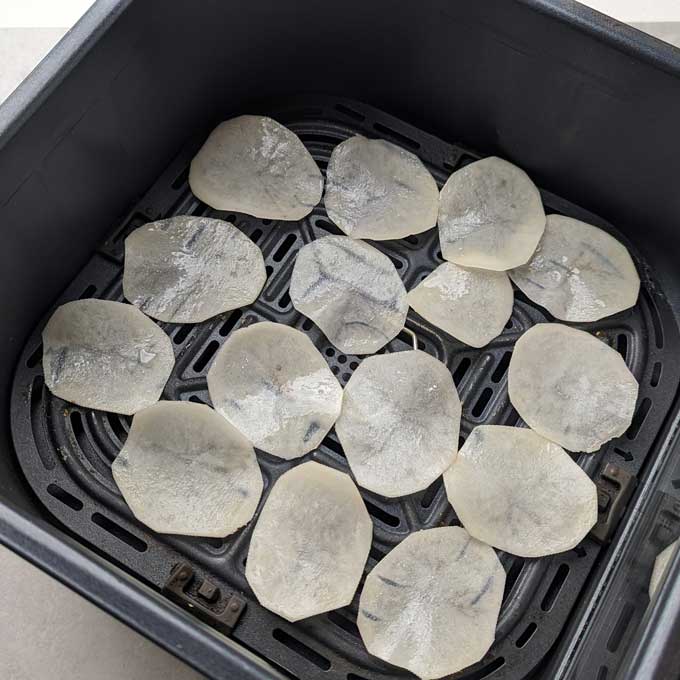
- Preheat your air fryer to 360°F (180°C). Spray the basket with oil.
- Arrange the seasoned potato slices in a single layer in the air fryer basket, making sure not to overcrowd them. You may need to cook the chips in batches depending on the size of your air fryer.
- Cook the potato chips in the air fryer for 10-12 minutes, flipping halfway through, until golden brown and crispy. Keep a close eye on them towards the end to prevent burning.
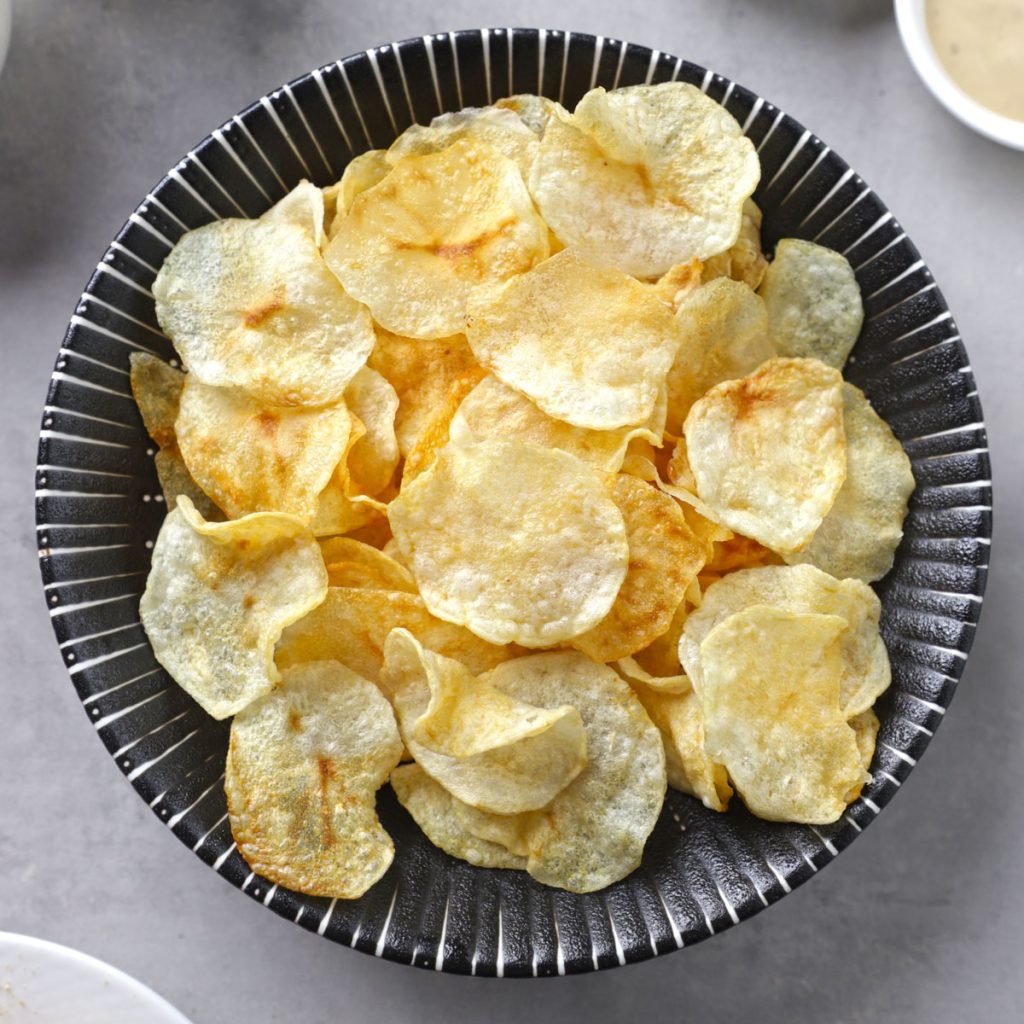
Once the chips are done cooking, transfer them to a colander or a big bowl.
Allow the chips to cool slightly before serving or storing.
Serving Suggestion
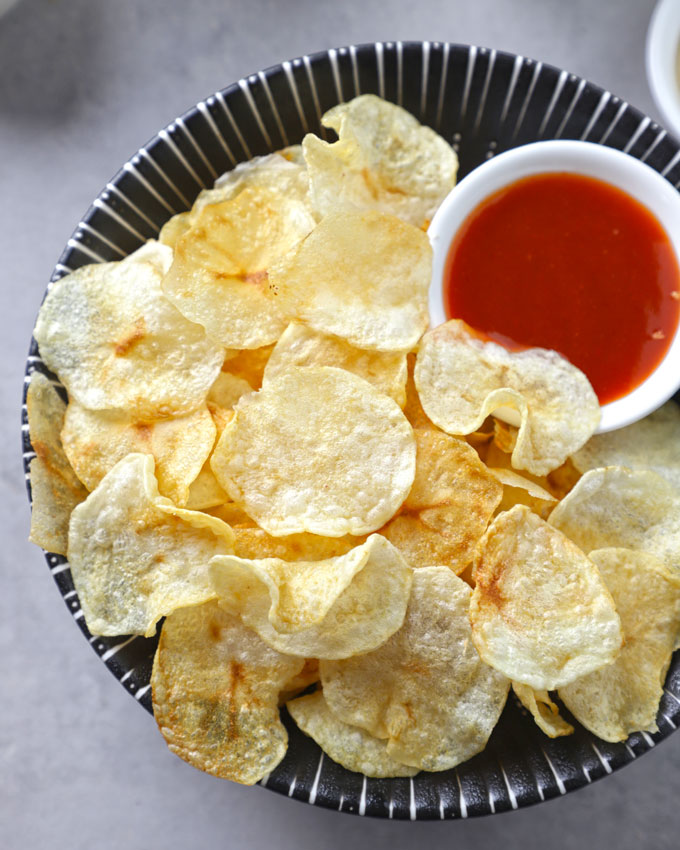
Potato Chips and dips are made for each other. From spicy salsa , creamy mango dip to cheesy corn dip , you can serve potato chips with any dipping sauce you choose.
One combination that never goes wrong is chips and ketchup . You can serve potato chips with old-fashioned tomato ketchup also.
These potato chips are a fantastic side dish to accompany sandwiches, wraps, or to pack in a school lunchbox.
My Tried and True Tips
- Slice Evenly: Consistency is key when slicing the potatoes. Aim for uniform thickness to ensure even cooking.
- Don’t Overcrowd the Basket: Overlapping potato slices can prevent proper air circulation, resulting in unevenly cooked chips. Cook in batches if necessary.
- Monitor Closely: Cooking times may vary depending on the size and thickness of your potato slices, as well as the model of your air fryer. Keep an eye on the chips to prevent them from burning.
- Get Creative with Seasonings: Don’t be afraid to experiment with different herbs and spices to elevate the flavour of your potato chips. From classic sea salt to bold BBQ seasoning, the possibilities are endless!
More Air Fryer Recipes
- Air Fryer Crispy Chickpeas
- Air Fryer Green Beans
- Air Fryer Malai Broccoli
- Air Fryer Banana Chips
- Air Fryer Karela Chips
- Air Fryer Pasta Chips
f ollow us on Youtube and Instagram for video recipes.

Ingredients
- ▢ 3 large size potatoes, peeled
- ▢ 2 tablespoon cooking olive oil
- ▢ 1 ¼ teaspoon table salt
- ▢ ¼ teaspoon garlic powder (optional)
- ▢ 4 cups ice cold water
Instructions
- Remove the skin of potatoes using a peeler. You can roughly scrub it with a kitchen towel if its thin instead of peeling.
- Using a sharp knife or mandoline slicer, thinly slice the potatoes into rounds. Aim for slices that are about ⅛ inch thick for optimal crispiness.
- Transfer the potato slices to a large bowl filled with ice-cold water. Let them sit in cold water for 10 – 15 minutes. This step helps in removing excess starch from the potato slices.
- Arrange the potato slices on a clean, kitchen cloth in a single layer without overlapping each other. Cover them with another kitchen towel. Pat dry, making sure to remove all the water. This takes approximately 20 minutes. You can place them covered under a fan also.
- Place the potato slices on a large sheet and drizzle with olive oil. Toss gently to coat each slice evenly. Season the potato slices with salt, pepper, and any additional seasonings of your choice.
- Preheat your air fryer to 360°F (180°C). Spray the basket with oil.
- Arrange the seasoned potato slices in a single layer in the air fryer basket, making sure not to overcrowd them. You may need to cook the chips in batches depending on the size of your air fryer.
- Cook the potato chips in the air fryer for 10-12 minutes, flipping halfway through, until golden brown and crispy. Keep a close eye on them towards the end to prevent burning.
- Once the chips are done cooking, transfer them to a colander or a big bowl. Allow the chips to cool slightly before serving or storing.
Recipe Notes:
- Each batch of chips took me exactly 10 minutes. Given the 6 QT size of my air fryer, it took me 30 minutes to make them in three batches.
- While air frying, do not leave the potato chips unattended and shake/flip them once or twice during the cooking time.
- For making 500 grams of chips I have used 3 large-size potatoes. The yield may vary depending on the size of the potatoes and how you slice them.
- Don’t be afraid to experiment with different herbs and spices to elevate the flavour of your potato chips. From classic sea salt to bold BBQ seasoning, the possibilities are endless!
Nutrition
We follow a strict NO SPAM Policy

Air Fryer Potato Chips Recipe
Equipment
- Air Fryer
- Mandoline Slicer
Ingredients
- 3 large size potatoes, peeled
- 2 tablespoon cooking olive oil
- 1 ¼ teaspoon table salt
- ¼ teaspoon garlic powder (optional)
- 4 cups ice cold water
Instructions
- Remove the skin of potatoes using a peeler. You can roughly scrub it with a kitchen towel if its thin instead of peeling.
- Using a sharp knife or mandoline slicer, thinly slice the potatoes into rounds. Aim for slices that are about ⅛ inch thick for optimal crispiness.
- Transfer the potato slices to a large bowl filled with ice-cold water. Let them sit in cold water for 10 – 15 minutes. This step helps in removing excess starch from the potato slices.
- Arrange the potato slices on a clean, kitchen cloth in a single layer without overlapping each other. Cover them with another kitchen towel. Pat dry, making sure to remove all the water. This takes approximately 20 minutes. You can place them covered under a fan also.
- Place the potato slices on a large sheet and drizzle with olive oil. Toss gently to coat each slice evenly. Season the potato slices with salt, pepper, and any additional seasonings of your choice.
- Preheat your air fryer to 360°F (180°C). Spray the basket with oil.
- Arrange the seasoned potato slices in a single layer in the air fryer basket, making sure not to overcrowd them. You may need to cook the chips in batches depending on the size of your air fryer.
- Cook the potato chips in the air fryer for 10-12 minutes, flipping halfway through, until golden brown and crispy. Keep a close eye on them towards the end to prevent burning.
- Once the chips are done cooking, transfer them to a colander or a big bowl. Allow the chips to cool slightly before serving or storing.
Video
Notes
- Each batch of chips took me exactly 10 minutes. Given the 6 QT size of my air fryer, it took me 30 minutes to make them in three batches.
- While air frying, do not leave the potato chips unattended and shake/flip them once or twice during the cooking time.
- For making 500 grams of chips I have used 3 large-size potatoes. The yield may vary depending on the size of the potatoes and how you slice them.
- Don’t be afraid to experiment with different herbs and spices to elevate the flavour of your potato chips. From classic sea salt to bold BBQ seasoning, the possibilities are endless!
Nutrition
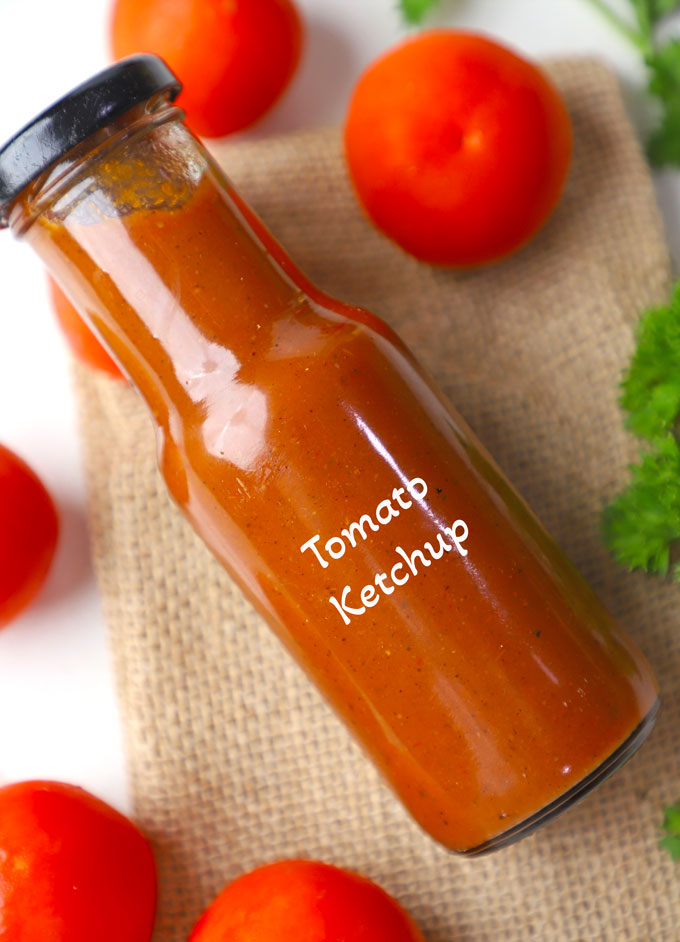
Ditch the bottled ketchup: Here is your guide to homemade, clean, vegan tomato ketchup recipe without artificial preservatives and colours.
Estimated reading time: 6 minutes
- Why Go Homemade? The Benefits
- Ingredients You’ll Need
- How To Make Ketchup
- Storage
- My Tried and True Tips
- Tomato Ketchup Recipe

Making your own perfectly sweet, and utterly delicious tomato ketchup at home is a rewarding experience that puts you back in charge of what goes into your food.
And the best part? You have complete control over every single ingredient, ensuring no hidden nasties, no unwanted sugars, and absolutely no preservatives .
This hot and spicy Indian Style Tomato Ketchup Recipe is:
- vegan
- gluten and nut free
- pressure cooker friendly
- contains zero oil or corn syrup
Why Go Homemade? The Benefits
- No Preservatives: This is the big one. Commercial ketchups rely on preservatives to give them their long shelf life. By making your own, you skip these chemicals entirely, opting for a fresher, cleaner taste.
- Control Over Sugar: Most store-bought ketchups are sugar bombs. With homemade, you can control the sweetness to your preference, using natural alternatives like maple syrup or agave, or even reducing it significantly.
- Real Ingredients: You know exactly what’s going into your ketchup – ripe tomatoes, aromatic spices, and natural sweeteners. No weird “natural flavours” or unidentifiable ingredients.
- Dietary Needs: For vegans, it ensures no animal-derived ingredients (like some obscure processing aids). For those with allergies, it guarantees a safe condiment.
- Cost-Effective: Especially when tomatoes are in season, making a large batch can be surprisingly economical.
Does it taste better than your favourite bottled tomato ketchups? The answer is NO. But its definitely healthier, wholesome, and an excellent homemade condiment especially for those who love to slather ketchup on anything and everything.
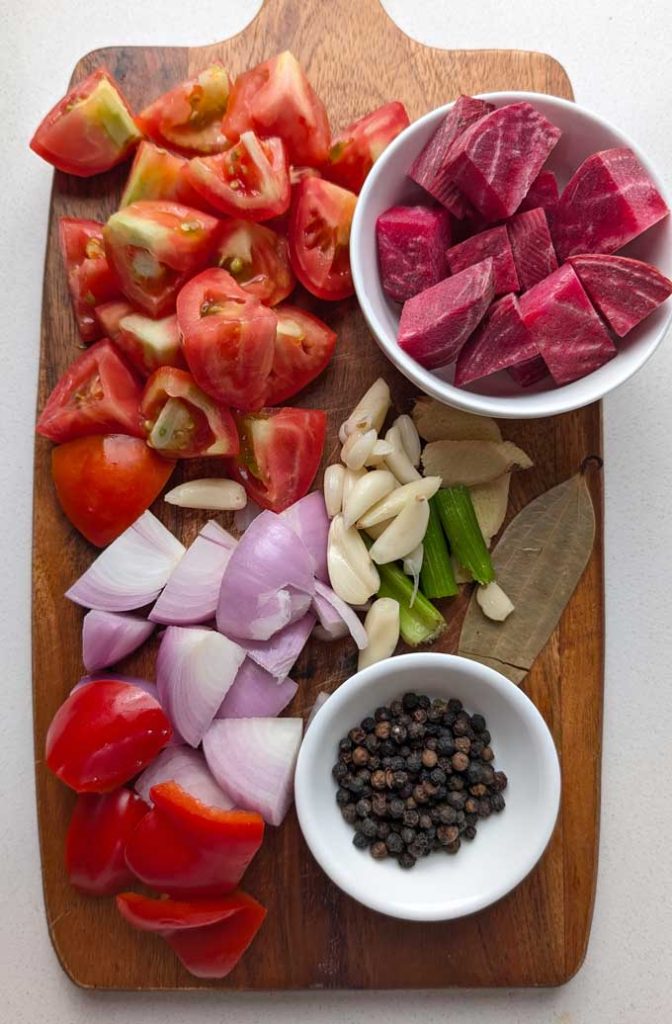
Ingredients You’ll Need
This tomato ketchup recipe focuses on simple, wholesome ingredients that are easily available:
- Ripe Tomatoes: The star of the show! Use good quality, ripe tomatoes – San Marzano, Roma Tomatoes are excellent, but any flavourful ripe plum, juicy, slightly sweet tomatoes will do. You can use fresh or good quality canned crushed tomatoes.
- Vegetables: A small size beetroot gives the bright red colour to the ketchup. Red Bell Pepper and celery helps in subtly sweet and spicy taste.
- Aromatics: Onion and garlic form the foundational savory notes.
- Apple Cider Vinegar or white vinegar provides that essential tangy kick.
- Sweetener: Brown Sugar, raw sugar, or agave nectar offers natural sweetness.
- Spices: A carefully selected blend of spices like ginger, bay leaf, dried red chilli, black peppercorn creates the classic ketchup profile.
- Salt is crucial for seasoning.
- Water to pressure cook.
How To Make Ketchup
Prep Vegetables:
- Peel beetroot, onion, and ginger. Wash all the vegetables.
- Dice all the vegetables into bite size chunks.
Pressure Cook
- Add diced tomato, beet, bell pepper, onion, celery, ginger, garlic, whole spices, and water in a pressure cooker. Close the lid and put on the whistle.
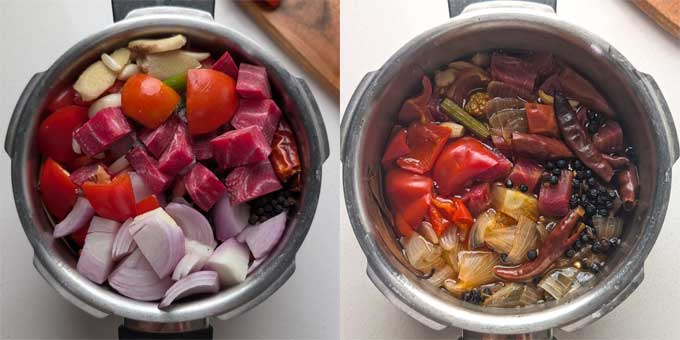
- Pressure cook over low heat for 4 whistles. Allow the steam to release naturally. Vegetables should be soften.
Blend To Puree
- Discard bay leaf. Allow the pressure cooked vegetables to cool down.
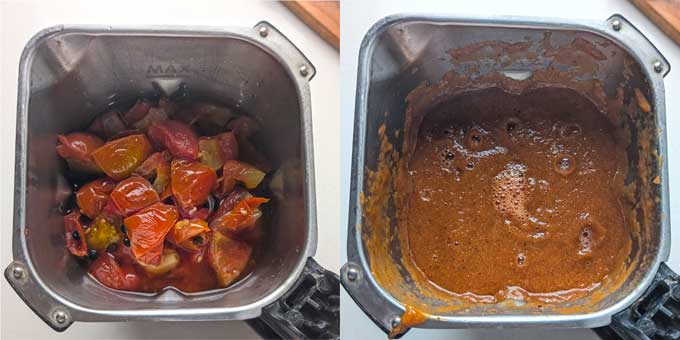
blending tomatoes to a puree
- Transfer them to a blender. Without using water, blend them to a smooth puree. Caution: When blending hot liquids, fill the blender only halfway, hold the lid down firmly with a towel, and start on low speed, gradually increasing.
Strain and Simmer
- For the absolute silkiest tomato ketchup , pass the blended mixture through a fine-mesh sieve using the back of a spoon to push the solids through. This removes any lingering seeds or skin bits. This step is optional but highly recommended for that classic ketchup texture.
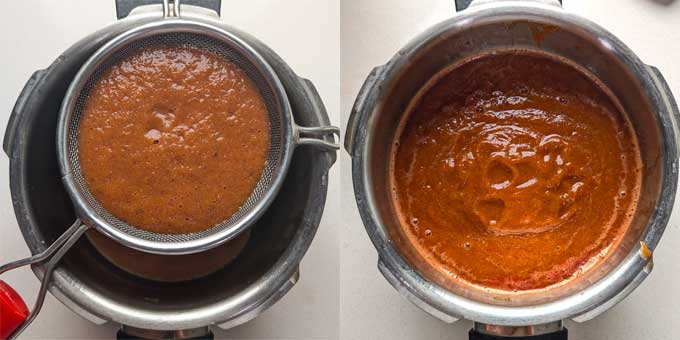
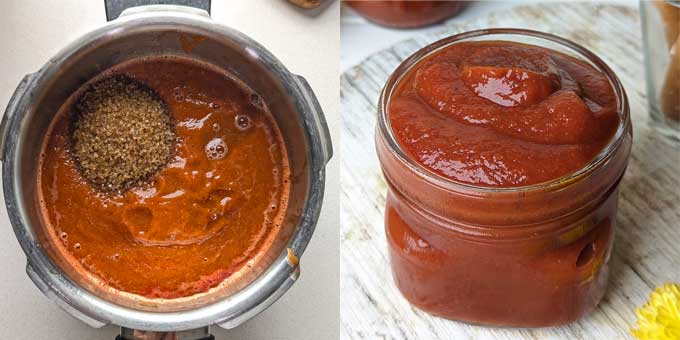
- Stir in the apple cider vinegar, sugar, salt. Stir well to combine.
- Bring the mixture to a gentle boil, then reduce the heat to low. Simmer, uncovered, stirring occasionally, for 30 minutes. The goal is to allow the sauce to thicken and for the flavours to meld beautifully. It should reduce by about one-third and have a rich, concentrated tomato flavour.
- Taste the ketchup. This is crucial! Add more salt, pepper, sweetener, or vinegar as needed to achieve your perfect balance of sweet, tangy, and savoury. Remember, flavours intensify as it cools.
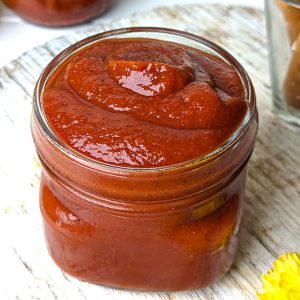
Let the tomato ketchup cool completely at room temperature before transferring it to clean, airtight jars or bottles.
Storage
Because this tomato ketchup contains no artificial preservatives, its shelf life is shorter than commercial varieties.
Store it in an airtight container in the refrigerator for up to 1 month . For longer storage, you can freeze it in small portions (e.g., in ice cube trays, then transfer to a freezer bag) for up to 3 months.
My Tried and True Tips
- Taste, Taste, Taste: The most important step! Adjust sweetness, tang, and saltiness to your liking.
- Patience is Key: Don’t rush the simmering process. Slow reduction concentrates the flavours and thickens the ketchup naturally.
- Fresh vs. Canned Tomatoes: While fresh ripe tomatoes offer incredible flavour, good quality canned crushed tomatoes are a fantastic, convenient alternative that yields excellent results.
- Cleanliness: Ensure your jars and utensils are clean and sterilized to maximize shelf life (even without preservatives).
More Dipping Sauce Recipes
- Chilli Oil
- Hummus
- Spicy Mango Dip
- Spicy Peanut Sauce
- Thai Sweet Chilli Sauce
- Greek Cucumber Sauce
- Roasted Red Pepper Dip
Ingredients
- ▢ 500 gram tomato
- ▢ 1 medium size onion
- ▢ 1 small size beetroot
- ▢ 1 small size red bell pepper
- ▢ 6 garlic cloves
- ▢ 1 inch ginger
- ▢ 1 inch celery stalk
- ▢ 1 tablespoon black peppercorns
- ▢ 4 dried red chilli
- ▢ 1 bay leaf (tej patta)
- ▢ 1 tablespoon salt
- ▢ ¼ Cup water
- ▢ ¼ Cup brown sugar
- ▢ 2 tablespoon apple cider vinegar
Instructions
- Peel beetroot, onion, and ginger. Wash all the vegetables. Dice all the vegetables into bite size chunks.
- Add diced tomato, beet, bell pepper, onion, celery, ginger, garlic, whole spices, and water in a pressure cooker. Close the lid and put on the whistle.
- Pressure cook over low heat for 4 whistles. Allow the steam to release naturally. Vegetables should be soften. You can do the same in an instant pot pressure cook mode for 8 minutes.
- Discard bay leaf. Allow the pressure cooked vegetables to cool down. Transfer them to a blender. Without using additional water, blend them to a smooth puree. Caution: When blending hot liquids, fill the blender only halfway, hold the lid down firmly with a towel, and start on low speed, gradually increasing.
- Pass the blended mixture through a fine-mesh sieve using the back of a spoon to push the solids through. This removes any lingering seeds or skin bits.
- Stir in the apple cider vinegar, sugar, salt. Stir well to combine. Bring the mixture to a gentle boil, then reduce the heat to low. Simmer, uncovered, stirring occasionally, for 30 minutes. The goal is to allow the sauce to thicken and reduce by about one-third and have a rich, concentrated tomato flavour.
- Taste the ketchup. Add more salt, pepper, sweetener, or vinegar as needed to achieve your perfect balance of sweet, tangy, and savoury. Remember, flavours intensify as it cools.
- Let the tomato ketchup cool completely at room temperature before transferring it to clean, airtight jars or bottles.
Recipe Notes:
- Substitute dried red chillies with smoked paprika.
- This is a hot and spicy Indian style tomato ketchup recipe. If you are not too keen on spicy flavour, skip adding ginger and red chillies.
- The colour of the ketchup is defined by the quality of the tomatoes. Hence, pick the ripe, red, juicy tomatoes without yellow or green blemishes.
- Beetroot is only added for the colour. Hence, do not add too much of it.
Nutrition
We follow a strict NO SPAM Policy
